Illustrated Kristina with an IBM Model M keyboard floating between her hands.

Keebin’ With Kristina: The One With The Tri-lingual Typewriter

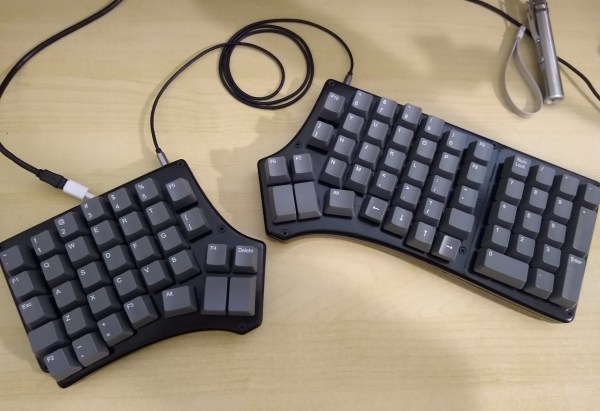
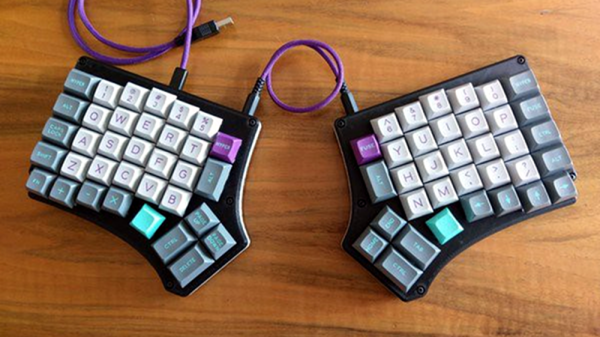
Isn’t it just fantastic when a project finally does what you wanted it to do in the first place? [Simon Merrett] isn’t willing to compromise when it comes to the Aerodox. His original vision for the keyboard was a wireless, ergonomic split that could easily switch between a couple of PCs. Whereas some people are more into making layout after layout, [Simon] keeps pushing forward with this same design, which is sort of a mashup between the ErgoDox and the Redox, which is itself a wireless version of the ErgoDox.

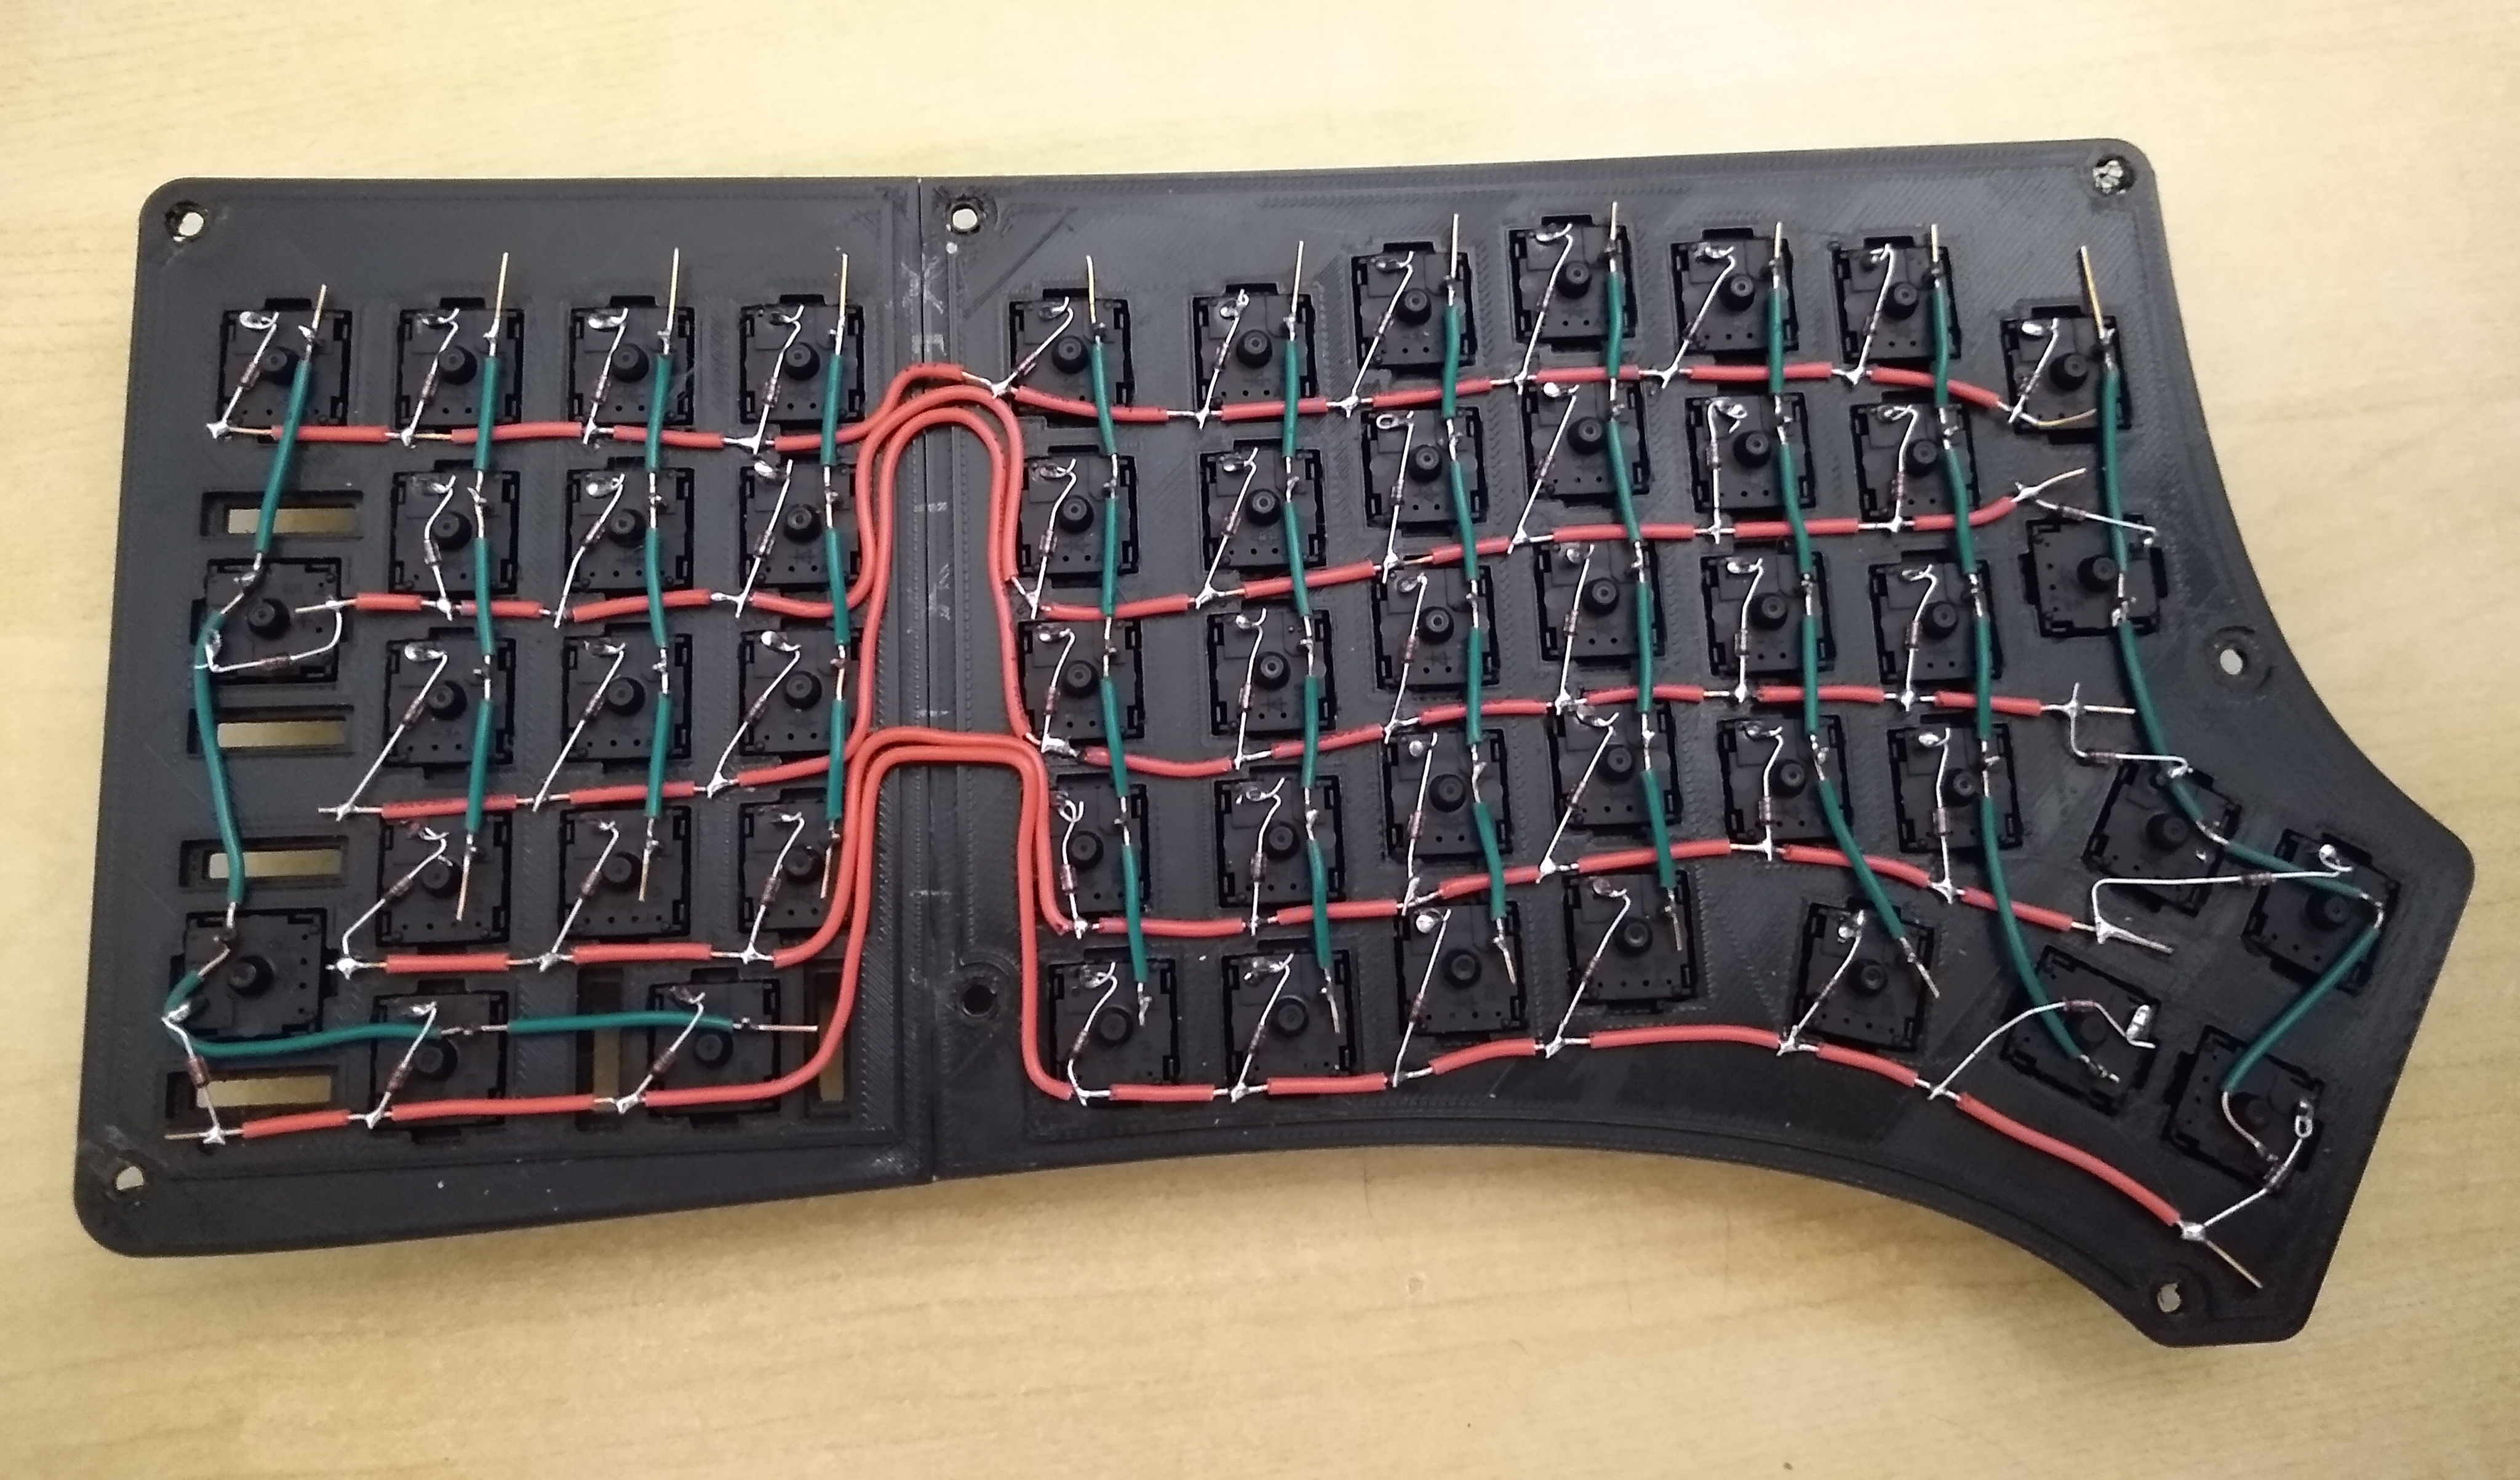
The Aerodox has three nRF51822 modules — one for the halves to communicate, one for the control half to send key presses, and a third on the receiver side. [Simon] was using two AA cells to power each one, and was having trouble with the range back to the PC.

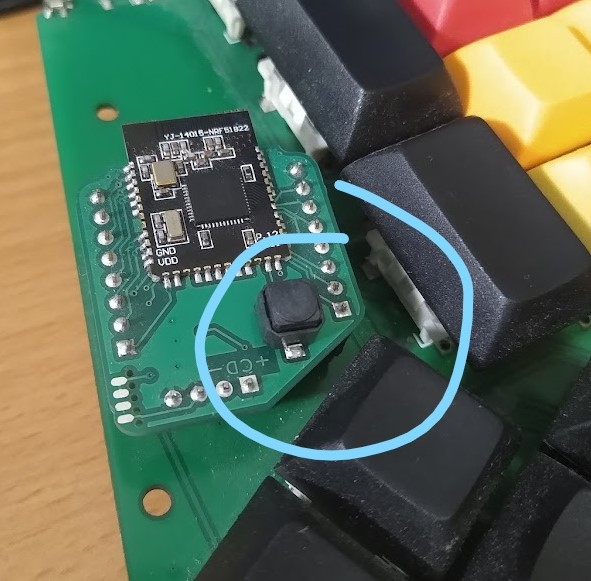
The NRFs want 3.3 V, but will allegedly settle for 2 V when times are hard. [Simon] added a boost converter to give each a solid 3.3 V, and the Aerodox became reliable enough to be [Simon]’s daily driver. But let’s go back to the as-yet-unrealized potential part.

Continue reading “Keebin’ With Kristina: The One With The Tri-lingual Typewriter”

Redox Redux: Split Keeb Gets A Num Pad

What’s the worst thing about split keyboards? If they have one general fault, it’s that almost none of them have a number pad. If you can fly on that thing, but struggle with using the top row numbers, you will miss the num pad terribly, trust us. So what’s the answer? Design your own keyboard, of course. [ToasterFuel] had enough bread lying around to cook up a little experiment for his first keyboard build, and we think the result is well done, which is kind of rare for first keebs.

This design is based on the Redox, itself a remix of the ErgoDox that aims to address the common complaints about the latter — it’s just too darn big, and the thumb clusters are almost unusable. We love how customized this layout is, with its sprinkling of F keys and Escape in the Caps Lock position. Under those keycaps you’ll find 100% Cherry MX greens, so [ToasterFuel] must have pretty strong fingers to pound those super clackers.

Everything else under the hood is pretty standard, with a pair of Arduino Pro Micros running the show. [ToasterFuel] had to wire up the whole thing by hand because of the num pad, and we’re impressed that he built this entire project in just three weeks. And that includes writing his own firmware!

Already found or built a split you love, but still miss the num pad? Why not build one to match your keyboard?

Split Keyboard Finder Stacks Them Up For Your Approval

Tired of a boring, single piece keyboard? Thinking about a change but don’t know what all your options are? Well prospective-keyboard-shopper, today is your lucky day. We at the Hackaday are here to facilitate the habit with two excellent resources for the eager keyboard shopper; [pvinis]’s awesome-split-keyboards and [jhelvy]’s splitkbcompare.

As indicated by its title, awesome-split-keyboards is an awesome list of split keyboards 50 examples strong. Every split we’ve come across seems to be represented here, many with at least an image or two along with links to more information about how to build or buy the model in question. If that’s not enough, the bottom of the page has a wealth of background information about building or buying your own.

But before making such an important decision it’s important to make sure the keyboard in question will be a good fit in the hands. This is where splitkbcompare comes in, providing a visualization of many popular split layouts. If we hadn’t just found awesome-split-keyboards this filterable list and wide selection would have been the highlight here. But what does stand out is the ability to generate 1:1 scale printouts of the layouts in question, even stacking them for comparison, allowing a prospective buyer get a hands on feel for what they’re considering.

Not enough clackin’ action? Recently we’ve been producing a fierce amount of keyboard related content, of particular highlight is [Kristina Panos’]’ series called Inputs of Interest. Earlier in the summer she even built her own Ergodox split keeb.

[Main image source: HeliDox by diimdeep]

Inputs Of Interest: ErgoDox Post-Mortem

In the last installment, I told you I was building an open-source, split, ortholinear keyboard called the ErgoDox. I’m doing this because although I totally love my Kinesis Advantage, it has made me want to crack my knuckles and explore the world of split keyboards. Apparently there are several of you who want to do the same, as evidenced by your interest in the I’m Building an ErgoDox! project on IO. Thank you!

Well boys and girls, the dust has settled, the soldering iron has cooled, and the keycaps are in place. The ErgoDox is built and working. Now that it’s all said and done, let me tell you how it went. Spoiler alert: not great. But I got through it, and it keyboards just like it’s supposed to. I’m gonna lay this journey out as it happened, step by step, so you can live vicariously through my experience.

Continue reading “Inputs Of Interest: ErgoDox Post-Mortem”

Inputs Of Interest: I’m Building An ErgoDox!

I’ve been using my Kinesis Advantage keyboard for two months, and I love it. I’ll never go back to a regular keyboard again if I can help it.

There are a few downsides to it, however. The biggest one is that split distance between the two sides is fixed. It doesn’t have Cherry MX blues (although the browns plus the firmware beeps is pretty nice). It doesn’t have layers, really — just a ten-key under the right hand. And honestly, it’s not very portable.

ErgoDox with Nuclear Data keycaps via geekhack

I took the Kinesis out to a coffee shop a few times before they all dried up into drive-thrus, and plunking it down on a four-top out in public made me realize just how large and loud it really is.

And so I’m building an ErgoDox keyboard. What I really want to build is a Dactyl — a curved variation on the ErgoDox — but I can’t just go whole-hog into that without building some type of keyboard first. That’s just my practical nature, I guess. I realize that the comparison is weak, because I’ll have to hand-wire the keyboard matrix when I make the dactyl. Assembling an ErgoDox is child’s play, comparatively. Our goal today is to lay out just what I’m getting myself into with a build like this one.

Continue reading “Inputs Of Interest: I’m Building An ErgoDox!”

The Redox Keyboard

Alternative keyboard layouts like Colemak and Dvorak are nothing new; they allow easier access to more often used keys to reduce the strain placed on the hands during typing. Building on the popularity of the ergonomic Ergodox keyboard, [Mattia Dal Ben] has developed the Redox keyboard, the Reduced Ergodox, to make an even smaller, more ergonomic keyboard.

Like the Ergodox, the Redox uses a columnar layout, where the keys are laid out in columns, each column offset based on the corresponding finger. Where the Redox breaks away from the design of the Ergodox is the thumb keys. [Mattia] started having pain in his pinkies, so he wanted the thumb layouts to take away some of the extra work from the pinkies. The thumb cluster is smaller than its ancestor and includes an additional rotated thumb key.

The Redox has some great improvements over the Ergodox in order to help with the types of strain injuries most associated with typing, hopefully leading to a much nicer interaction with the peripheral that gets the most use.

The mechanical keyboard community is constantly coming up with great new designs and different DIY keyboards and we’ve featured many of them on the site. After you’ve checked out the pictures and schematics [Mattia] has created, take a look at this 3D printed mechanical keyboard, and details of a keyboard design and build were presented at the Hackaday Superconference in 2017.

Custom Designed Keyboard Needs A Custom Made Metal Case

It’s hardly news that mechanical keyboard users love their keyboards.  When it comes to custom keyboards, though, [Cameron Sun] has taken things to the next level, by designing his own keyboard and then having the case custom milled from aluminum.  If a Macbook and an ErgoDox had a baby, it would look like this!

[Cameron] had been using a 60 percent keyboard (a keyboard with around 60% of the keys of a standard keyboard) but missed the dedicated arrow keys, as well as home/end and pgup/pgdown keys. Thus began the quest for the ultimate keyboard! Or, at least, the ultimate keyboard for [Cameron.]

Keyboards begin and end with a layout, so [Cameron] started with keyboard-layout-editor.com, a site where you can create your own keyboard layout with the number of keys you’d like. The layout was a bit challenging for [Cameron] using the online tool, so the editing was moved into Adobe Illustrator. Once the layout was designed, it was time to move on to the case. Wood was considered, but ultimately, aluminum was decided upon and the basic shape was milled and then the key holes were cut using a water jet.

An interesting addition to the keyboard were three toggle switches. These allow [Cameron] to choose a modified layout for use when gaming, and also to move some of the keys’ locations so that one side of the keyboard can be used for gaming.

Custom keyboard layouts are getting more and more popular and there are lots of DIY cases to hold those layouts. [Cameron] has upped the ante when it comes to cases, though. If you’re interested in building your own keyboard, we have you covered with articles like The A to Z of Building Your Own Keyboard. If you’re looking for more custom cases, perhaps a concrete one is what you want?

Via Reddit.