No, you can’t print in leather — at least not yet. But [Make Everything] has a tutorial about how to produce a custom leather embossing jig with a 3D printer. From a 3D printing point of view, this isn’t very hard to do and you might want to skip over the first six minutes of the video if you’ve done 3D printing before.
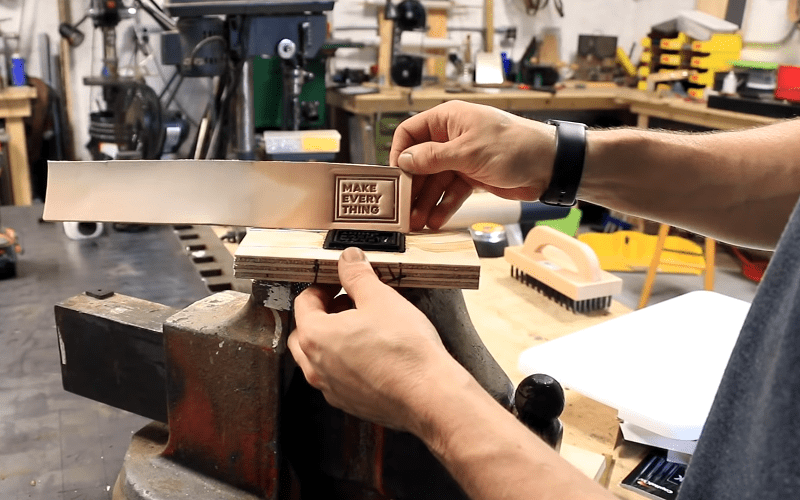
The real action is when he has the 3D print completed. He glues the stamp down to some wood and then fits the assembly to a vise that he’ll use as a press. After wetting the leather, the wood and 3D printed assembly sandwiches the piece and the vise applies pressure for ten minutes. He did make the leather a bit oversized to make alignment more forgiving. After the embossing is complete, he trims it out.
If you are experienced with leather, this probably isn’t a revelation. But if you are not wise in the ways of tanned animal hide, this is an easy way to add a capability to your workshop using nothing more than what you already probably have. All you need is some leather.
If you decide you want to go all out working with textiles, we can help you. We’ve actually seen 3D-printing done for leather book covers before, although the technique is quite a bit different as the plastic stays in and the text is outset.


I’m a knifemaker and also do leather stamps using my cnc router, couple of tips: there is no need to leave it 10 minutes, once you mark the wet leather it stays marked forever. What takes time, because it needs to dry is shaping it, there you need to wait until its dry so it keeps its new form. To speed up this process you can use alcohol to wet the leather, but his also dries it and becomes stiffer. I like to call leather the plastic of the gauchos (cowboys) lol
I wonder if you could 3D print some rollers, and slowly emboss an entire hide by slowly cranking it through a set of rollers.
Yeah, much like folks laser cut rolling pins for cookies or polymer clay.
Of course, much like how laser cutters have engraved rolling pins for use with cookies or polymer clay.
It’s like dejavú
It’s like dejavú
It’s like dejavú inception
Interesting. I have a friend who does a lot of leather work, I may make him a stamp. What kind of filament did you make your stamp out of?
It looks like he is using ABS 15% infill and 0.1 layer height. Note he prints a raft to hold it all together and does not remove it. I’m not sure I wouldn’t just design in the base so it was attached full on, but I haven’t tried it.
WordPress eats my time encoded YouTube links but look at 5:15 in the video and you can see his settings.
I do leather work (used to be full time, now parttime) For making stamps, I use PLA, 50% infill w/ 4 shells, and 2mm top and bottom.
For molds, it’s 30%, 3 shells, 1.2mm top and bottom. If you’re gonna tool on top of the mold (like for a molded phone case) increase the infill and top. Otherwise, you might break through the top of the mold.
I may try making my friend a stamp tonight. I am not sure if my cheepie printer gets hot enough to do ABS but it does a nice job with PLA I did see that he uses a raft, I may have to go back through slower and see if I can eyeball any more of his settings.
Good luck! Remember to smooth anything that’ll touch the leather, as it WILL pick up the marks!
Or choose the printing direction wisely and use the pattern as a feature ;)
Thanks for the tips. I wussed out last night and did not fire up the printer. I have a laser engraver too. I wonder if I could do a negative engraving in a hard wood like oak and use that. There is a lot less set up there and I suspect the wood would be denser and hold up better. Anyway, lots of good ideas to think about and play with. Truthfully in the nice weather I try and concentrate on outdoor projects. 3D printing etc is winter stuff when you are cooped up in the house.
Thanks, added to the subscribed channels!
:o)
Nice video, some clever ideas hidden in there that help make the process easier. Another viable option that I have done for a friend is to etch Delrin on a laser cutter. Using a piece of 1/4″ Delrin, I etched the negative of a logo to a depth of about 0.1″. Works very well for leather patches like this (the one I made was for a 3″ round patch). Delrin rasters very clean at depths up to 1/8″. Beyond 1/8″, you need to be careful with multiple paths and focus heights. I have rastered a piece of 1/2″ Delrin to a depth of 0.380″ for a particular project, but it took 5 passes to give a clean result. Just like on a CNC, I did 3 passes that took away 0.10″, then 2 more passes that took away 0.040″ to get the precise depth.
The headline for this article gave me a weird idea. What if you replaced the 3D printer nozzle with a blunted solid tip, like for a wood burning tool? Most printers can withstand a little pushback on the hotend, so you could put a sheet of leather/wood on the build plate, and adjust the height such that the nozzle bears down on it lightly. Then, just get up to temperature and run your program. Simple CNC woodburning rig!
Go for it. Write it up somewhere (like Hackaday.io) and we’d post it, I bet. There are plenty of pen holders for printers to make them plotters. Ought to work.
Put one of those USB soldering irons in a pen holder on your printer. They have small tips for fine detail, but low thermal mass, so you may need to experiment with the speed a bit.
There is a post on V1Engineering somewhere where they attached a wood burning pen to an MPCNC and made some pretty slick garden signs
I was muse on if this was possible after learning how to use a filament 3d printer.
One of the most critical parts in 3D printing is getting a good first layer. This sets up a solid foundation for the rest of your model and can save problems later on in the print.