Recently I was given a somewhat crusty looking ThinkPad T400 that seemed like it would make a good knock around machine to have on the bench, if it wasn’t for the fact the person who gave it to me had forgotten (or perhaps never knew) the BIOS password. Cleaning the machine up, putting more RAM in it, and swapping the wheezing hard drive for an SSD would be a relatively cheap way to wring a few more years of life from the machine, but not if I couldn’t change the boot order in BIOS.
 Alright, that’s not entirely true. I could have installed an OS on the SSD from my desktop and then put it into the T400, but there was something else at play. The locked BIOS gave me the perfect excuse to install LibreBoot on it, which is one of those projects I’ve had in the back of my mind for years now. Replacing the BIOS with something entirely different would solve the password issue, but there was only one problem: the instructions for flashing LibreBoot onto the T400 are intimidating to say the least.
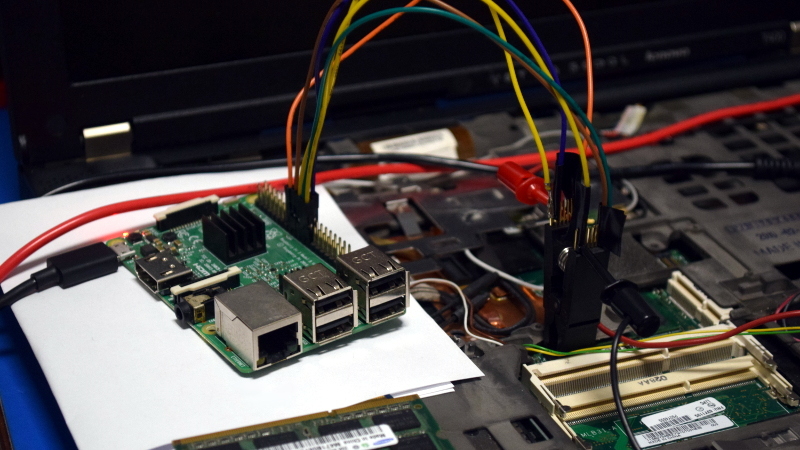
You’re supposed to take the entire machine apart, down to pulling the CPU cooler off and removing the display. All so you can flip the motherboard over to access a flash chip between the CPU and RAM that’s normally covered by a piece of the laptop’s frame. Oh how I hated that diabolical chunk of magnesium which kept me from my silicon quarry. Flashing the chip would take a few minutes, but YouTube videos and first hand accounts from forums told me it could take hours to disassemble the computer and then put it back together after the fact.
Deep into that darkness I peered, long I stood there, wondering, fearing, doubting. Then a thought came to me: maybe I could just cut the thing. If it was a success, it would save me hours of work. If it failed, well, at least the computer didn’t cost me anything. Time to roll the dice.
Risky Business
Cutting the frame instead of pulling the motherboard would be much faster, but did pose a few worrying problems. A major concern was the copious amounts of magnesium dust that taking a rotary tool to the frame would dump onto the motherboard. Granted magnesium isn’t a terribly great conductor, but it might still wreak havoc on the board if it worked its way into sensitive areas. The instructions also mentioned disconnecting all of the components from the board, which obviously I wouldn’t be doing either.
But above all, the biggest risk in this attempt would be the human element. There’s precious little space between the laptop’s frame and the motherboard itself, and the smallest mistake could gouge the PCB or destroy one of the components on it. If the cutting wheel even just taps anything beyond the frame itself, it could be game over.
Long story short, you shouldn’t go this route unless you can afford to lose the laptop if things don’t go well. If you have any strong feelings about this particular T400, or actually need to have a working machine after all is said and done, you might just want to spend the time to follow the official installation procedure.
Making the Cut
With a cutting wheel chucked up in the Dremel, the frame material gives way pretty quickly. I had to keep the speed fairly low and the pressure light, or else I was worried I’d blow right through it and dig into the motherboard. The metallic dust produced gets everywhere, and even if you’re normally too macho for eye protection, you’d be a fool not to use them for this. In fact, a dust mask would be a good idea as well.
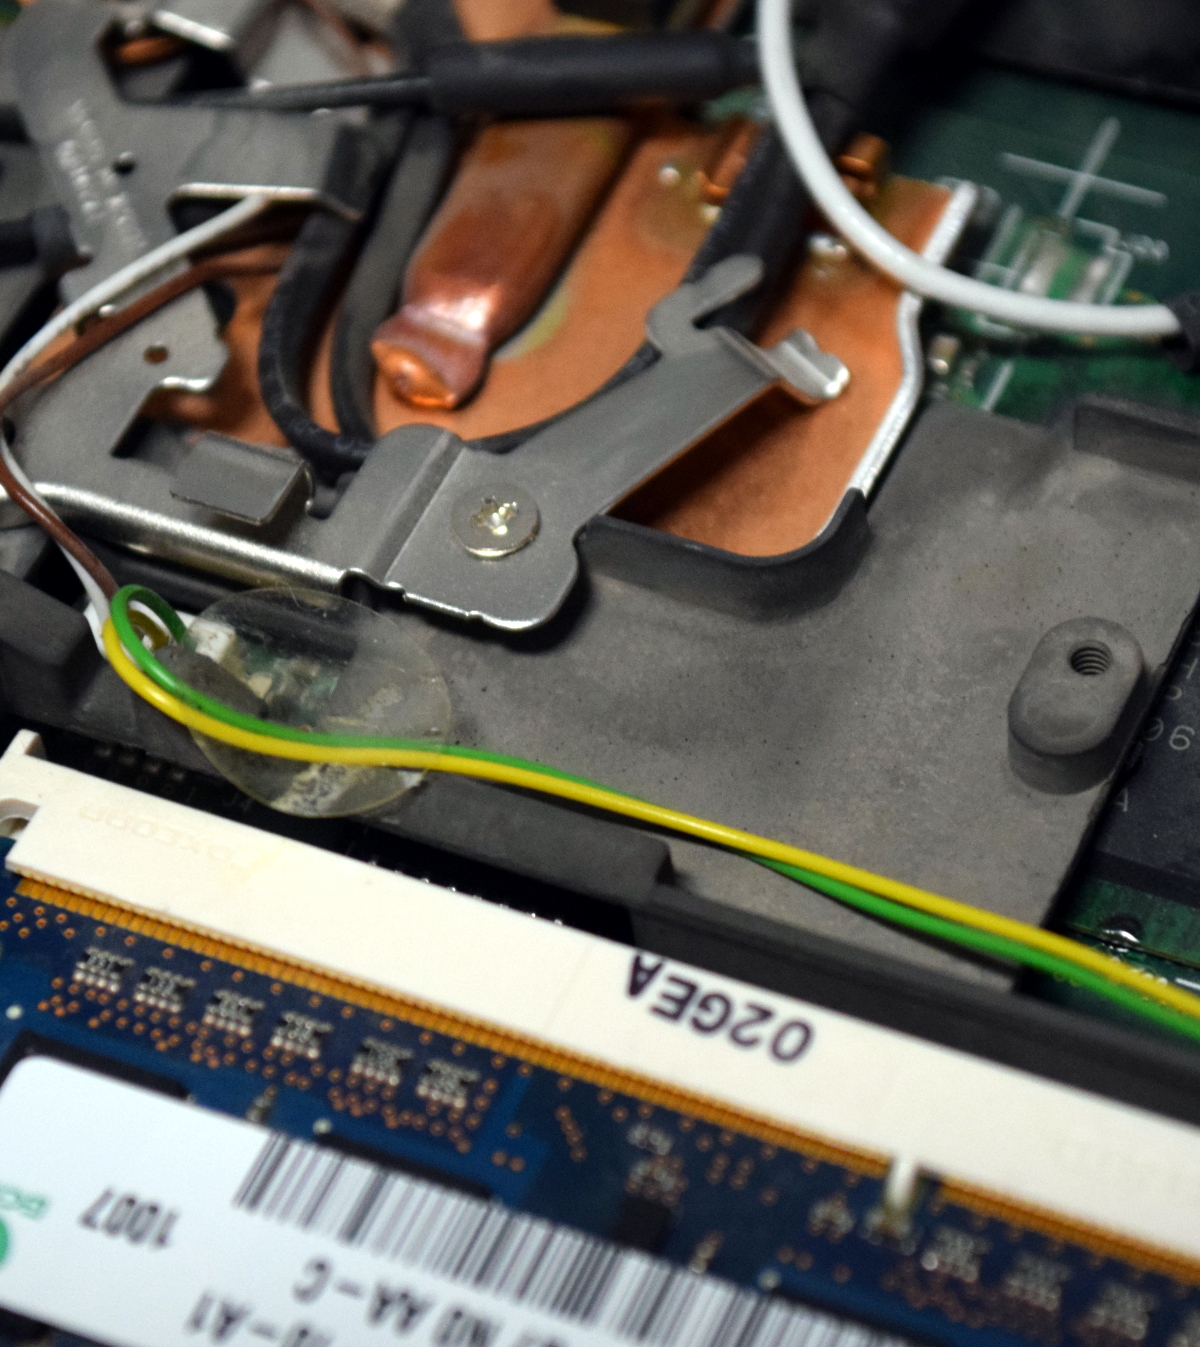
The right hand cut is easy enough to make, and a relatively forgiving area to start with. I did end up digging into the plastic of the memory socket, but luckily it was one of the few things you can hit in there without doing any damage. On the left side, things get tricky. I was able to make a straight cut across the top of the chip with the wheel, but then had to widen the opening with a carbide burr to make enough room for the clip to attach.


Cleaning Up
After verifying I had enough clearance to get the clip on, I took the T400 outside and started hitting it with compressed air from as many angles as I could. I easily spent as much time blowing the magnesium dust out of every nook and cranny of the case as I did actually making the cuts. The process can be helped along by removing the optical and hard drive, as that will give you another opening to blow air through. Since there was really no way to tell when this phase of the process was done, I basically just keep going until my patience ran out.
While on the subject of shooting compressed air into electronics, I should mention my compressor has a coalescing filter on it to take moisture and oils out of the air before it reaches the blow gun. An unfiltered compressor can spray all sorts of atomized liquids and contaminates out, so you want to be very careful about the source of air you plan on using if you want to clean something like a motherboard.
Flashing LibreBoot
Our own Bryan Cockfield wrote up an illuminating first hand account about the highs and lows of flashing LibreBoot which is a must-read for anyone looking to take the plunge, so I won’t go over it all again here. Suffice it to say, the process isn’t exactly beginner friendly. From getting the programmer wired up to modifying the LibreBoot ROM file with your machine’s MAC address, it’s a path only to be walked by the true disciples of Saint IGNUcius.
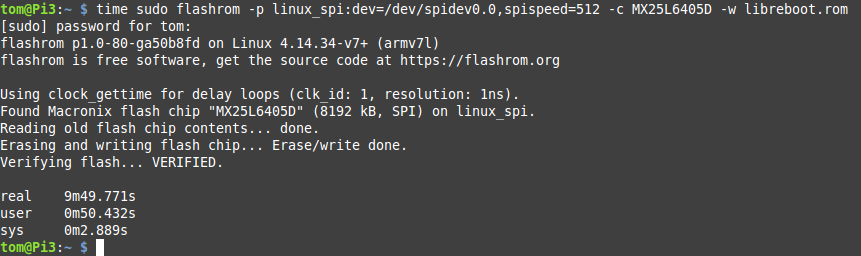
That being said, the process went pretty smoothly. For my programmer I used a Raspberry Pi 3B+ and didn’t need an external power supply. I had a bit of trouble getting the clip attached onto the chip securely, but once it was on there tight enough that the flashrom tool could see it, it stayed connected until the process was complete.
The entire flash took just shy of 10 minutes with this setup, which compared to some of the horror stories I had read on forums, was a relief.
New Lease on Life
In the end, the process was a success. The T400 didn’t short out due to insidious magnesium particles (at least, not yet), and I was able to boot up to a USB flash drive to start the installation of Arch Linux. Start to finish it took a fraction of the time it would have to strip the machine down and build it back up. As for the experience of using LibreBoot itself, there’s definitely a learning curve. It still seems strange to me that there’s no configuration options anymore, the computer just boots directly into GRUB.
LibreBoot devotees will tell you that it increases performance and extends battery life, but I can’t speak to that because I never really used the computer before installing it. One thing I can tell you for certain is that if you’ve got a ThinkPad T400 with a locked BIOS, a Dremel, and nothing to lose, there is a light at the end of the tunnel.


Complex “build”, not something you see every day on Hackaday; I am glad you brought it here. But as for myself, I would never try it myself in any machine I care about. Prefer to have a locked,commercial and maintainable boot instead of some open source “nobody to be found authored it” kind of software.
Yes, use something more secure, like Intel Management Engine or something like that.
At least using intel guarantees that EVERYONE will face the same problem, not some unsupported minority
yes, very helpful when the government spies on us all (:
Technically they spy on no one, they do collect lots and lots of data. But they have redefined the meaning of spying as an actual human being reviewing the collected data, unless that happens then no ones privacy has been violated and the fourth amendment’s virginity is totally preserved.
I totally agree with you, and that commercial company needs to be based in the US.
Haha, well played.
Ah… the BIOS password… Lenovo chose a “security chip” ROM approach (A ROM with an encryption mask or something lame like that… can’t remember).
Shorting the SDA and SCL when entering BIOS then pressing enter you could disable the password… but if you set a new password it’ll always store garbage in the ROM.
I had pulled from scrap 3x T400:
My first attempt bricked the first board (Fried something I guess),
2nd attempt success… but it ran hot and slow because Lenovo BIOS bug of sorts,
I put my foot through the second one, Luckily the board survived as the third was liquid damaged.
I left it stored away for about 8 months until I heard of Libreboot….
I flashed Libreboot and the lappie became a lot more smoother and cool running than stock firmware and no white-lists to contend with.
Additionally:
Dell got security right… they store the password in the EC so the password can’t be tampered easily… also if authentication failed in certain ways (Time-outs, 3-incorrect attempts, etc) the laptop would shut-down abruptly and flag for Thorough Boot (Longest boot mode, slows brute force attacks)…
Someone at my work place tried to steal my E6400 and they tried removing the BIOS battery to remove an EC ROM-stored password…. I found it with the bottom cover off and the RTC battery on the keyboard… lol
There’s a website (or two) and programs that will provide the ‘back door’ key many Thinkpads and some other laptop brands will accept once you’ve tried several wrong passwords in the proper manner. The laptop puts some code on the screen, plug that into the right decoder then take that result to use as the BIOS password to get in and change or disable the password.
It also depends on the age of the machine and on how secure the machines actually are…. those whom rely on using the Intel features for security won’t have these (yet) i.e. the baytrail Lenovo tablet PC… change the only physically separate ROM it has (Excluding the eMMC) and it still asks for a password.
The Dell Latitude E6400 may have a backdoor through the LPC traces, debug/ISCP or even an undocumented serial/gpio… however I haven’t found such info.
Also who wants to spend hundreds hacking off a password from a laptop that goes for $25 on the local second hand market?
Last place I was working at, a user set a BIOS password, and then forgot it. In the end all we could do was ‘accidentally’ short a 9V battery all over the motherboard, and then claim on the warranty for an ‘unexplained’ failure.
Sorry for taking advantage of your generous warranties Dell :(
So warranty fraud?
As described: it was an accident. Manufacturer failed to properly protect the motherboard. Ain’t that hard.
;-P
Would it work if you just swapped out the EEPROM with a blank one?
Short answer:
No.
Detail:
I’ve tried wiping the ROM… however the system sits at a blank screen, so it knows it’s been tampered with.
The system firmware ROM (containing Intel ME, BIOS, LAN, ETC..) stops if said chip is corrupt… however it looks for the password set flag. If the flag is set then the firmware asks for a password, it does stuff… i.e. hashing etc and hands it to the chip where the chip, I’d guess the chip takes the hash and spits back an area decrypted against the hash..
The reason for my thinking of this is because if and when shorting said chip during the password unset phase… writing a new password works… but you’ll always get “incorrect password” responses back… say password: 1234 as a test…. trying that to get back to BIOS wont work… so every time you brick the BIOS setup with a password, you have to strip… boot, short and wipe the password-set flag every time (Oh, cloning the chip in said state, I’ve not tried.)
I have a Samsung sub laptop in the drawer with a crashed HDD, problem is that it wont accept a blank replacement, because the UEFI boot system expects Samsung specific secret files on the drive to begin with! I’ll have to look into this, never heard abou Libreboot before. Very nice.
I have a few systems like that, you have to turn off the UEFI secure boot temporarily and then it’ll work. If the hard drive will power up, though, you might try using ddrescue to clone it to a good drive, I’ve done that in the past with decent success.
That’s excessively proprietary. Worse than what Apple used to do with drives for Macintosh. Samsung doesn’t appear to have much, if any, interest in the North American laptop scene since MPC folded in 2008. Micron, MicronPC, and MPC laptops were all rebadged and often slightly restyled Samsungs. Almost all of them were very high end.
I ran Windows 10 Pro x64 on a TransPort T2500 (Samsung X65) for a while. Not a problem after Microsoft released an update to fix networking. (Took them almost a year to the day after RTM to fix what they’d broken!) My only gripe with it was it had a CardBus slot instead of ExpressCard. WTH was Samsung thinking?! CardBus in 2008?!
good job! Using masking tape to cover all but the working area + vacuum while cutting would make it more pleasant experience I guess ;)
True, but you could also induce board frying static electricity with either option…but as you’re already going at it with a dremel tool, it’s half a dozen on way and 6 the other.
I guess you could use a milling machine and a smallish endmill, at least the chips would be bigger.
Cut up an old ESD bag to shield what you can and tape it down using Kapton.
Static risk from handling assembled components is essentially a myth. I blame Serial Experiments Lain.
Aaaaaaand now I’ve got the theme song stuck in my head.
Yeah absolutely, if I were to do it again I would have tried to mask things off at the very least. The metal dust ended up being worse than I expected, honestly.
Probably could hack Intel ME to do the flashing with less effort. After all, it has complete control of the system.
How? Is there enough available knowledge of that proprietary hornet’s nest to trick it into doing such a thing?
This is the best idea ever. If anyone (outside the spy community) ever figures out how to make it do that, I hope to read about it on these pages!
I’m pretty sure that IME can flash a BIOS over the network, although I doubt it would flash Libreboot.
The original intent was as a ‘lights-out’ management system similar to most servers, but in desktop machines. I have no idea why they thought including it in non-business machines was a good idea though.
” It still seems strange to me that there’s no configuration options anymore, the computer just boots directly into GRUB. ”
Your view seems PeeCee brainwashed.
Any RealComputer[TM] after toggle switch consoles is like this, I can’t recall of any VAXStation, AlphaStation, SPARC &UltraSPARC, PPC (IBM, Motorola) that was not this way.
Yeah, but why not have a massive array of toggle switches on a modern laptop in case one day you decide to reprogram the bootloader on the fly :-D
I wonder if rather then cutting away the whole piece of frame a person couldn’t just cut 2 slots or drill a series of holes above the chip and use POGO pins to do the programming? Getting it right the first time would be hard but then publishing the measurements for the holes and POGO jig would make it easier for those that follow.
I feel like I have cutters/snips that could have made a notch in that, causing large chips which could be contained easily. It’s like that “When all you’ve got is a hammer, everything looks like a nail” quote for dremels though.
A blue nail ;)
http://lell.se/bilder/blue-nail.jpg
How could you get cutters in there if the frame piece is only a few mm over the PCB? You have to cut it from above.
I’ve got cutters that could work, you might have some big old clumsy shit.
Not sure if the long link will get cut, but got similar to these, mine are unbranded ones I got off a fleamarket “tool guy” they go through soft PC case steel to tidy up holes you gouged in it if you only take it a mm at a time, I’m thinking that frame metal is something like cast aluminium in hardness, ,,,,
https://www.joeknowselectronics.com/wp-content/uploads/2018/05/Rayley-Electrical-Cutting-Plier-Wire-Cable-Cutter-Side-Snips-Flush-Pliers-Tool-170-Flush-Cutter-Internal-Spring-Cutting-Pliers-small-wire-cutters-0.jpg
Those are actual flush cutting side cutters, as opposed to the ones that don’t, if you put those flat against a copper pad on a PCB you can shave the pad off.
I was actually thinking of using a dremel, Ive got a few saw blades that have worked well with aluminum, less dust more chips then cutoff wheels, spiral cut bits seem to work good on soft metals as well. As far as protection I have a few static shielding bags from shipped components that could be sacrificed to collect the debris rather then let it land on the board.
When I hear magnesium and cutting I run the other way. I have listened to to many machinists and their tales of a magnesium fire to leave me spooked. Then there is the metal power if it doesn’t catch fire.
its not pure magnesium. its an alloy. the Next cube and stations were also made of this metal and they are not flamable in any way.
Here’s a detailed report about burning the NEXT cube. It is eminently flammable, although I give it to you that It’s not easy to start the fire:
https: //simson.net/ref/1993/cubefire.htmlhttps://simson.net/ref/1993/cubefire.html
Sorry for the mangled URL—the submit code balked at the real one.
That was the last metal I had to learn to tig weld… then I graduated to “government” jobs (desks, chairs, sports equipment, autoshop class jobs, etc.). Never had an issue, though was always scared.
I got once an Acer laptop with bios password, I was successful with a dos execute on boot usb stick; cnlpwd.exe
Some friends report been able to remove password on other manufacturer laptop also
Took me 10 mins, however when there no other option then hardware hack is the way to go… thumbs up!!!
Since last looking at LibreBoot they’ve added some new Hardware to the list.
LibreBoot is awesome, too bad there isn’t a single desktop class board (AMD OR Intel) you can walk into a store and buy in 2018 that can in any way run LibreBoot. A few laptops but zero desktop boards from any vendor.
Sorry I missed this. I’m planning on installing Libreboot the hard way, on a X230 tablet. As I understand it, what makes this possible in Thinkpads ~2007 is that there are actually two BIOS chips, one flashable and one not. (or maybe I’m confusing this and there are two distinct halves of one chip?)
I’m surprised there’s no mention here of booting first into “heads,” a spinoff of Tails that allows for saving settings as well as persistence. It can basically be used as a replacement for UEFI, giving these laptops a significant advantage against “bootkits”. It also omits Systemd, and I imagine if one goes this far, one might as well also avoid systemd in the primary operating system. Systemd, EFI, and Intel ME all commit the sin of being unnecessarily complicated and providing rich targets for motivated, expert intruders (I still refuse to call them “hackers”). That raises these above just “project laptops” and into the realm of seriously secure machines. Bragging rights!