
We’re living in the world of connected devices. It has never been easier to roll your own and implement the functionality you actually want, rather than live with the lowest common denominator that the manufacture chose.
In a previous article I walked though a small python script to talk to a BLE light and used it to cycle through some colors. Now I want to delve deeper into the world of Internet Connected BLE devices and how to set up a simple Internet-Of-Things light. With this example in hand the sky’s the limit on what you can build and what it will be able to do.
Join me after the break as I demonstrate how to use NodeJS to bridge the digital world with the physical world.
Bluetooth Support in Languages
NodeJS is very different from traditional languages in the way that Node is considered asynchronous in its execution. NodeJS uses an Event Loop and things happen as a consequence of events such as user actions as well as messages from other programs and threads. A traditional program or script is a sequence of actions that will get executed one by one until all actions are completed. If a particular action is blocking such as waiting for a button click or a message from a device, then the program will have to wait until the process is complete.
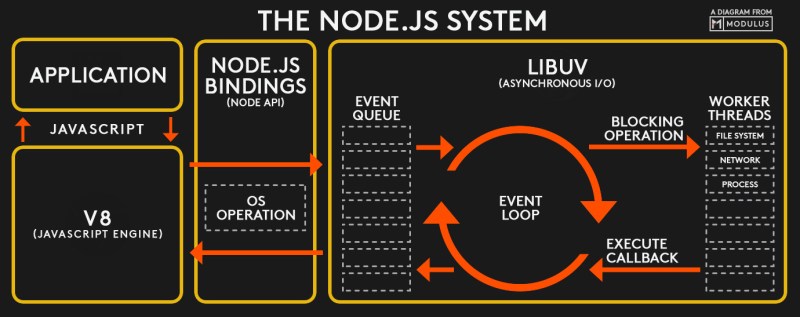
I am not an expert on NodeJS but the basics should be understood to be able to write our application. Details of Async.js and the event loop are beyond the scope of this article and we will start with a basic application and add the necessary functionality.
BLE support in NodeJS is enabled by the ‘NobleJS’ package by Sandeep Mistry. You can learn a lot by studing other programs that already use the package. I had a discussion with Alex Albino about his experience with BLE and NodeJS. Alex Albino is the same guy responsible for the IMUDuino I mentioned before and his web dashboard app is written in NodeJS. He has a number of other example applications up on GitHub that he put together with the help of Kas Perch and Russell Hay. I took inspiration from their work and created a small bridge application described here. It uses NobleJS which works on MacOS as well as Linux. Windows 10 support is available but I did not venture into that direction.
Let’s start with a basic application to get a better understanding of how things work.
A Simple BLE Scanner Application
 The NobleJS package page has all the necessary documentation required to get started. The basic install instructions are simple and include the tools we installed in the previous write-up. To start a new project, simply create a new folder and run the command:
npm init blescanner
NPM will ask you a number of questions and you just need to press return for what you don’t want to fill out. Just note the entry point which is index.js by default. This is the file where all the code will go.
Next, install the Noble package:
sudo npm install noble --save
Edit the index.js in your favorite editor. I’ve already sample code to get started. If you’re following along, copy this Github Gist and paste it into your index.js file.
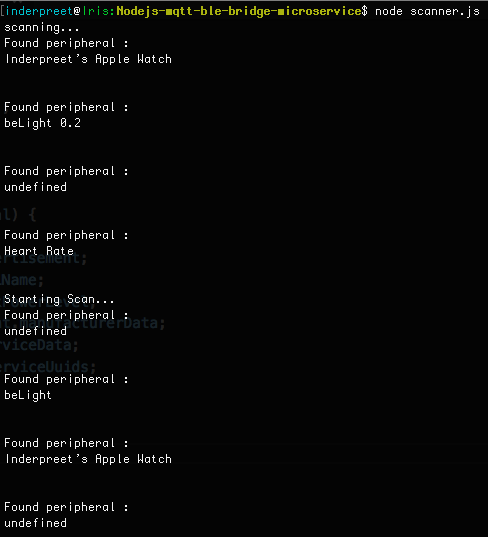
The code has three parts. The first is to instantiate packages and create variables. The second is to add callbacks to functions such as the noble.on events. The third is a small interval loop that allows our program to enable and disable scanning of BLE. Once you run the script, it should spit out the names of BLE beacons and peripherals around you. I left some other data un-displayed for you to experiment with.
Talking to the BLE Lights
The scanner has the ability to print the IDs of all the peripherals in the vicinity. I renamed my scanner index.js to scanner.js and ran it to scan nearby BLE devices. Once the scanner lists out the BLE Lights, we create a list of UUIDs by a simple copy and paste which can be modified later.
I created a new index.js where I try to connect to each BLE Light and then write a known value to the relevant characteristic. Unlike the previous article where we wrote a 4 byte RGBW value, in this exercise, individual characteristics are used as a proof-of-concept. The code can be downloaded from my Github Repository.
In my experiment, I used the values 00 for each light since the BLE Lights turn on at full brightness by default when first powered ON and hence a successfully connected instance would turn the light OFF.
Connectivity – MQTT
 There are a number of ways to interface our application to the internet to qualify it as an IoT app, however, we will employ the MQTT protocol. MQTT is the same protocol used by Facebook Messenger for it’s connectivity, and it’s something of a favorite around here for home automation.
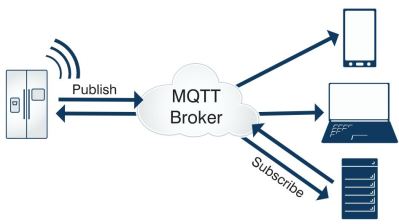
MQTT works by having a central post-office of sorts called an MQTT Broker and this broker allows clients to connect to it. Once a client registers itself with the broker, it subscribes to a particular topic which is equivalent to a post-box. Once a message is posted to the topic, it is distributed to the registered clients.
There are a number of decisions to be made such as authentication and ensuring delivery but the important thing is that every client connects outward to the broker. This means that there is no messing around with IP addresses and firewall settings(unless your network blocks all ports). The underlying protocol is TCP/IP and there is a lot that can be configured which I leave as an exercise for the reader.
For this exercise, we shall use the free MQTT broker at iot.eclipse.org which can be used without any registration at Eclipse which is pretty awesome. This can be used by anyone in any language and even by dedicated hardware. I have used the service to connect a CC3200 to the internet in the past (I will discuss the project in brief at the end of this article).
A sample program is available and I strongly urge you to try it out before going any further. Just replace the connect string to mqtt://iot.eclipse.org and you are good to go. At this point you have two pieces of the puzzle, tested and ready to go. Next we put humpty-dumpty together.
Creating a Bridge
The final thing to do here is create the actual bridge. Here is how it should work.
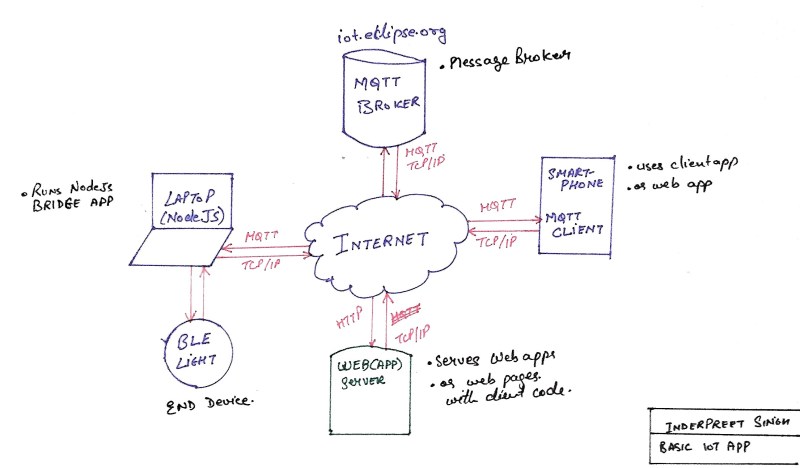
Once the NodeJS app is executed, it should attempt to connect to the MQTT Broker. If this fails then we should get an error, however, if all goes as expected, the app should subscribe to a topic and wait for a message event. Additionally, it should check if the BLE device on the machine is enabled and if so then it should start scanning for BLE devices on a regular interval. Local variables will be used to store R,G,B and W values that are to be transmitted to the BLE device. If this application were to be extended, more variables could be used to save data exchanged between BLE and our client application.
Once a message is received on the MQTT topic, the value is written to the local variable ready to be passed onto the BLE devices. Once a BLE device is found, the application should connect to it and write to the appropriate characteristic.
There are some design choices here to be made. Firstly, I chose to have the local data refreshed to the BLE devices even if it had already been written in a previous transaction. This is redundant and you could potentially save energy by adding a check here. Secondly, I have four different topics for R,G,B and W which means four different connections. A better way would be to either use JSON or a custom data packaging method to consolidate data into a single stream.
So now how do we send the commands? A similar application with only the MQTT part of the code would do the trick and I am including the source code for that as well. Check out my code and feel free to explore and fork it. I would love to see what you build with it.
A Short Note on Front Ends
A command line tool is not the best way to present your idea and since we are using NodeJS, I thought I would just touch on the topic of front ends. Traditional applications would have to be written in Visual Basic or Java(AWT or Swing anyone?), however webapps and related technologies can be a portable solution of sorts. Instead of an executable, a webpage could be coded to display necessary buttons and have javascript functions to send necessary data to something like an MQTT server. Remember, NodeJS is javascript for the backend and the same(ish) code can be run in the modern web browser.
Need more inspiratoin? Check out three.js and MeteorJS and you will find yourself with the ability to have easy(ish) GUI applications with very few lines of code that you can port to the likes of the Raspberry Pi.
A Similar Project
Before I close, I wanted to add a video demo of a small project I did a few years ago with Texas Instruments’ CC3200 platform. Instead of having a laptop run the MQTT code, I had the CC3200 connect to the broker and wait for commands. Benjamin Cabe was the inspiration behind the work where the entire Eclipse PAHO library was used as a base. For the front-end, I used the PAHO JS library to send commands over MQTT and get status messages and display them in real-time.
(External Link to the live version)
That’s all I have for now and if you like what you saw, tell us about it. We would love to see your projects that are enabled by similar technologies and if you have something that you feel is amazing, feel free to send us a link via the tips line.


A couple of comments. This is quite a nice introduction to using BLE with NodeJS and MQTT but the architecture is very insecure. Firstly the devices should connect together over a secured LAN with a gateway between that and the Internet. Secondly, TLS should be used with MQTT over the Internet, ideally with client side certificates. Also, Node-Red is a good way to glue IOT systems together. It supports JavaScript coding when that is needed and allows sophisticated systems to be assembled very quickly. MQTT is an excellent way to interconnect IOT systems but because it uses TCP which is connection oriented, it doesn’t work well for low power devices. CoAP over UDP is a good choice for such devices. The use of a laptop to interface to BLE is somewhat overkill but decent for prototyping. BLE isn’t very secure but is OK for use at the periphery. I hope you find these comments useful.
It is quite a tragedy when every IoT tutorial focuses on stuff like MQTT and working with various external brokers – but not a single iota about basic security, how to harden the setup in order to not become a botnet zombie, how to make sure that only authorized and authenticated devices/users can connect to it, etc.
No wonder that IoT is such an unmitigated disaster and almost profanity in any IT/infosec circles.
[oldjoke]The S in IoT stands for security.[/oldjoke]
You want a secure IoT network? That’s what I run.
https://hackaday.io/project/12985-multisite-homeofficehackerspace-automation
1. Don’t trust normal store bought endpoints. They yack to mothership. Build your own.
2. Ensure endpoints to base station are secure (replay resistance, encryption)
3. Data sent/received to SSL endpoints (HTTPS, SSL)
4. Connections to data hubs at sites goes over Tor.
We guarantee: authentication, identification, authorization. We enforce this via Tor, login/password, and access controls. The firmware has least capability, so reprogramming them on the fly is not possible.
“We’re living in the world of connected devices. It has never been easier to roll your own and implement the functionality you actually want, rather than live with the lowest common denominator that the manufacture chose.”
*Takes apart expensive appliance* ;-)
This is so true. Nothing noways is usable and hackable enough if it’s cheap. The “masses” in “technology to the masses” that people advertise these days is missing.
Yes, BLE is horrifically insecure, but it’s generally fine for most use cases provided the pairing/bonding scenario happens within a controlled environment.
I’ve been working on an implementation of BLE that allows for a TLS/PKI-based solution to provide this “bonding” without requiring such a vulnerable exchange of information. Sadly, due to how BLE operates, if an attacker is able to sniff the entire pairing and bonding step, they own the whole connection. This helps mitigate it although with adding in a large requirement of an entire PKI infrastructure.
Trade-offs.
> Yes, BLE is horrifically insecure, but it’s generally fine for most use cases provided the pairing/bonding scenario happens within a controlled environment.
Who cares about a potential local exploit when the rest of the system is even more widely open *and* accessible from the internet?
I’m probably biased as I’m the author of the following projects, but might I offer a BLE-to-MQTT bridge for linux + Bluez: https://github.com/shmuelzon/ble2mqtt.
I also have one for the ESP32: https://github.com/shmuelzon/esp32-ble2mqtt
Why not Web Bluetooth? If JavaScript is your poison, why not at least do something that only JavaScript can do?