Taking pictures in the 21st century is incredibly easy. So easy in fact that most people don’t even own a dedicated camera; from smartphones to door bells there are cameras built into nearly electronic device we own. So in this era of ubiquitous photography, you might think that a very slow and extremely low resolution camera wouldn’t be of interest. Under normal circumstances that’s probably true, but this single pixel camera built by [Tucker Shannon] is anything but normal.
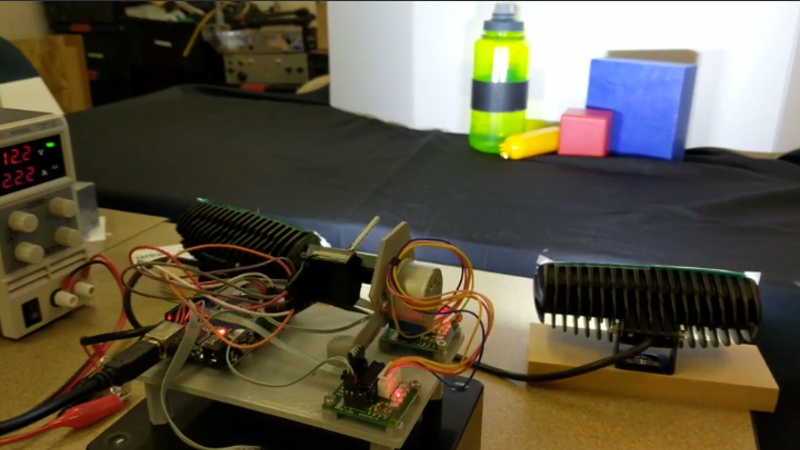
 At the heart of his unusual camera is the TCS34725 RGB color sensor from Adafruit which receives a tightly focused beam of incoming light by way of a 3D printed enclosure and a 3mm OD aluminum tube. This allows an Arduino Uno to determine the color of this tiny slice of light, making up a single pixel of the final color image. [Tucker] notes that you could even swap the color sensor out for a simple photocell if you don’t mind a black & white image at the end of the process.
In either event, once the light has been analyzed the sensor is repositioned autoturret-style by way of dual BYJ-48 stepper motors. This process continues on, spiraling outwards until the whole image is stitched together from these individual readings
Now compared to the camera in your phone, the resulting image might be a bit underwhelming. We’d say it’s a bit like looking at a digital picture on an 8 bit computer, but in truth even that might be overly generous. But even if it isn’t as crisp as modern eyes would like there’s no question that it’s certainly a recognizable image, which is all [Tucker] was shooting for.
Of course if your optical frugality is such that even this low-resolution camera is too sharp for your tastes, we’ve seen a similar concept using a roof-mounted solar array.


Maybe a fast scanning XY galvanometer in front of a pinhole, with the right optics at the front and after the scanner, could do a fast one-pixel camera…
The datasheet for the sensor states it needs a minimum of 2.4ms to read the color but further suggests that the device can be configured up to (if I’m reading this correctly) 700ms for a fully accurate reading. Adafruit’s code suggests they have it set to 154ms.
Thats right, the galvanometer scanner solution works much better and faster. There is a single pixel camera project on kickstarter, trying to come out with a camera product right now.
That’s essentially how old vidicon tubes worked, which were also called “flying spot cameras”. I still have one lying around somewhere (Panasonic branded) which I got in the early 80’s. It was used to turn a VHS tape recorder into a “home movie” recorder. I even have some of the old NTSC videos I made with it. I think it’s been around in one form or another since the twenties.
See: https://en.wikipedia.org/wiki/Video_camera_tube
That’s not a flying-spot camera. A flying-spot camera projects a raster with a narrow beam of light on the object to be televised and the reflected light is measured. In the early days of TV the raster was generated with an arc lamp and a Nipkow disc, light was detected with arrays of large photocells.
Interesting site on old TV technology http://www.nbtv.wyenet.co.uk/
An actual flying spot camera might be a nice idea for this. Have a fixed light sensor, then spin a laser across a scene in a dark room. You could even use different coloured lasers, with a non-filtered sensor. The advantage would be that moving a spot of light with a galvo is much easier than moving a sensor with wires dangling off.
I did this with a thermocouple once and it took so long it just wasnt worth the skewed spherical image afterwards
Like as a thermal camera?
Yah, I called it SLIR (slow looking infrared). It worked alright, I was just messing around to see the feasability of a cheap flir to check for insulation leaks outside a house. The FOV was too wide for my liking and the real small FOV components were just too much for how cheap I wanted to make it. Picture of it taking a picture of my heater vent http://www.zptr.net/i/840.jpg
So…do you have this build written up someplace? Looks pretty awesome to me.
Maybe you’d be interested in this? https://www.niklasroy.com/project/195/DIY_thermal_imaging
No help for the acquisition time, but a spherical image could be flattened by software.
This is a neat project! A similar technique was used successfully on Mars over 40 years ago – see https://en.wikipedia.org/wiki/Viking_program#Camera/imaging_system
Single pixel cameras are cool but wake me up when someone publishes open source compressed sensing algorithms.
https://news.mit.edu/2017/faster-single-pixel-camera-lensless-imaging-0330
Here you go:
https://scikit-learn.org/stable/modules/classes.html#module-sklearn.decomposition
This isn’t a compressed sensing algorithm. But CS algorithms are there for people to use. Maybe you meant this: https://scikit-learn.org/stable/modules/generated/sklearn.linear_model.OrthogonalMatchingPursuit.html#sklearn.linear_model.OrthogonalMatchingPursuit
I wonder what’s the limit for single pixel cameras. I already know you can get to one motor with a bolt as a shaft and spinning it around. You might event get to none it we agree pendulum mechanism is not a motor.
Now hook up two of them for the world’s slowest stereo vision. :grin: