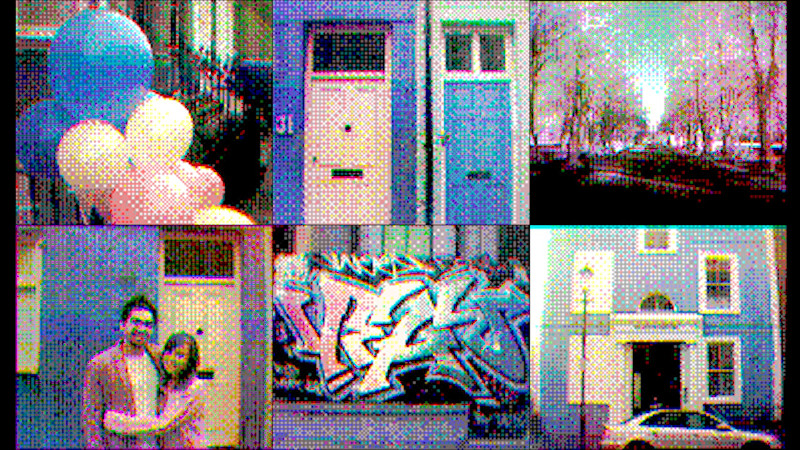
The Game Boy Camera is a legendary piece of 90s gaming hardware, despite not being a game at all. It consisted of a low-resolution greyscale camera, fitted to a Game Boy cartridge, that you could use to photograph your friends, vandalise their pictures, then print them out on a thermal printer. It’s hardware that was fun because of its limitations, not despite them. However, [Matt] wondered if there was a way to use early photographic techniques to get color photos.
The technique is simple – get red, green, and blue filters, and take three photos – one using each filter. Then, combine the photos digitally to create the color image. This necessitates an amusingly complex process to transfer the photos from Game Boy to PC, of course.
There are some limitations – due to the speed of the Game Boy Camera, it works best with static scenes, as it takes several seconds to shoot. Also, due to the low resolution, it’s best to choose subjects with broad swathes of color. Despite this, [Matt] managed to take some great images with a colorful yet vintage digital charm. There’s other ways to achieve this, of course – like bringing the power of neural networks to bear on your low-res Game Boy images. Video after the break.


Fun hack, but the quality could be way better. For one thing, it doesn’t seem to be using the “HiColor” hack that us professional GBC programmers were all using back in the day.
May I ask you : “Whaaat?”
I can’t see the youtube video on this computer, but by reading the description, I understand that [Matt] takes 3 picture using filters, transfers it the computer and then use the computer to create the final color image. (like in this post (in french, sorry) https://www.yaronet.com/topics/164949-photos-couleurs-avec-la-game-boy-camera . By the look of the image, I even believe that he didn’t filters UV and IR.)
The HiColor hack you are talking about is trick on the game boy color.
You modify half of the sprites and background color palettes each scanline witch allows you to use like 50colors per line instead of per screen.
As far as I can remember, the camera embedded in the game boy camera can only give greyscale images (128*126 ish. The camera does pretty funky processing to pump up the percieved quality of the image. The GB only keeps 128*112. More infos here : https://github.com/AntonioND/gbcam-rev-engineer/blob/master/doc/gb_camera_doc_v1_1_1.pdf). Furthermore, even if you can plug a game boy camera into a game boy color, you can’t (as far as I know) reprogram the game boy camera to take advantage of it…
Edit: Some madman has switched ROM by an EEPROM and a USB wizardry to allows quick read of the camera. But I don’t think one have modified the firmware to enhance or add functions to the camera. https://chipmusic.org/forums/topic/1720/usb-enabled-gameboy-camera/
Ooups, that was a long post… But I wanted to find sources to backup my sayings.
I’d like to see someone use an old HP ThinkJet print color transparencies by doing RGB separations of an image then either printing on the same piece of transparency film with Red, Green, and Blue inks or printing three transparencies and overlaying them.
Can you even get red green or blue inks for those old printers? Some of the nicer modern photo printers have those inks, but almost every other inkjet uses CMYK.
The ThinkJet and QuietJet were single color inkjet printers with resolution about like a 9 pin dot matrix printer. Their original black ink was 92261A which required HP’s special JetPaper. That was followed by the 51604A black for plain paper. 51605R, 51605G, and 51605B were Red, Green, and Blue for JetPaper. I’ve not been able to find any Green available in a quick search. Also not turning up anything specific about special transparent sheets for those printers.
Ha ha ha, I did that back in the day. The problems I recall having were around feeding the paper through accurately and paper distortion no doubt due to the now added ink moisture. Lets just say, if the paper feed was done well the 3 feed picture was quite excellent (compared to colour dot matrix output) at the start but would have terrible registration progressing down the page. Et the end of an A4 page it was often out at least 1mm so you had that newsprint colour quality. Amusingly frustrating. By the way I used Quink …fountain pen ink in the three separate cartridges. It was available in various colours including RGB and it was said to clean the pen and given that the cartridges were prone to clogging up thus was seen as a bonus. In the end I just continued printing using a lovely deep blue ink instead of black just for the quirkiness of it.
This reminded me I had two GB cameras in my junk project drawers. Both new in box and one still sealed. Looked at ebay and was surprised how much they were worth. Just GB used $10, GB with box new $20+, sealed $40+++.
Time to sell at ebay. so thanks for the article just for this.
Fun to see someone doing this with a gameboy, thanks for sharing.
In the 90’s I had a second-second-hand Amiga, I used the B/W RGB technique to digitize some pictures from magazines. Worked like a charm mostly because of the software included with the vidi amiga (12). That made it very easy to capture R G and B independently and combine them without any hassle (no other software needed). I didn’t have a color wheel so I bought some color filters from the local hobbyshop. And also my green was way too light, so I ended up using multiple layers of the same green filter sheet to increase the filter effect for that color. The camera I used was a very bulky and old B/W security camera I bought for next to nothing on a flea market. It was fun.
The 8-bit guy also did a video about the same concept:
https://www.youtube.com/watch?v=a-ny3geJ-nk
I think the green filter in the Gameboy project had the same problem.
Maybe missing Infra Red or UV filter…
Matt’s a ton of fun, and I’d be remiss if I didn’t mention his partner in crime, Tom Scott, one of the best YouTubers going.
And of course, he’s on a park bench at the end.
This takes me back. I remember reading about a similar mod in … 2002-2003? where someone did the exact same thing! The results inspired me to drop $10 on a used Gameboy Camera but I got sidetracked playing with the music tool instead.
Everything old is new again : )
Actually I think this may be the photographer who did it in 2001… his original site went down, but he’s reposted the images on his new blog.
http://www.ironicsans.com/2007/09/idea_color_photos_with_the_gam.html
A similar concept is used to take most of the “color” photos we’ve all seen of space or other planets in the solar system; take the same shot at different wavelengths and then combine them to get the final image. Layer in some hyperspectral shots while you’re at it.