For those with some experience with pro audio, the term “ribbon microphone” tends to conjure up an image of one of those big, chunky mics from the Golden Age of radio, the kind adorned with the station’s callsign and crooned into by the latest heartthrob dreamboat singer. This DIY ribbon mic is none of those things, but it’s still really cool.
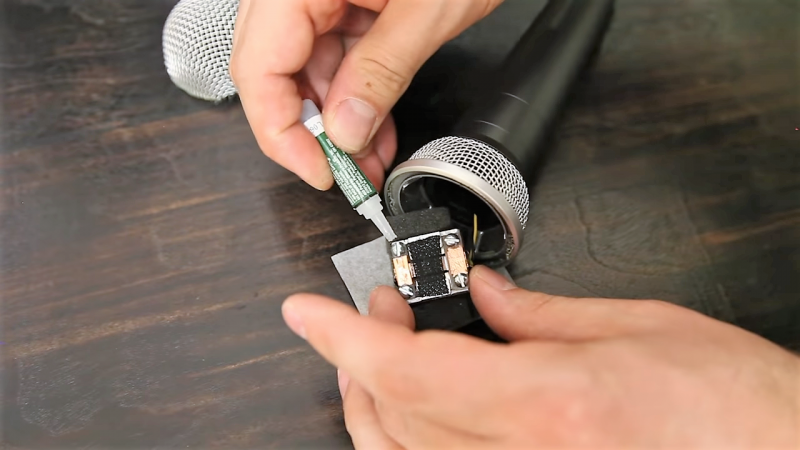
Of course the ribbon mic isn’t always huge, and the technology behind it is far from obsolete. [Frank Olsen]’s ribbon mic starts out with gutting a run-of-the-mill studio mic of its element, leaving only the body and connector behind. The element that he constructs, mostly from small scraps of aluminum and blocks of acrylic, looks very much like the ribbon element in commercial mics: a pair of magnets with a thin, corrugated strip of foil suspended between them. The foil was corrugated by passing it through a jig that [Frank] built, which is a neat tool, but he says that a paper crimper used for crafting would work too. There’s some pretty fussy work behind the cartridge build, but everything went together and fit nicely in the old mic body. The video below was narrated using the mic, so we know it works.
Fun fact: the ribbon microphone was invented by Walter Schottky. That Walter Schottky. Need more on how these mics work? Our colleague [Al Williams] has you covered with this article on the basics.


This is very very cool, thanks for sharing!
I was hoping someone would describe/diagram the piston-ribbon microphone.
Ribbon mics have carried this reputation of fragility. I like the internal foam padding. I wonder if this construction is better at protecting the delicate ribbon?
Everything made with hand tools, neat! What a fascinating build and a great outcome. I enjoy all the little build tips along the way, like abrading surfaces during glueing, and the use of the spacer between magnets when fabricating the frame.
I have seen some articles showing the ribbon made by passing some “industrial grade” aluminum foil through a pair of Lego gears.
I have replace a ribbon in a cheap ribbon mic with silver leaf, covered in toilet paper, passed through an oil paint tube roller.
The struggle before 3D printers.
Toilet paper added thickness for existing gear spacing and was a release agent of sorts.
Neat Hack! If I find the time to experiment with this build, I’ll definitely try your tissue paper release method. Somebody told me fully2/3 of all ribbon elements get damaged/destroyed in the stretching&attatchment process even in professional commercial assembly. A light touch is a must–think butterfly wings!
I don’t know if the voiceover was also done with this microphone; if so, its output must be very low, as the preamp noise is noticeable even without headphones.
Is it actually an upgrade, performance-wise?
It’s a trade off with ribbon mikes. You’re gaining a flatter frequency response in exchange for a much,much weaker signal that must be externally boosted by a pre-amp (a must!). It’s not unusual for new purchasers to try returning/ exchanging their “defective” new mike because of the weak signal–it happens! They are also notoriously fragile, even having to be stored in an upright position so the ribbon doesn’t sag into the motor body. Good luck!
Another unique feature of ribbon mikes are their “figure eight” sensitivity pattern (as opposed to the more familiar cardioid patterns found in most dynamics). This makes them ideal for desk mikes in radio studios for interviews, and an old favorite in recording studios for recording duets.. Some recording engineers also like them for recording amp cabinets in the belief that their is little to no inductive coupling between speaker and mike coils.
Question seconded, that mic sounds noisy as can be. Props to him to building it “from scratch” and “just for the experience”, but value to effort ratio is too lower than I can spare time for.
I think its he wasn’t speaking very loud into it during the commentary. The outro music was recorded was recorded with the mic as low and the noise floor is much more reasonable.
This is most likely not a problem of a mic itself, but of a preamp.
As someone who was trying (and kinda succeeded) to build a low-noise mic preamp, I can say that it is a rather tricky business. Even having a true low-noise op amp does not guarantee a good result – one must know the ins and outs of circuit noise sources and how to deal with them.
For a ribbon mic I’d suggest using an opamp with a lowest possible voltage noise; current noise is not a concern here, because the mic output impedance is so low. This means using a bipolar-technology opamp, and the first appropriate device that comes to mind is the classic NE5532. With its equivalent 8 nV RMS of noise at 100 Hz (and 5 nV/rtHz broadband), it has a noise well below noise level of most resistors.
And yes, I wouldn’t bother building low-noise preamp with discretes. Nowadays opamps have characteristics far superior to what can be achieved using discrete design.
Seems like the ribbon would be a lower impedance than the old coil, so that transformer would be a mismatch. So, lower output.
That transformer was aftermarket, not part of the original dynamic harness. All ribbons use a transformer to raise the signal level of the relatively minuscule level coming off the ribbon itself. I suppose you could use an outboard direct box while you’re experimenting.
The original (assuming this was an SM-58 clone) didn’t have a transformer, so yes, the transformer is there to make the very low impedance of the ribbon match a higher impedance input, similar to an SM-58.
It didn’t look like a $100 Lundahl transformer, so I’d guess he used one out of an old mic. Which might be 20 to 200 ohms or something. The Lundahl is a very low impedance, with apparently bifilar wound parallel secondaries, probably to improve the HF transfer. I’m sure they’re worth it for a recording studio but this looks like a low-budget hack. So maybe a 4 ohm to ~1000 ohm transistor radio output xfmr would give more voltage stepup.
The Lundahl is 37:1
You mean 1:37
A traditional ribbon mike “motor” also has a “tuned”exponential horned and ported tube attached to the back of the chassis extending into the mike body. It might be worth experimenting with some soft copper plumbing tube and a cap, formed with a tube flaring tool. In a commercial hand held tube mike I worked on (a Beyerdynamic 500 (n)c) the ribbon was protected by both a 1/8th inch foam pop filter lining the interior of the top of the mesh ball, and a “quanset hut” shaped “blast cage”, made of an extremely fine synthetic mesh. The actual ribbon (super thin, like metal leaf) was actually corrugated longitudinally (length-wise) to both stiffen it and promote “piston driving” for a relatively stronger signal. A pre-amp is a must!–true of all ribbon mikes. I am blown away that a relatively “massive” piece of copper tape produces such a clean signal. I imagine it is also less fragile than a commercial ribbon (no longer available since production ceased in the 90’s for the Beyer)!
Very cool! Great step-by-step instructions. A project I could easily build with my kids.
I was wondering what kind of magnets ( nickel-cobalt? Neodymium? rare earth?) were used and how their respective poles were oriented?
Ribbon mics have ridiculously low impedance (and thus, output voltage), and the stronger the field is, the higher the impedance and voltage go, which is good. So neodymium is a good idea. These should be oriented so that the ribbon cuts through the magnetic field lines, so the N side of one magnet should face the S side of the other, with the ribbon between them.
Ah cool! Stephen built one of these on our podcast and we recorded his audio with it! We 3D printed a fixture to fold the foil and then 3D printed microphone body to hold the foil and magnet correctly! https://macrofab.com/blog/mep-ep110-dangling-transformers/