Tattoo-Removal Laser Brought Out Of Retirement For A Megawatt Of Fun

We’ve got to say that [Les Wright] has the most fun on the internet, at least in terms of megawatts per dollar. Just look at his new video where he turns a $30 eBay tattoo-removal laser into a benchtop beast.

The junk laser in question is a neodymium:YAG pulse laser that clearly has seen better days, both externally and internally. The original pistol-grip enclosure was essentially falling apart, but was superfluous to [Les]’ plans for the laser. Things were better inside the business end of the gun, at least in terms of having all the pieces in place, but the teardown still revealed issues. Chief among these was the gunk and grunge that had accumulated on the laser rod and the flash tube — [Les] blamed this on the previous owner’s use of tap water for cooling rather than deionized water. It was nothing a little elbow grease couldn’t take care of, though. Especially since the rest of the laser bits seemed in good shape, including the chromium:YAG Q-switch, which allows the lasing medium to build up a huge pulse of photons before releasing them in one gigantic pulse.

Cleaned up and with a few special modifications of his own, including a custom high-voltage power supply, [Les]’ laser was ready for tests. The results are impressive; peak optical power is just over a megawatt, which is enough power to have some real fun. We’ll be keen to see what he does with this laser — maybe blasting apart a CCD camera?

Continue reading “Tattoo-Removal Laser Brought Out Of Retirement For A Megawatt Of Fun”

Magnetic Gearbox, Part 2: Axial Flux Improves Performance

The number of interesting and innovative mechanisms that 3D printing has enabled always fascinates us, and it’s always a treat when one of them shows up in our feeds. This axial flux magnetic gearbox is a great example of such a mechanism, and one that really makes you think about possible applications.

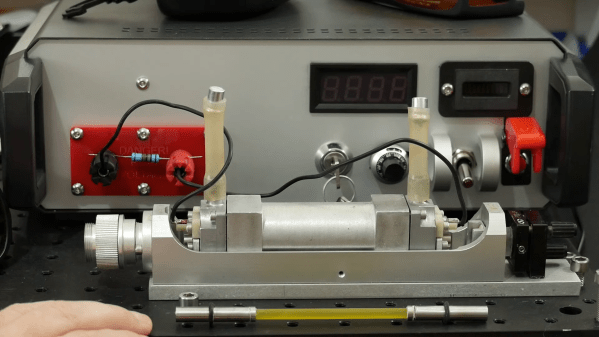
The principles of [Retsetman]’s gearbox are simple for anyone who has ever played with a couple of magnets to understand, since it relies on that powerful attractive and repulsive force you feel when magnets get close to each other. Unlike his previous radial flux gearbox, which used a pair of magnet-studded cylindrical rotors nested one inside the other, this design has a pair of disc-shaped printed rotors that face each other on aligned shafts. Each rotor has slots for sixteen neodymium magnets, which are glued into the slots in specific arrangements of polarity — every other magnet for the low-speed rotor, and groups of four on the high-speed rotor. Between the two rotors is a fixed flux modulator, a stator with ten ferromagnetic inserts screwed into it.

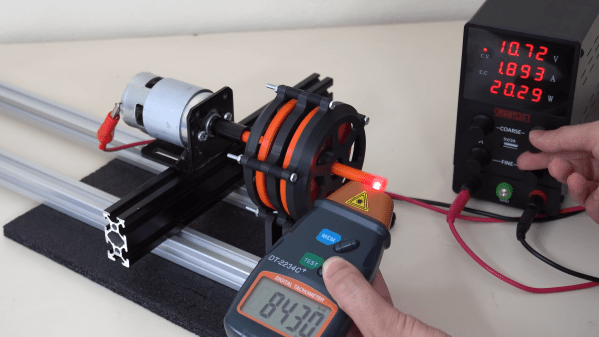
In operation, which the video below demonstrates nicely, the magnetic flux is coupled between the rotors by the steel inserts in the stator so that when one rotor moves, the other moves at a 4:1 (or 1:4) ratio in the opposite direction. [Retsetman] got the gearbox cranked up to about 8,500 RPM briefly, but found that extended operation at as little as 4,000 RPM invited disaster not due to eddy current heating of the inserts or magnets as one might expect, but from simple frictional heating of the rotor bearings.

Torque tests of the original gearbox were unimpressive, but [Retsetman]’s experiments with both laminated stator inserts and more powerful magnets really boosted the output — up to a 250% improvement! We’d also like to see what effect a Hallbach array would have on performance, although we suspect that the proper ratios between the two rotors might be difficult to achieve.

Continue reading “Magnetic Gearbox, Part 2: Axial Flux Improves Performance”

Hall Sensors Offer Drop-In Replacement For Drifting Game Console Joysticks

No bananas were harmed in the making of this Hall effect drift-proof joystick replacement. OK, not really — two bananas were turned to mush. But it’s OK, they’re just bananas, after all.

Why bananas, you ask? Because [Marius Heier] uses them to demonstrate what we all intuitively know — that rubbing something over and over again tends to wear it away — but engineers seem to have forgotten. Wear such as this, with resistance material rather than fruits, is what causes the dreaded drift, a problem that the world collectively spends $20 billion a year dealing with, according to [Marius].

While numbers like that seem to be firmly in class-action lawsuit territory, sometimes it’s best to take matters into your own hands and not wait for the courts. The fix [Marius] shows here is to yank the potentiometers off a PS4 joystick and replace them with contactless Hall effect sensors. The end of the shaft for each axis gets a diametral neodymium magnet attached to it, while a 3D printed bracket holds a tiny custom PCB in close proximity. The PCB has an AS5600 Hall sensor, which translates the shaft angle to an analog voltage output. After programming the chip over its I2C bus, the sensor outputs a voltage proportional to the angle of each shaft, just like the original pots, but without all the wear and tear.

While [Marius] is selling these as drop-in replacements for PS4 controllers, he plans to release all the design files so you can build one yourself. He also has his sights set on replacements for PS5 and Xbox controllers, so watch for those. This isn’t his first foray into joystick hacking, having shared his 3D Hall effect and haptic feedback joysticks with us previously.

Continue reading “Hall Sensors Offer Drop-In Replacement For Drifting Game Console Joysticks”

Exploring The Hall Effect For Haptic Feedback PS4 Joysticks

Modern gaming console controllers aren’t without their annoyances — Joy-Con drift, anyone? The problems might stem from design deficiencies, but we suspect that user enthusiasm and the mechanical stress it can introduce might play a significant role as well. Either way, [Marius Heier] decided to take a look at what would be required to build a better joystick and came up with some interesting results.

The first video below lays the basic groundwork, with a bunch of experiments with 3-axis Hall effect sensors, specifically the Texas Instruments TMAG5273 and TMAG5170. They’re essentially the same sensor with different interfaces — SPI for the 5170 and I2C for the 5273. Using just one of these sensors, he was able to build a joystick with the usual X- and Y- axis control, but also with a rotary axis. What’s more, he built a motorized version using two NEMA 17 steppers to mechanically drive the stick back to center.

The joystick is bulky, but it looks like he’s got plans for a much smaller one with [Carl Bugeja]-style PCB motors that should fit into a PS4 controller. That’s the subject of the second video below, which uses a different Hall sensor — an Allegro A1304 — and is mainly concerned with getting the output of a non-motorized but considerably miniaturized joystick stick talking the language that the controller expects. It’s not a simple process, but it seems to be coming along nicely, and we’ll be watching progress closely.

Continue reading “Exploring The Hall Effect For Haptic Feedback PS4 Joysticks”

Clever Mechanism Makes A Linear Control From A Rotary Hall Sensor

Every once in a while we stumble across something so simple yet so clever that we just have to call it out. This custom linear Hall effect sensor is a perfect example of this.

By way of backstory, [Nixieguy], aka [The Electronic Mercenary], offers up a relatable tale — in the market for suitable hardware to make the game Star Citizen more enjoyable, and finding the current commercial joystick offerings somewhat wanting, he decided to roll his own controllers. This resulted in the need for a linear sensor 100 mm in length, the specs for which — absolute sensing, no brushes or encoders, easily sourced parts — precluded most of the available commercial options, like linear pots. What to do?

The solution [Nixieguy] settled on was to use a Hall effect sensor and a diametrally magnetized neodymium ring magnet. The magnet is rotated through 180 degrees by a twisted aluminum bar, which is supported in a frame by bearings. A low-friction slider with a slot captures the bar; moving the slider along the length of the control rotates the bar, which rotates the magnet, which allows the Hall sensor to measure the angle of the magnetic field. Genius!

The parts for the prototype sensor are all made from 0.8-mm aluminum sheet stock and bent to shape. The video below shows the action better than words can describe it, and judging by the oscilloscope trace, the output of the sensor is pretty smooth. There’s clearly a long way to go to tighten things up, but the basic mechanism looks like a clear win to us.

Hats off to [Nixieguy] for this one, which we’ll surely be following for more developments. In the meantime, if you need to brush up on the Hall effect, [Al Williams] did a nice piece on that a while back.

Continue reading “Clever Mechanism Makes A Linear Control From A Rotary Hall Sensor”

Fifteen Flat CRTs And A Bunch Of Magnets Make For Interactive Fun

If you were a curious child growing up when TVs were universally equipped with cathode ray tubes, chances are good that you discovered the effect a magnet can have on a beam of electrons. Watching the picture on the family TV warp and twist like a funhouse mirror was good clean fun, or at least it was right up to the point where you permanently damaged a color CRT by warping the shadow mask with a particularly powerful speaker magnet — ask us how we know.

To bring this experience to a generation who may never have seen a CRT display in their lives, [Niklas Roy] developed “Deflektron”, an interactive display for a science museum in Switzerland. The CRTs that [Niklas] chose for the exhibit were the flat-ish monochrome tubes that were used in video doorbell systems in the late 2000s, like the one [Bitluni] used for his CRT Game Boy. After locating fifteen of these things — probably the biggest hack here — they were stripped out of their cases and mounted into custom modules. The modules were then mounted into a console that looks a little like an 80s synthesizer.

In use, each monitor displays video from a camera mounted to the module. Users then get to use a selection of tethered neodymium magnets to warp and distort their faces on the screen. [Niklas] put a lot of thought into both the interactivity of the exhibit, plus the practical realities of a public installation, which will likely take quite a beating. He’s no stranger to such public displays, of course — you might remember his interactive public fountain, or this cyborg baby in a window.

Continue reading “Fifteen Flat CRTs And A Bunch Of Magnets Make For Interactive Fun”

Faceless Clock Makes You Think Twice About How It Works

We love projects that make you do a double-take when you first see them. It’s always fun to think you see one thing, but then slowly realize everything is not quite what you expected. And this faceless analog clock is very much one of those projects.

When we first saw [Shinsaku Hiura]’s “Hollow Clock 4,” we assumed the trick to making it look like the hands were floating in space would rely on the judicious use of clear acrylic. But no, this clock is truly faceless — you could easily stick a finger from front to back. The illusion is achieved by connecting the minute hand to the rim of the clock, and rotating the whole outer circumference through a compact 3D printed gear train. It’s a very clever mechanism, and it’s clear that it took a lot of work to optimize everything so that the whole look of the clock is sleek and modern.

But what about the hour hand? That’s just connected to the end of the minute hand at the center of the clock’s virtual face, so how does that work? As it is with most things that appear to be magical, the answer is magnets. The outer rim of the clock actually has another ring, this one containing a pair of neodymium magnets. They attract another magnet located in the very end of the hour hand, dragging it along as the hour ring rotates. The video below shows off the secrets, and it gives you some idea of how much work went into this clock.

We’re used to seeing unique and fun timepieces and other gadgets from [Shinsaku Hiura] — this up-flipping clock comes to mind, as does this custom RPN calculator — but this project is clearly a step beyond.

Continue reading “Faceless Clock Makes You Think Twice About How It Works”