DIY Ribbon Element Upgrades A Studio Microphone

For those with some experience with pro audio, the term “ribbon microphone” tends to conjure up an image of one of those big, chunky mics from the Golden Age of radio, the kind adorned with the station’s callsign and crooned into by the latest heartthrob dreamboat singer. This DIY ribbon mic is none of those things, but it’s still really cool.

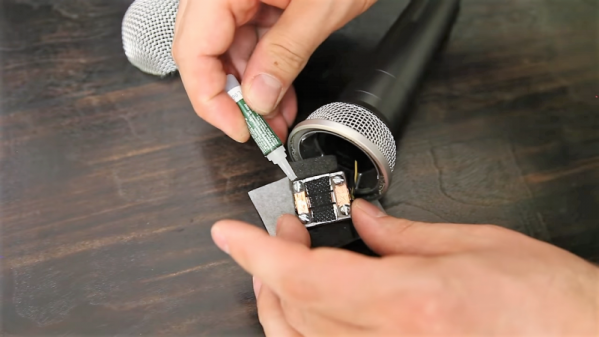
Of course the ribbon mic isn’t always huge, and the technology behind it is far from obsolete. [Frank Olsen]’s ribbon mic starts out with gutting a run-of-the-mill studio mic of its element, leaving only the body and connector behind. The element that he constructs, mostly from small scraps of aluminum and blocks of acrylic, looks very much like the ribbon element in commercial mics: a pair of magnets with a thin, corrugated strip of foil suspended between them. The foil was corrugated by passing it through a jig that [Frank] built, which is a neat tool, but he says that a paper crimper used for crafting would work too. There’s some pretty fussy work behind the cartridge build, but everything went together and fit nicely in the old mic body. The video below was narrated using the mic, so we know it works.

Fun fact: the ribbon microphone was invented by Walter Schottky. That Walter Schottky. Need more on how these mics work? Our colleague [Al Williams] has you covered with this article on the basics.

Continue reading “DIY Ribbon Element Upgrades A Studio Microphone”

Superheterodyne Radios Explained

The general public thinks there is one thing called a radio. Sure, they know there are radios that pick up different channels, but other than that, one radio is pretty much like the other. But if you are involved in electronics, you probably know there are lots of ways a radio can work internally. A crystal set is very different from an FM stereo, and that’s different still from a communications receiver. We’d say there are several common architectures for receivers and one of the most common is the superheterodyne. But what does that mean exactly? [Technology Connection] has a casual explanation video that discusses how a superhet works and why it is important. You can see the video, below.

Engineering has always been about building on abstractions. This is especially true now when you can get an IC or module that does most of what you want it to do. But even without those, you would hardly start an electronics project by mining copper wire, refining it, and drawing your own wire. You probably don’t make many of your own resistors and capacitors, neither do you start your design at the fundamental electronic equations. But there’s one abstraction we often forget about: architecture. If you are designing a receiver, you probably don’t try to solve the problem of radio reception; instead you pick an architecture that is proven and design to that.

Continue reading “Superheterodyne Radios Explained”

Custom Mini 4WD Runs On Steam

Tamiya’s Mini 4WD toy line primarily consists of small 1:32 scale toy cars powered by AA batteries, which have no remote control and are guided around a plastic track by horizontally oriented drive guide wheels. Tuning and racing these cars is popular in many parts of the world, but this build is a little different.

After initial experiments with a modified Tamiya chassis are unsuccessful, a fresh build using a bespoke aluminium chassis is begun. A sturdy boiler is created, feeding into a piston which is used to drive all four wheels through a series of driveshafts.

It’s interesting to watch the iterative design process solve various problems such as piston wear and gearing. Performance is underwhelming for those used to the immense speed of the electric toys, but we’d love to see a competition series using steam powered racers.

We don’t see a whole lot of steam hacks around here, but the Hudspith steam bicycle is something to marvel at. Video after the break.

Continue reading “Custom Mini 4WD Runs On Steam”

Wooden Clock To FPGA Conversion

[John] wanted a project to help him learn more about FPGAs. So he started with his wooden clock — made with an Arduino — and ported it over to a Lattice FPGA using Icestorm. What’s nice is that he takes you through the steps he used to simulate the design using the Falsted simulator and then realizing it in the FPGA. Since he’s just starting out, it is a good bet he ran into the same rough edges you will (or did) and sometimes that can really help get you over the hump. You can see a video below, and the code for the project is on GitHub.

For example, after mocking up a circuit design in Falstad he realized he could make one large counter instead of several modules, and he contrasts that to a more modular approach. He also ran into a feature that was simple for the Arduino but difficult for the FPGA. He got it working, but it took some optimization effort to make everything fit in the relatively small FPGA he was using.

Continue reading “Wooden Clock To FPGA Conversion”

A Page-Turner On Kindle – One Step At A Time

You don’t have to be an avid bookworm to find use for an e-book reader. Take your local wedding band for example: with a big repertoire of songs to cover, you don’t really want to drag huge folders full of chords and lyrics around, tediously browsing through them to find the correct one for every new song. Even the biggest tree corpse enthusiast cannot deny the comfort of an e-book reader here. And since turning the page boils down to simply changing the content on a display, you don’t necessarily need to use your hands for that either. With that in mind, [mosivers] built a WiFi foot switch for his musician brother’s Kindle to flip backwards and forwards through the pages.

After jailbreaking the Kindle and installing busybox, [mosivers] set up a web server to serve two CGI scripts that write the previously recorded input events for forward and backward flipping respectively to /dev/input/event0, essentially simulating a touch screen press that way. The foot switch, as counterpart, houses a battery-powered ESP8266, acting as access point for the Kindle to connect to, and requesting those page flipping CGI scripts whenever one of its two buttons is pressed.

If you don’t like the idea of jailbreaking your device in order to change the pages without using your hands, you could of course consider combining a more mechanical solution with the foot switch concept. And in case you want to see more of [mosivers], have a look at his DIY talk box project we’ve covered earlier.

Fail Of The Week: EPROMs, Rats’ Nests, Tanning Lamps, And Cardboard On Fire

It all started when I bought a late-1990s synthesizer that needed a firmware upgrade. One could simply pull the ROM chip, ship it off to Yamaha for a free replacement, and swap in the new one — in 2003. Lacking a time machine, a sensible option is to buy a pre-programmed aftermarket EPROM on eBay for $10, and if you just want a single pre-flashed EPROM that’s probably the right way to go. But I wanted an adventure.

Spoiler alert: I did manage to flash a few EPROMs and the RM1X is happily running OS 1.13 and pumping out the jams. That’s not the adventure. The adventure is trying to erase UV-erasable EPROMS.

And that’s how I ended up with a small cardboard fire and a scorched tanning lamp, and why I bought a $5 LED, and why I left EPROMs out in the sun for four days. And why, in the end, I gave up and ordered a $15 EPROM eraser from China. Along the way, I learned a ton about old-school UV-erasable EPROMs, and now I have a stack of obsolete silicon that’s looking for a new project like a hammer looks for a nail — just as soon as that UV eraser arrives in the mail.

Continue reading “Fail Of The Week: EPROMs, Rats’ Nests, Tanning Lamps, And Cardboard On Fire”

1973: When Calculators Were Built Like Computers

Should you ever pick up [Steve Wozniak]’s autobiography, you will learn that in the early 1970s when his friend [Steve Jobs] was working for Atari, [Woz] was designing calculators for Hewlett Packard. It seems scarcely believable today, but he describes his excitement at the prospects for the calculator business, admitting that he almost missed out on the emerging microcomputer scene that would make him famous. Calculators in the very early 1970s were genuinely exciting, and were expensive and desirable consumer items.

[Amen] has a calculator from that period, a Prinztronic Micro, and he’s subjected it to an interesting teardown. Inside he finds an unusual modular design, with keyboard, processor, and display all having their own PCBs. Construction is typical of the period, with all through hole components, and PCBs that look hand laid rather than made using a CAD package. The chipset is a Toshiba one, with three devices covering logic, display driver and clock.

The Prinztronic is an interesting device in itself, being a rebadged 1972 Sharp model under a house brand name for the British retailer Dixons, and that Toshiba chipset is special because it is the first CMOS design to market. It was one of many very similar basic calculators on the market at the time, but at the equivalent of over 100 dollars in today’s money it would still have been a significant purchase.

Long-tern Hackaday readers will remember we’ve shown you at least one classic calculator rebuild in the past, the venerable 1975 Sinclair!