
Open-Source Extruded Profile systems are a mature breed these days. With Openbuilds, Makerslide, and Openbeam, we’ve got plenty of systems to choose from; and Amazon and Alibaba are coming in strong with lots of generic interchangeable parts. These open-source framing systems have borrowed tricks from some decades-old industry players like Rexroth and 80/20. But from all they’ve gleaned, there’s still one trick they haven’t snagged yet: affordable springloaded T-nuts.
I’ve discussed a few tricks when working with these systems before, and Roger Cheng came up with a 3D printed technique for working with T-nuts. But today I’ll take another step and show you how to make our own springs for VSlot rail nuts.
Why Springload in the First Place?
For anyone playing extrusion hot-potato in a multi-person build a-la Lasersaur, springloaded T-Nuts are a wonderful convenience. When springloaded, these otherwise normal T-nuts stick in place rather than slide down the slot, making the building process more manageable with less parts to track simultaneously. We just set and forget!
Don’t get me wrong. Springloaded T-nuts already exist for us hobbyists using maker-style extrusions. But they’re pricey, as in more-than-a-dollar-a-pop pricey. Alternatively, we have the more popular “afterthought nuts,” commonly known as “Drop-In” style T-nuts. We can conveniently add these nuts even after we’ve closed off access to the slides with other nuts. But anyone who’s done that a few dozen times knows two things. First, orienting a panel full of these nuts can be cumbersome, and second: drop-in T-nuts don’t always seat properly when tightened, leaving them catching nothing and utterly useless.
In short, springloading the vanilla T-nut with our own springs is the cheapest bet for reliable assembly that guarantees that our nuts stay fixed during assembly, if you can sacrifice an hour to make the springs.
Ok; enough with the chit-chat. Let’s start making springs!
Springmaking Ingredients:
For this build, you’ll need:
- 1x M6 threaded rod with 1mm pitch or a 30+mm M6 screw of any type
- 1x hand drill
- 1x set of needle-nose pliers (normal-nose pliers work too.)
- 1x set of hard wire cutters (such as McMaster-Carr PN: 59445A45)
- 1x spool of 0.016-in. stainless steel wire (McMaster-Carr PN: 949K59)
- 1x safety glasses per pair of eyeballs
I’ll make two forewarnings.
First, this stainless wire is fairly thin stuff. I’m sure you can substitute other wire types, but if you use anything thicker you must wear gloves. The wire I chose happens to be thin enough that it’s fairly friendly to form without the risk of drawing blood.
Second, this stainless wire is also much harder than copper hookup wire. In fact, it’ll gladly nom your electronics wire cutters if you let them get too close to each other. I know it’s tempting, but make sure you use wire cutters that can handle hard wire, and, for heaven’s sake, don’t put this stuff anywhere near your teeth!
Spring-Making
Heads-up: plop on some eye-protection before marching into these instructions in real life!
Wire Prep
To prevent the wire from popping out of the drill chuck, we need to fatten up the tip. With pliers, curl away the end into a small lump like shown.


From here, put a right-angle bend about 16mm (0.629in.) down the length. This bent piece will serve as our “key” for loading into the chuck. Now, unspool about 450mm (1.5ft) of wire and chop it off with your hard wire cutters.
Spring-Winding
Now, let’s prep the tool. Load a small portion of your M6 threaded rod (or really long screw) into your hand drill’s chuck. Here I’m using a 40mm, M6 set screw with 5 threads-worth inserted in the chuck.
If your drill has a low-speed mode, set it now. This next part is counter-intuitive: set your drill to the unscrew setting (aka: counterclockwise), which will make the wire climb the screw thread. From there, load the bent tip of the wire into the free space between the drill chuck teeth like shown.


Slowly engage the drill trigger and let the wire collect on the screw. Rest your left-hand index finger on the wire such that it rests on a screw groove and slowly spool up the wire with the drill trigger.
As it spools, keep your thumb away from resting directly on the wire. It’s tempting to rest our thumb on top of the wire and close to the screw, but it’s a pinch point.
As you continue spooling do not spool up the whole wire length. It’s easy to lose control and have it whip your fingers. Larger wires would be sure to cut your hand, but this one would still leave a nasty sting.
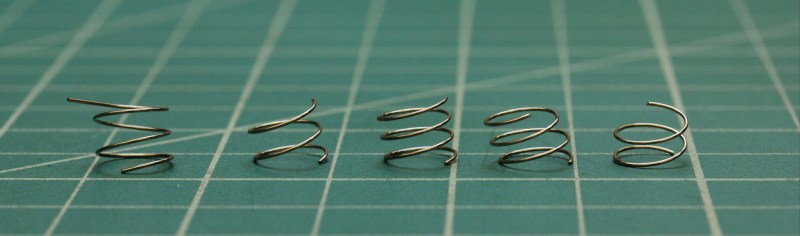
Instead, stop spooling with about 30mm (1.2in) of loose wire left. From there, remove your spooling hand, and the wire should uncoil itself with no pain to those precious fingers. Ta-daa! Your first spring has come to life.
Spring Grooming:
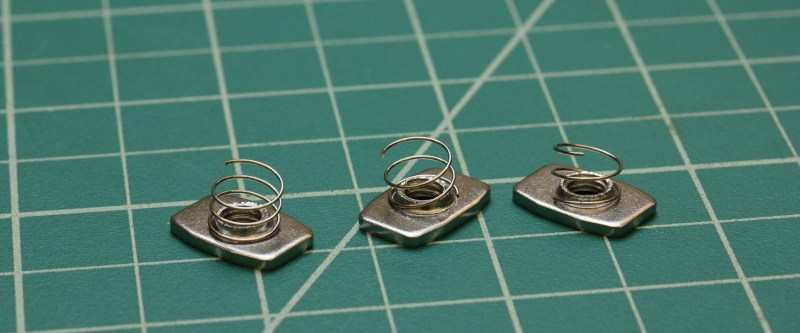
Note: Notice how our spring tends to expand after we finish winding it? I’ve tried a few different screw types and finally landed on M6, which leaves the spring expanding to a size that just perfectly fits over the bottom of a classic VSlot T-nut.
At this point, our spring is a bit squished, so give it a stretch to give our spring about a 2mm pitch. I begrudgingly put a number on this step because I do this part by feel, and I’d encourage you to do the same. The stainless steel has such a weak spring constant that tolerances on this step are very forgiving.
Finally, give that spring a haircut. With your hard wire cutters, cut down smaller springs that have about 3 wraps apiece. Again, tolerances in this step are also forgiving. If your spring has between 2.5 and 3.5 wraps, it’ll work. Remember: the whole idea behind these pieces is to save time later, not spend time now, right?
Installation:
Finally, we’ve made it to that glorious moment! Load a spring on the back of your T-nut, slide it victoriously into position, and simply beam with exultation. And, perhaps, post to the internet. Tag appropriately. Call mom.
Conclusion
This process may be a bit time-consuming, but I find it rather therapeutic when I’m supposed to be writing research papers. And for all the times where I have extrusions mounted vertically, these springs are a huge win.


The same technique works for 1/4″ spring wire, but the spool of wire sits where the spool of wire wants to sit.
https://youtu.be/thtDRjgbxRE
Don’t be tempted to try heat-treatment. Small diameter spring wire gets it’s properties from work-hardening during cold drawing, not from heat-treatment. (Developing improved spring steel formulations was one of two consecutive research projects where I used Erbium.)
Good to know! I was about to link to this explanation for how to do heat treating for springs, but it’s good to know it wouldn’t help. (I’m linking anyway for an alternate method of winding the springs for anyone who has access to a lathe. Plus there is information on making extension springs in addition to compression springs.)
Is there a point at which heat treatment starts to matter? A certain wire diameter? Or extension vs. compression springs?
He is stress relieving, that is OK and as he says, might help with fatigue life etc.
The heat-treatment I was talking about is hardening (heating red hot and quenching). That will not help the properties at all.
I think that the cross-over between cold-drawn and heat-treated springs is at the point that cold-forming is just too difficult. Vehicle suspension springs (leaf and coil) for example seem to be hot-formed then heat treated.
Spring-steel for heat-treatment is very different from music-wire, which is typically just a plain carbon (0.8%) steel.
Be careful! A drill and thin gauge steel wire can cause serious injury in a heartbeat. Would be good to keep fingers far away from the wire while winding it, thin wire under tension next to a rotating rod is a recipe for slicing through flesh and having the bone wrapped to a spinning lathe followed by having the bone twisted off at the joint. Owie!
yes rotating machines are nasty, but its obvious its a hand drill, you would be amazed how fast one can cut the power while the latching relay (ie finger) is attached to the operators pain sensors
If you have need to make a lot of these, here’s a modified method that will allow you to make significantly more in a shorter time frame.
Take two 6″ lengths of 2×4, clamp them together and drill an 8mm hole about 1″ from an end, centered on the width
Attach the two 6″ lengths of 2×4 to the ends of an 18″ piece of 2×4
Secure the jig you just made to any sturdy surface you have handy at a comfortable working height
Drill a hole large enough for your spring wire to pass through about 4″ from one end of a 24″ length of 6mm rod
Chuck the end of the 6mm rod in your drill and pass it through the holes in the 2x4s
Insert the spring wire into the hole in the rod, which should be just on the inside of the drill end of the jig
Now you can wind a 16″ or so long spring coil, and cut it down into whatever size springs you need
It’s helpful to put the spool of wire on a spool holder as well so it unrolls nicely as you wind the coil
And please, for the love of god, follow all of the safety precautions in the article. Heavier wire especially can do some
serious damage to you if it gets loose!
I used a similar jig to run off 1000′ of galvanized fencing wire into 1/2″ ID coils to then cut down for chain mail rings. Took about an hour to wind it all up :)
I like the spring loaded ball versions better. the advantage is that the thread is longer so more force can be applied without stripping the thread (happened to me a few times) and they stay put in the slot while also staying together when you remove them. And you can drop them in the middle of the slot.
https://images-na.ssl-images-amazon.com/images/I/41QwoAiCu7L._SX342_.jpg
This is the correct answer
to what question?
I’m cheap so I made mine out of regular nuts an a printed a carrier
A simpler, practical and free alternative is to use a small ball of adhesive rubber (the one used to attach postcards to the wall) to immobilize ordinary T-Slots nuts.
It is easy to adjust the position of the nut, and to remove the adhesive rubber when it is no longer needed.
I mean adhesive gum…
In English it’s “Blu-Tack”. Dunno about other countries, just look up Blu-Tack and you’ll see the stuff. I’m sure we all knew what you meant though, the stuff to stick posters to walls.
*British* English. In America, we hardly know anything about Blu-Tack, unless we happen to watch a lot of British TV.
Oddly enough, Walmart used to sell it, but no longer. I guess no one knew what it was? Then again, makes you wonder how we stick up our posters? Tape, pins, staples… I just realized we’re a bunch of heathens. :D
I have a question regarding the language in the first paragraph: What makes an aluminum extrusion open-source? I know 80/20 publishes their dimensions and there’s nothing different (to my knowledge) in the manufacturing of the aluminum sold by either company other than I would guess the “open” ones have lower quality raw materials. Is it just having “Open” or “Maker” in the name? I’m legitimately curious but I also have a pet peeve of people throwing around words like “Open”, “Maker”, etc. just because they’re trendy.
Nothing makes it open.
It’s a past kickstarter that only leads to a defunct web page. Where some people slapped ‘open’ & ‘rail’ to describe anodized plates that let you put V wheels on normal T-track or Makerslide(tm) extrusions. It seems their initial site might have been replaced with an online store.
They are open in that you could have a company that makes aluminum extrusions produce them for you. If you wanted to have a production run of OpenBeam or MakerBeam nothing is legal stopping you. It’s probably still better/cheaper to acquire OpenBeam and MakerBeam through their markets at this point for “economy of scale” and time, since any new producer would need to make or obtain the dies before starting production.
I assume the 80/20 profiles are only available through 80/20 and its licensees, anybody producing 80/20 profiles outside of that would be subject to a lawsuit.
I wonder if you could use a bit of foam to provide the necessary springiness? I have an 8-year old boy, which means I’m never more than 3 feet from a nerf bullet. perhaps a slice of nerf bullet foam would fit? If not, maybe rubber/pvc tube?
Good idea. Foam ear-plugs ought to work too.
I have made something similar using “weld nuts” which are simply punched pieces of steel with a threaded hole in them and foam rubber with adhesive on one side. Simply cut the foam to the same length as the weld nut and stick them together. They stay in vertically and can be inserted into the rail as well too. YMMV with different size rail, just find the correct size weld nut. Also very cheap, Mcmaster part #’s:
98001A125
8694K13
>making the building process more manageable with less parts to track simultaneously. We just set and forget!
Fewer parts.
less (adjective)
6. fewer
https://www.dictionary.com/browse/less
But more generally, you can’t claim it is a mistake unless you claim to have never heard of it before; once you know people sometimes say it that way, you already know it is one of the meanings of the word. ;) It is how words work.
Perhaps you are applying your own hypercorrection to what most people would find as completely acceptable grammar?
‘if you can make it plural and use a numeral in front of it (five eggs), then it’s a count noun and it takes fewer.”.. from http://www.arrantpedantry.com/tag/fewer/
Also see:
https://en.m.wikipedia.org/wiki/Fewer_versus_less
I just use the regular drop-in type and small magnet to position it. Works great. I can even rotate it before attaching the screw.