Thermal cameras are one of those tools that we all want, but just can’t justify actually buying. You don’t really know what you would do with one, and when even the cheap ones are a couple hundred dollars, it’s a bit out of the impulse buy territory. So you just keeping waiting and hoping that eventually they’ll drop to the price that you can actually own one yourself.
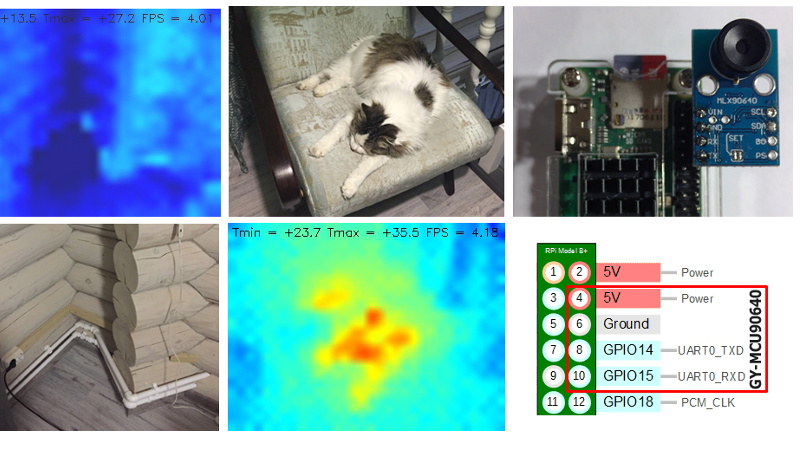
 Well, today might be the day you were waiting for. While it might not be the prettiest build, we think you’ll agree it can’t get much easier than what [vvkuryshev] has put together. His build only has two components: a Raspberry Pi and a thermal camera module he picked up online for about $80 USD. There isn’t even any wiring involved, the camera fits right on the Pi’s GPIO header.
Of course, you probably wouldn’t be seeing this on Hackaday if all he had to do was just buy a module and solder it to the Pi’s header. As with most cheap imported gadgets, the GY-MCU90640 module that [vvkuryshev] bought came with some crusty Windows software which wasn’t going to do him much good on the Raspberry Pi. But after going back and forth a bit with the seller, he was able to get some documentation for the device that put him on the right track to writing a Python script which got it working under Linux.
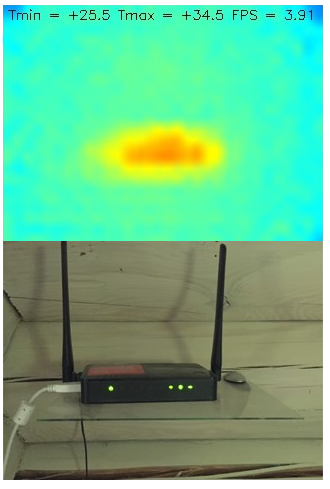
The surprisingly simple Python script reads a frame from the camera four times a second over serial and run it through OpenCV. It even adds some useful data like the minimum and maximum temperatures in the frame to the top of the image. Normally the script would output to the Pi’s primary display, but if you want to use it remotely, [vvkuryshev] says he’s had pretty good luck running it over VNC. In fact, he says that with a VNC application on your phone you could even use this setup on the go, though the setup is a bit awkward for that in its current incarnation.
This isn’t the first DIY thermal camera build we’ve seen, and it isn’t even the first one we’ve seen that leveraged a commercially available imaging module. But short of buying a turn-key camera, we don’t see how it could get any easier to add heat vision to your bag of tricks.


Can someone explain to me why these things are so expensive? A high resolution camera module for a Raspberry pi is worth £25 if you don’t shop around very much. The least I can find one of these things for locally is £95, or £65 from aliexpress.
Isn’t this just a camera module with a different sort of filter and only one set of sensors instead of three?
Thermal IR cameras measure IR way down in the long wave IR spectrum (8-14 um) while normal visible light camera sensors can only get up to ~1000nm — just a little beyond visible light. They’re totally different types of sensors.
Each pixel is a sort of insulated thermometer. The price is increased by them not being mass market consumer products. There are also export restrictions on higher resolution high frame rate cameras.
Afaik this only applies to the US. The russian ones we can buy in the EU (pulsar?) Have proper framerates
Do u have a link, please and thank you
Link for in the eu ?
IR modules that can see the signals from for example an IR diode on a remote control can be made essentially the way you describe since the wavelength of the light is quite similar to the visible light. These wavelengths are not very useful for figuring out the temperature of what you are looking at (unless the temperature is very high, e.g. almost glowing in the visible spectrum say). Thermal cameras requires much more exotic materials to be useful that we do not yet know how to make as cheaply as silicon based sensors.
It’s because there isn’t enough product moving in volume to catch a break from manufacturers of the key components. Prices have dropped sharply since the arrival of the Seek and Flir smartphone connected modules. How can the seller expect to sell a dinosaur model for 2-3x what the a comparable smartphone sensor goes for.
this should provide you with answers https://www.reddit.com/r/AskEngineers/comments/2fbc0m/why_is_flir_so_expensive/
Thanks all, interesting and informative answers.
I’m an infrared thermographer and an owner of the ridiculously expensive Flirs lol. The lenses of these camera are germanium, which in and of itself is more expensive. Infrared cameras cannot “see” through glass, so the lens has to be germanium. Also, flir made the first camera in 1965, and maybe two other companies (Fluke and now Ridgid) really make a comparable camera. Also, if you get technical, each ir camera has to be calibrated on black boxes for accurate readings, and these facilities are not available to just anyone. It’s definitely a process, plus the revenue generated with the cameras is substantial when compared with the cost of them, imo.
FYI, the lenses in the low cost bolometers are made of chalcogenide glass because it is much cheaper than germanium. Also, while they do need to have their gain calibrated against a blackbody, they have an internal calibration blackbody integrated in the camera module (it looks like a small shutter, but it is actually a blackbody for calibration) and self-calibrates every few seconds while in operation.
Hughes made them too IRCC. Lenses can be made of salt (NaCl), but they are a bit delicate. I think the classic Beckman IR spec uses a salt lens.
GaAs and Zinc Selenide are also pretty common lens materials.
A Gallium Arsenide based lens would be stupid expensive. I’d love to try out one compared to a proper Germanium lens.
They are not expensive these days. I paid $30 for a 2 inch focal length GaAs lens off AliExpress.
I don’t know what “proper” means in this context. GaAs has better transmission at thermal wavelengths. Germanium has better transmission close to 20um. If you want the best transmission you use NaCl, but it’s hygroscopic (obviously).
The specs on the 90640 are pretty good for a thermopile sensor (a 32×24 array of thermocouples behind a lens) and not having to wade through building the interface will save a good deal of time and sanity. Sparkfun and other sell similar units.
The bad news is that you’re not likely to get any kind of fine resolution that you might with microbolometer units like the FLIR Lepton, but it’s “good enough” for a whole lot of projects at a lower cost. The good news is that thermopiles aren’t nearly as touchy and delicate, so you could conceivably use them under much harsher conditions.
That’s a very nice price point for using it as a security camera.
Stand alone or addition to a visual sensor for verification.
32×24 and choice of FOV too.
Our I2C-based version, with C code to get higher frame rates (up to about 64fps) if you push the bus speed.
https://shop.pimoroni.com/products/mlx90640-thermal-camera-breakout
https://github.com/pimoroni/mlx90640-library
Why ditch the serial port ?
The serial port version has extra converter chip. The (cheaper) sensor itself has I2C interface.
Nice. I came to the comments exactly for this reason. I figured somebody would have a solution for higher framerates.
So, has the seller been swamped by the Slashdot effect?
B^)
So, it looks like it is attached to a Pi Zero, but I’m wondering if it would be better with a standoff to get the module further away from the Pi’s hot spots?
Has anyone used this module with some form of cooling (liquid, CO2, N2, ?) to increase sensitivity?
A quick G**gle turned up a $74 on Aliexpress
https://www.aliexpress.com/item/MLX90640-Camera-Module-IR-32-24-GY-MCU90640-Infrared-Thermometric-Dot-Matrix-Sensor-32×24-Sensor-Module/32962087015.html?spm=2114.10010108.1000014.4.2247a93c8HTGAT&gps-id=pcDetailBottomMoreOtherSeller&scm=1007.13338.106568.000000000000000&scm_id=1007.13338.106568.000000000000000&scm-url=1007.13338.106568.000000000000000&pvid=1528235b-e48e-4cd4-a5d6-08020a68d3fe
You can cut the URL down quite a bit: https://www.aliexpress.com/item/MLX90640-Camera-Module-IR-32-24-GY-MCU90640-Infrared-Thermometric-Dot-Matrix-Sensor-32×24-Sensor-Module/32962087015.html For most shopping sites, anything after the first ? can be dropped.
Thanks!
You can cut it down much more, to https://www.aliexpress.com/item/hackaday/32962087015.html (similarly on other websites of this type, on banggood you only need to preserve the p- part)
Why would I want to buy that module in China if the bare sensor costs $40-$50 at Mouser and Digikey?
The sensor has four easily solderable pins (GND, 3.3V, SDA, and SCL).
Mix this with a Pi Camera Module and some simple PIL image stuff and YCrCb mode and you can apply the tempature color onto the black and white image from the camera.
Something similar came to mind as I read this, I wonder if the Pi Zero could handle the extra processing (real time?)
Should easily be able to do edge-detection and overlay edges on the colorized frames. I think.
Yep, that’s how my setup works. Wide FOV MLX90640 and a wide FOV Pi camera module. I also have it running through an Intel NCS Movidius neural net for live object recognition. It’s a very very early build, still at the duct tape and zipties stage. Code is mostly cobbled together from examples so it’s only ~2 FPS for now.
https://i.imgur.com/RrnOiMO.jpg
https://i.imgur.com/eI7of7M.jpg
Er. Broken links. See:
https://i.imgur.com/eI7of7M.jpg?3
https://i.imgur.com/RrnOiMO.jpg?1
Hi, I’m need to interface MLX90640 with raspberry pi 3 and Noir picamera. Can you help me how you can do it?I need lt vert urgent…please thank you very much
You can get a diecent thermal camera on bangood for $200 – any serious maker needs to have one. I was an early adopter of the seek thermal unit, and it paid for itself in less time spent troubleshooting in about a week. I “found” a loose circuit breakr wire in my generator, bad caps in a TV power supply, and a place where the idiot contractor for my house felt the need to put the insulation in wrong. Do your self a favor, just as you need a soldering iron and a diecent scope, you need a thermal camera.
+1
I do what I want.
https://learn.adafruit.com/thermal-camera-with-display
The sensor in the camera is by Melexis company, it’s description and
datasheet is here:
https://www.melexis.com/en/product/MLX90640/Far-Infrared-Thermal-Sensor-Array
can i know what is the software using to access the GY-MCU90640
https://habrastorage.org/webt/ri/fo/pq/rifopqyhbfzldcrxujqgobydntm.jpeg
thank you.
Did you have any luck locating the software, I have a couple of these sensors I was wanting to test and have not been able to locate the PC Software. DIYMore who the modules were purchased thought dont seem to be responding to messages at all.