Yes, you can whip up a design for a printed circuit board, send it out to one of the many fab houses, and receive a finished, completed board in a week or two. There are quick-turn assembly houses that will manufacture a circuit board and populate it for you. But sometimes you need a board now, and that’s when we get into home PCB fabrication. You can do this with either etching or milling, but [Renzo] has a great solution. He built a 3D printed milling machine that will make a printed circuit board.
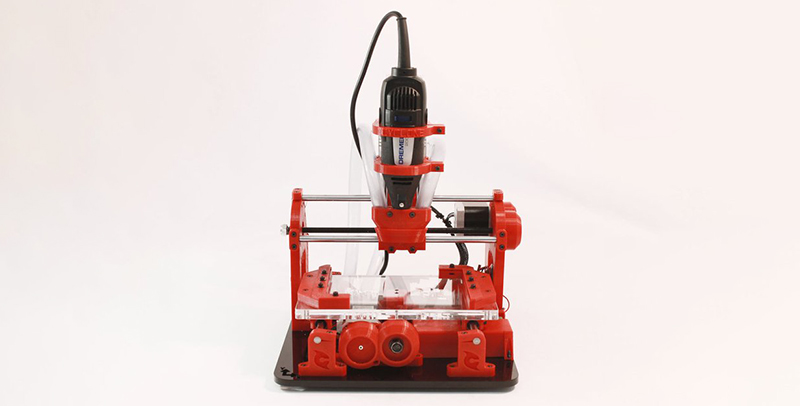
The design of this tiny micro mill is based on a handheld rotary tool, also called a Dremel, but that’s like Kleenex, so just buy a Proxxon. This mill is designed with 3D printed T-track and constructed with linear bearings on smooth rods with standard NEMA 17 stepper motors and herringbone gears for little to no backlash. There is quite a bit going on here, but lucky for us [Renzo] has a video tutorial of the entire build process available for viewing below.
We’ve previously seen some of [Renzo]’s previous efforts in homemade PCB fabrication, up to and including applying green soldermask with the help of Fritzing. This is good, very good, and the only thing that really separates this from manufactured PCBs is the lack of plated through holes. That’s just a bit of graphite and electroplating away, and we’re looking forward to [Renzo]’s further adventures in making PCBs at home.


Why would I buy a Proxxon when I already have a Foredom? :D
Why not use a LaserJet a clothes iron eaglecad and ferric chloride? You really don’t have to mill the traces. Start to finish in about an hour.
You’d have to buy acetone to remove the toner. Since 1 Feb 2019 you can’t buy it in EU without a gov. license for handling hazardous goods. Also, as few people from http://www.forbot.pl have discovered, buying “large quantities” (> 5L) of acetone is a guaranteed way to get an unfriendly visit from Internal Security Agency (ABW) as (at least in Poland) it’s considered a bomb-making material.
That’s… unfortunate. You can still get it by the gallon in metal cans at pretty much every home improvement store here in the States.
So… How are Europeans getting nail polish off? How do you classify a chemical made by the human body as a hazardous material? Is there some nefarious purpose you can put acetone to which warrants such control?
Polish remover in Poland is not popular ;)
Our ladies use Ethyl acetate instead.
It is used as a solvent when making drugs. Of course there are plenty of legitimate uses for acetone, so any smart criminal will find a way to get it without problems. One could just run a legit business that has a need for acetone, and part of it use for drug making purposes…
One guy I used to know, had a visit from Central Investigation Bureau (Centralne Biuro Śledcze – CBŚ) because he posted a YT video demonstrating burning of guncotton Because all of the “evidence” was destroyed in the process, they just confiscated his collection of rocks containing uranium ore. Just in case he was going to make an atomic bomb. Polish law is stupid…
Wow, I don’t even know what to think of that! That is one of the more useful chemicals that I keep by the gallon. Is it a terrorist thing, absurd but politicians are morons, or is it an environmental thing, equally absurd at the amounts that it community would use?
It’s still available in stores in Sweden, no restrictions for as far as I can see. https://www.biltema.se/bygg/farg/rengoringsmedel/aceton-2000030019 (~6€ for 1L)
Do you have any source for your statement?
Here, have this link. It’s a chemistry book that teaches how to make fundamental substances like bleach (electrolysis of salt water), hydrofluoric acid (from fluorspar and sulfuric acid), and acetone (heating wood in absence of air).
It is becoming a more and more useful resource these days.
An Elementary Study of Chemistry by William McPherson William and Edwards Henderson:
https://www.gutenberg.org/ebooks/20848
A scouring pad or even steel wool with some elbow grease works just fine removing the toner.
Wow, it’s opposite here.
I can’t buy ferric chloride anymore.
But I can buy the chemicals needed to make explosives like TATP easily.
Not that I do as it’s criminal here.
And as we all know, terrorists would never commit a crime.
I gave up on ferric chloride years ago. Messy stuff that needs to be heated. I switched over to the hydrochloric acid and peroxide mix. Much more effective and doesn’t need heating.
But chemicals aside I like the idea of a pcb router – send the file to the router and go and do something else while it prints out.
When etching it’s an hour of labour to complete the job than the clean up and store the chemicals..
Funny enough, here in Slovenia (also EU) I can easily buy acetone, HCl and Ferric Chloride, but when I asked about peroxide, I was told they couldn’t sell it to me, because it could be used to make bombs. So it seems like every country is different. (And I know I can get peroxide at a pharmacy, but for etching with HCl it’s not really needed so I didn’t bother)
Here is Acetone at Bauhaus Germany…. https://www.bauhaus.info/terpentinersatz-verduenner-loesemittel/aceton/p/23754696 if any country was going to follow EU regulations it would be Germany, since it’s freely purchasable there… I call baloney on your statement. You sure as heck don’t need 5L of acetone to wipe off some toner from a PCB.
Toner can be removed using a variety of paint thinners, paint removers, polish removers or just sandpaper if nothing else is available.
Source? I just bought 500ml of acetone without any problems (Germany). Maybe if you buy a few liters of it?
I know thay buying some chemicals has always been cumbersome in Poland but how come there are so many offers available at https://allegro.pl/listing?string=aceton%20techniczny ?
I have the same mill as above and can route a modest sized board in less than that. Maybe 10 mins setup, 15 – 20 mins for traces and under 10 mins for drill holes.
I can’t even consider a PCB method that doesn’t do vias.
I have a cheap Chinese Arduino board, a typical example of a small, simple PCB. It has 92 vias.
If you can’t do reliable vias that don’t require manual labor, then you are limited to boards that even low-level hobbyists will find too crude.
92 vias for an Arduino is a really crappy layout job.
I built the same Cyclone PCB Factory and it works quite well. Most of my boards use 0.1″ sized through-hole parts and tracks 1mm and up, but I can do features down to 0.5mm OKish. Personally I think there is a design flaw in the X-axis that introduces wiggle, if I modified that out I could get slightly better resolution.
I do recommend using a dedicated spindle motor rather than a dremel though, dremel is not really designed for low runout whereas the bearings in a decent spindle bearings are.
One of the awesome things is pairing the router up with software that does z-probing. On my router platform I have made a support with a deliberate hump/curve in it to keep the copper clad board stiff in the z-axis. I then run an automated electronic z-probe on a 1cm grid, and when it routes the traces the software adjust z-height on the fly. The cutting depth is only 0.2mm and it keeps that amasingly consistent.
Sure it cant do vias, but I find it great for fast turnaround of small run boards.
In a former melinium we used digits or solder old component leads for vias.
For those talking about vias: you can do these manually using copper rivets. Accepted, it’s a bit of a fiddle.
I’ve had success with this method using Ethernet wire (0.5mm) for use in my homemade 6″x 6″ board. 150 VIAs and another 223 THT. I processed the VIAs manually with a small hammer and anvil then soldered to protect against corrosion. Used 3D printed PCB registration mounts and left stuck to my 3D bed to register 2 sided correctly. CNC drill first, paint, isolate, etch, clean pads with 3d printer (make sure VIAs are not tented), process VIAs, do an e-test if paranoid, as rest of components and use.
My modded 3D printer (an i3 clone) used a Dremel only for CNC drilling, and spring loaded sharpened stainless rod for removal of paint for isolation and later for cleaning paint from all the pads for “solder mask”. I use blue layout spray fluid. Might help to quick dip the raw copper board before painting, would help the paint stick to the copper by lightly etching the surface.
Through holes are easy, just drill through and fill it up with solder.
https://youtu.be/dmm16oOhpKM
this ANT CNC that is specialized for PCB milling looks as a better option to me.
The single thing that improved my PCB milling the most was [these bits](https://www.ebay.com/itm/263885828282). They’re like the normal 10° engraving bits but with a bit cut out of the side. They eliminated copper burrs so completely that the first time I used them I thought initially that I was looking at a board that I’d finished earlier.
Source? I just bought 500ml of acetone without any problems (Germany). Maybe if you buy a few liters of it?
Rivits, not digits.