Building A Vibration Tumbler On The Cheap

There are few tasks quite as laborious as sanding and polishing. Any job that takes a lot of time and elbow grease is a prime candidate for mechanical help, and this one is no exception. At the suggestion of friends, [VegOilGuy] decided it was time to invest in a vibration tumbler. Naturally, building it rather than buying it was the order of the day.

If you’ve ever used an electric sander, you’ll know they’re an excellent source of vibration. Initially, the intention was to build a tumbler with the sander being removable and still usable for its original purpose. A clamping base was constructed with cable ties, wood, and Bondo, but sadly to no avail. The Velcro connection to the plastic tumbler bowl was simply not robust enough to hold up to repeated use.

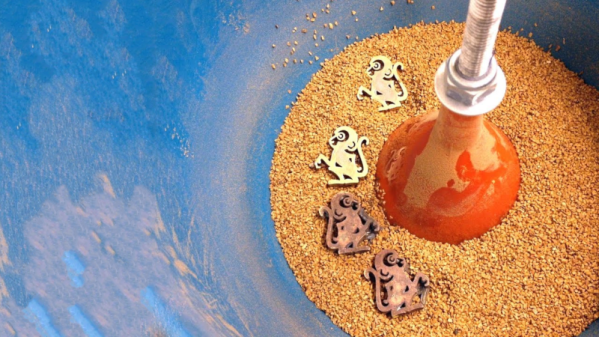
Instead, the sander was permanently bolted to the tumbler bowl, yielding more positive results. A funnel was then also added to the bowl, to improve media circulation and reduce the amount required. Initial tests were positive, with the tumbler successfully polishing some cast brass parts using crushed walnut shells. [VegOilGuy] is still looking for a more abrasive media to use for initial patina removal, however.

Sometimes the best tools are the ones you build yourself. In this case, it’s a cheap and easy way to get a vibration tumbler and the results are great. If sanders aren’t your speed, why not check out this fan based build instead? Video after the break.

Continue reading “Building A Vibration Tumbler On The Cheap”

We Were Really Overdue For Laser Jackets

Depending on who you talk to, everything is either fine, or we’re living in an oppressive cyberpunk dystopia in which we forgot to drench everything in colored neon lighting. There’s little to be done about the digital surveillance panopticon that stalks our every move, but as far as the aesthetic goes, [abetusk] is bringing the goods. The latest is a laser jacket, to give you that 2087 look in 2019.

The build starts with a leather jacket, which is festooned with 128 individual red laser diodes. These are ganged up in groups of 4, and controlled with 32 individual PWM channels using two PCA9685 controllers. An Arduino Nano acts as the brains of the operation, receiving input from a joystick and a microphone. This allows the user to control lighting effects and set the jacket to respond to sounds and music.

[abetusk] does a great job of conveying the tricks needed to successfully pull this off. The instructions should allow any curious maker to replicate the build at home, and code is available on Github to help run the show. There’s lots of detail on proper enclosures, connectors, and cabling techniques to avoid the wearer inadvertently pulling everything to bits when wearing the garment to the club. Remember, there’s nothing more punk than educating your friends.

It’s an eye-catching build that would be an excellent addition to any Neo-Chicago street gang wardrobe. It’s not the first time [abetusk] has graced these pages, either – there are electroluminescent looks, too. Video after the break.

Continue reading “We Were Really Overdue For Laser Jackets”

Fizzle Loop Synth Does It With 555 Timers

For every project that uses an Arduino to make soup or an ESP8266 to hash bitcoin, there’s always someone out there uttering the same old refrain. I could have done it with a 555. More often than not, this is true, even if it is tangential to the discussion being had. In this case however, such a statement is moot. [lonesoulsurfer] has built the Fizzle Loop Synth, featuring not one, but three triple-nickel timers.

It’s a build that delights in both presentation and performance. The hardware is elegantly slotted into a vintage metal flashlight case, which is absolutely covered in controls. It’s an aesthetic that gives us an irresistible urge to start twiddling knobs and flicking switches. Inside, two 555s are set up as basic flasher circuits, each feeding a vactrol – essentially a resistive optoisolater. Inside is an LED, which is optically coupled to a light-dependent resistor. The LEDs are flashed by the 555s, and this creates a varying resistance which is used to feed a third 555 which generates the tones.

The final result is a fun little noisebox that’s capable of generating quite the variety of bleeps, bloops and blops. There’s an onboard speaker for noodling on the go, as well as a line-out if you need to record your work on external hardware. It would be great fun to hear this circuit hooked up to a modular synth, too.

For a history lesson on the venerable 555, we’ve got you covered. Video after the break.

Continue reading “Fizzle Loop Synth Does It With 555 Timers”

Recreating Classic Model Kits With Modern Tech

It used to be that if you wanted to make a nice scale model of an airplane, you’d be building the frame out of thin balsa ribs and covering it all up with tissue paper. Which incidentally was more or less how they built most real airplanes prior to the 1930s, so it wasn’t completely unreasonable to do the same on a smaller scale. But once injection molded plastics caught on, wood and tissue model kits largely went the way of the dodo.

[Marius Taciuc] wanted to share that classic model building experience with his son, but rather than trying to hunt down balsa kits in 2019, he decided to recreate the concept with modern techniques. His model of the Supermarine Spitfire, the vanguard of the British RAF during the Second World War, recreates the look of those early model kits but substitutes 3D printed or laser cut components for the fragile balsa strips of yore. The materials might be high-tech, but as evidenced by the video after the break, building the thing is still just as time consuming as ever.

Using a laser cutter to produce the parts would be the fastest method to get your own kit put together (you could even cut the parts out of balsa in that case), but you’ll still need a 3D printer for some components such as the propeller and cowling. On the other hand, if you 3D print all the parts like [Marius] did, you can use a soldering iron to quickly and securely “weld” everything together. For anyone who might be wondering, despite the size of the final plane, all of the individual components have been sized so everything is printable on a fairly standard 200 x 200 mm print bed.

While there’s no question the finished product looks beautiful, some might be wondering if it’s really worth the considerable effort and time necessary to produce and assemble the dizzying number of components required. To that end, [Marius] says it’s more of a learning experience than anything. Sure he could have bought a simplified plastic Spitfire model and assembled it with his son in an afternoon, but would they have really learned anything about its real-world counterpart? By assembling the plane piece by piece, it gives them a chance to really examine the nuances of this legendary aircraft.

We don’t often see much from the modeling world here on Hackaday, but not for lack of interest. We’ve always been in awe of the lengths modelers will go to get that perfect scale look, from the incredible technology packed into tiny fighter planes to large scale reproductions of iconic engines. If you’ve got some awesome model making tips that you think the Hackaday readership might be interested in, don’t be shy.

Continue reading “Recreating Classic Model Kits With Modern Tech”

CNC Your Own PCBs With A 3D Printed Mill

Yes, you can whip up a design for a printed circuit board, send it out to one of the many fab houses, and receive a finished, completed board in a week or two. There are quick-turn assembly houses that will manufacture a circuit board and populate it for you. But sometimes you need a board now, and that’s when we get into home PCB fabrication. You can do this with either etching or milling, but [Renzo] has a great solution. He built a 3D printed milling machine that will make a printed circuit board.

The design of this tiny micro mill is based on a handheld rotary tool, also called a Dremel, but that’s like Kleenex, so just buy a Proxxon. This mill is designed with 3D printed T-track and constructed with linear bearings on smooth rods with standard NEMA 17 stepper motors and herringbone gears for little to no backlash. There is quite a bit going on here, but lucky for us [Renzo] has a video tutorial of the entire build process available for viewing below.

We’ve previously seen some of [Renzo]’s previous efforts in homemade PCB fabrication, up to and including applying green soldermask with the help of Fritzing. This is good, very good, and the only thing that really separates this from manufactured PCBs is the lack of plated through holes. That’s just a bit of graphite and electroplating away, and we’re looking forward to [Renzo]’s further adventures in making PCBs at home.

Continue reading “CNC Your Own PCBs With A 3D Printed Mill”

Cambridge Mini Uncon: Robots, Light Boxes, PCB Watches, And Retro Computers

At Hackaday, we are nothing without our community. We meet up at conferences, shows, and camps, but one of our favourite way to congregate is with the Unconference format. It’s an event where you can stand up and give an eight-minute talk about what is important to you, and what you are working on.

Thank you to the Cambridge Makespace for hosting our most recent a Mini Unconference. Let’s take a look at the excellent talks and demos that highlighted the day!

Continue reading “Cambridge Mini Uncon: Robots, Light Boxes, PCB Watches, And Retro Computers”

Hackaday Podcast 013: Naked Components, Shocking Power Supplies, Eye-Popping Clock, And Hackaday Prize

Editors Mike Szczys and Elliot Williams geek out about all things hackerdom. Did you catch all of our April Fools nods this week? Get the inside scoop on those, and also the inside scoop on parts that have been cut in half for our viewing pleasure. And don’t miss Mike’s interview with a chip broker in the Shenzhen Electronics markets.

We rap about the newly announced Hackaday Prize, a word clock to end all other word clocks, the delights of transformerless power supplies, and tricks of non-contact voltage testers. You’ll even find an ode to the App Note, as well as a time when electronics came in wooden cases. And who doesn’t love a Raspberry Pi that grinds for you on Nintendo Switch games?

Take a look at the links below if you want to follow along, and as always, tell us what you think about this episode in the comments!

Take a look at the links below if you want to follow along, and as always, tell us what you think about this episode in the comments!

Direct download (60 MB or so.)

Continue reading “Hackaday Podcast 013: Naked Components, Shocking Power Supplies, Eye-Popping Clock, And Hackaday Prize”