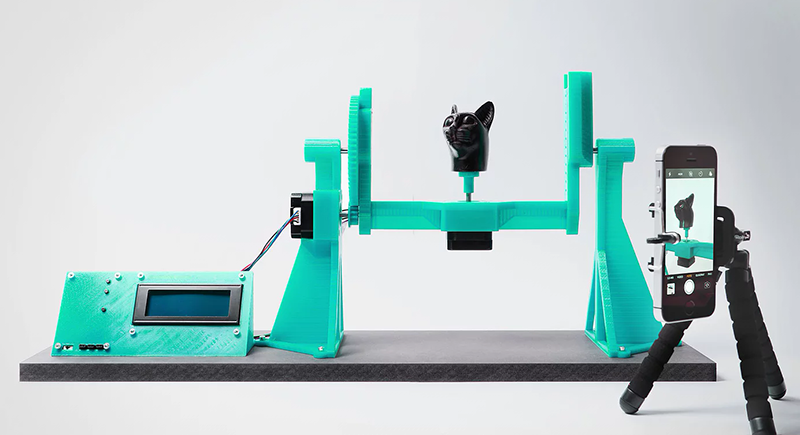
It seems 3D printers have been around for ages and still we don’t have a good solution for turning physical 3D objects into digital ones. Yes, 3D scanners exist, but the OpenScan is the best 3D scanner we’ve seen. It’s a 3D printed device meant to take pictures of an object that can then be used by photogrammetry software to construct a point cloud. From there, it’s just a matter of messing with meshes to create a 3D printed copy of anything you want.
The latest version of the scanner is an improvement over the previous version that kind of, sort of looked like the Machine from Contact. This was a gigantic hubless ring, with a smartphone attached to the rim. Put an object in the center, and the phone would rotate around the object in every axis, snapping pictures the entire time. Needless to say, a simpler design prevailed. That doesn’t mean the old version didn’t look awesome. The electronics are simply an Arduino clone, two stepper drivers, a character display for control and some headers for connections and power supplies. This is pretty normal stuff for the RepRap crew.
Running this machine is as simple as putting an object in the device and taking a few pictures. There is some support for remotely controlling some cameras, but everything is universal if you have a remote shutter release. This can be plugged into the electronics, and once everything is done you have a few dozen pictures of an object with optimal lighting conditions that can be thrown into your photogrammetry software of choice. (Ed note: at least one that doesn’t rely on the object remaining stationary with respect to the background to estimate camera position.)


my experience with photogrammetric scanner rigs has always been that i get inferior results to just moving the camera around the object. the rig i built just rotated the object and elevated and aimed the camera. added bonus that the whole thing was built from old skool technic lego and used 2 motors and an arduino. i often end up with multiple objects that are full of noise and dont combine well. i figured the background was as important as the foreground when crunching the data. i contemplated building the rig to emulate what i would do, rotate around the object while it stays static. but i havent gotten to building it yet.
[Pointless negativity]
[angry response]
needless to say the mk1 was less than successful. point is without a moving background, the results are less than spectacular.
Maybe I can clearup some of the misconceptions. You are partly right, when saying, that the background should stay in line with the object. BUT you can trick the software by using a uniform background without any features and thus you will be able to move the object relative to the background. See one example of pictures and a result here: https://www.instagram.com/p/BtqG4NToIMQ/
I have also made some picture sets available on the openscan website. If you have problems reconstructing your models, you might send me one or two of your pictures, as this is usually the main cause for errors/bad results…
i did try blanking out as much of the area i could with a bunch of old black tshirts. the joys of no budget hacking. i get a lot of instances where the scan couldn’t tell front from back. i scanned a little plastic cat and had parts of the tail and head at both ends. i printed out a reference grid ringed with a regular black white tile pattern with random colored tiles randomly inserted into it so that it would look different from different angles hopefully to help with feature matching, but that didnt really work either. i was trying to emulate the tile floor i did my first scan on. may have also been a scale issue because i was scanning a much smaller object.
@LordNothing I’ve you are interested, you could send me some of the pictures for diagnosis, usually the problem lies somewhere in the picture quality/features of the object –> info at openscan dot eu
There is a tiny bit more to photogrammetry than just moving a camera or an object. If you get noise in your scan, you definitely need to learn those additional bits.
i had very good results on my first try considering i was using a 12 year old digital camera, and not a great model. i get good results out of other manual scans as well. its when i try to automate the process that things go tango uniform.
One nice thing if you are using a Canon running CHDK or you can otherwise control your camera remotely/through a script is that you can take sixty shots of each pose if you want, then average all of them to reduce noise down to almost nothing. (Better yet is average X focus stack X exposure bracketing X desired number of final images, though if you are going to be taking a couple of thousand shots, you had either better have a *huge* memory card or some way to stream them, especially if you plan to use RAW images.)
“It seems 3D printers have been around for ages and still we don’t have a good solution for turning physical 3D objects into digital ones. ”
Borrow the one they used in TRON.
I think that thing is called a goniometer.
Well, eBay is filled with Chinese protractors using “goniometer” in the descriptions. A positioning goniometer works like this https://www.motioncontrol.com/sensors/instruments/goniometer/
Isn’t lighting the subject from different angles for the same pose helpful?
What exactly do you mean? Usually the ligthing should be as uniform as possible, which can be managed either with indirect/soft environmental lighting or by adding a ringlight to the camera. You might check out the following sample-picture-set and the result to get an idea of what “good” pictures for photogrammetry should look like: https://www.instagram.com/p/BtqG4NToIMQ/
Can someone please explain why when using a rig like this the software still tries to estimate position? Surely different vectors can be calculated while the object rotates. Is it just that it’s not possible to input these into software?
In theory, this should be possible, but there are two things to consider. First, you would have to touch a properly running software and the advantage of adding the know positions might account for less then 1% of the reconstruction time. Second, even when you use a very accurate rig, you do not know the -exact- positions of the camera and you would still need to add a certain error to the equation, I guess, that this error would be larger, then the one from the calculations.
One interesting thought would be using the known positions and start the calculations from there, but I do not know, what kind of improvements to expect.
UPDATE: After quite some time, I got to use the solder robot for several hours continously. The TS100 works perfectly and after dialing the printer in (as it had been untouched for a few weeks), the success rate is 1786/1800 joints equalling 99,2%. To be fair, dialing it in today was a little bit annoying and it failed on the first 5 PCBs (due to my impatience to do proper leveling ;) The total workload for thos 1800 joints (including dialing in) was roughly an hour, which is okeyish. But the overall productivity will further increase as I will let the robot do its job for a couple more hours…
I’ll be glad when in 5 years you can buy refurbed iPhone X’s on Aliexpress for $90, and make an array of their truedepth cameras, much like the array of kinect sensors from yesteryear.
Having that much processing power on-device is quite convenient too.
Now, will someone between now and then write the software to run them collaboratively or will I have to break out XCode?
Has anyone considered treating the object as an item to be machined in CAM Software?
This is basically a simple version of a CNC trunnion table I used to run parts on. 2 axis of rotation. CAM software would take known imputs for the center height and rotation centers for the 2 axes, and calculate toolpaths based in part on that for 2+3 or true 5 axis milling.
My point is- once you build the thing you should be able to reasonably measure those two variables on the physical rig, using calipers, and a cheap height gauge to a ball bearing in the center as a calibration sphere.
There should be and equivalent for these distances in software to enter that would help I would assume with the focus and depth setting for picture taking, but most likely your camera would have to be in a fixed position from the rig and not move for this strategy to work
That LOOKS great, but it suffers from a fatal flaw: without shadowless shots from every angle, the textures can’t match properly. What is needed is a larger frame with a stationary frame inside of it with bright, diffuse, high-CRI lighting mounted on it. (technically, it would need to rotate in the opposite direction and at the same speed of the current inner frame.) Lighting that changes between shots is probably the number one reason that it is suggested to move the camera instead of the object; at least then, the shadows will be in the same spot in every shot. (Baked-in shadows don’t look good, but at least you can get the point cloud.)