Putting Some Smarts Into An Electric Car Charger

Many electric cars feature a timer capability that allows the owner to set which hours they want the vehicle to start pulling a charge. This lets the thrifty EV owner take advantage of the fact that the cost of electricity generally goes down late at night when the demand is lower. The Renault Zoe that [Ryan Walmsley] owns has this feature, but not only does it cost him extra to have it enabled, it’s kind of a hassle to use. So being an enterprising hacker, he decided to implement his own timer in the charger itself.

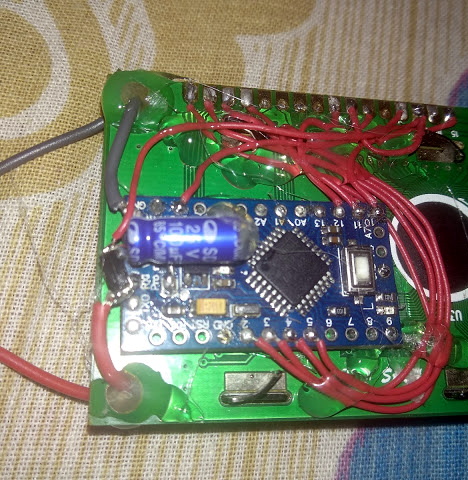
Now controlling high voltages with a lowly microcontroller might sound dangerous, but it’s actually not nearly as tricky as you might think. The charger and the vehicle actually communicate with low-voltage signals to determine things like the charge rate, so it turns out you don’t need to cut into the AC side of things at all. You just need to intercept the control signals between the two devices and modify them accordingly.

Or do you? As [Ryan] eventually realized, he didn’t need to bother learning how the control signals actually worked since he wasn’t trying to do anything tricky like set the charge rate. He just wanted to be able to stop and start the charging according to what time it was. So all he had to do was put the control signal from his car through a relay controlled by a Particle Photon, allowing him to selectively block communication.

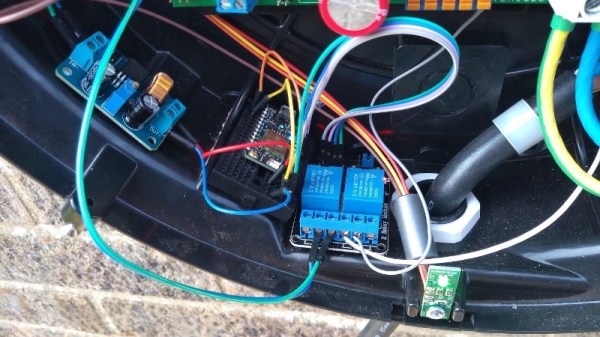
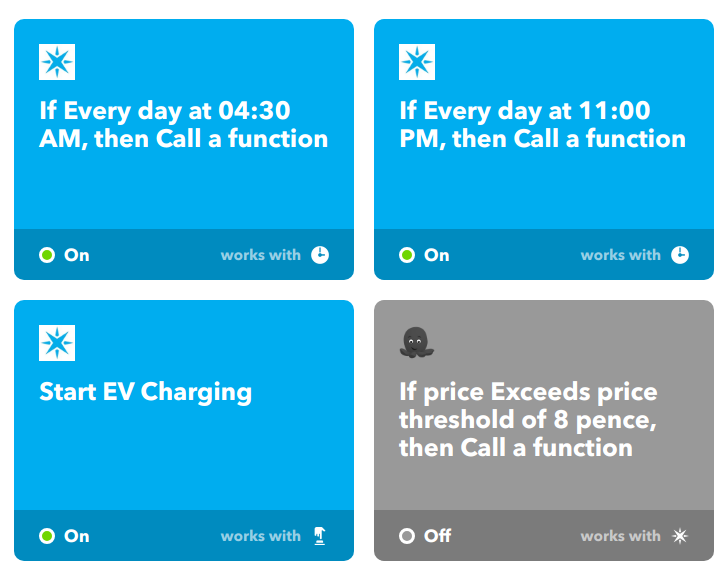
The charger also had an optional key lock, which essentially turns the controller off when the contacts are shorted. [Ryan] put a relay on that as well so he could be absolutely sure the charger cuts the juice at the appropriate time. Then it was just a matter of getting the schedule configured with IFTTT. He mentions the system could even be tweaked to automatically control the charger based on the instantaneous cost of electricity provided by the utility company, rather than assuming overnight is always the most economical.

We’ve seen a fair amount of electric car hacking, but with only a few exceptions, the projects always steer clear of modifying the actual chargers themselves. In general hackers feel a lot safer playing around in the world of DC, but as [Ryan] has shown, safely hacking your EV charger is possible if you do your homework.

This Owner Took Control Of Their Proprietary Alarm System

When a tip comes in and the tipster feels they have to reassure us that despite appearances their subject is not facilitating crime, it certainly gets our attention. [Flam2006] has a Brinks home security system which can only be configured using a special device only available to installers, and though they managed to secure one through an eBay sale they went to the trouble of reverse engineering its protocol and writing a software emulator in Python. When an owner hacks their own security system to gain full control of something they own, that’s right up our street.

The communication is via an RS485 serial line, and follows a packetised structure with binary rather than ASCII data. There is an almost plug-and-play system for identifying devices connected to a controller, though it is restricted to those devices which the controller already knows about. There is a video of the official method of programming the controller, as well as one of the software in action. We’ve posted them below the break for your delectation.

The ability to perform these tasks on your own property is an important right that has at times been placed under threat by legislation such as the DMCA. We’ve touched upon it countless times, but probably the most high-profile example that we and the wider media have covered are those stories concerning the parts lockdown on John Deere tractors.

Continue reading “This Owner Took Control Of Their Proprietary Alarm System”

This 3D Scanner Is Your Ticket To Photogrammetry

It seems 3D printers have been around for ages and still we don’t have a good solution for turning physical 3D objects into digital ones. Yes, 3D scanners exist, but the OpenScan is the best 3D scanner we’ve seen. It’s a 3D printed device meant to take pictures of an object that can then be used by photogrammetry software to construct a point cloud. From there, it’s just a matter of messing with meshes to create a 3D printed copy of anything you want.

The latest version of the scanner is an improvement over the previous version that kind of, sort of looked like the Machine fromĀ Contact. This was a gigantic hubless ring, with a smartphone attached to the rim. Put an object in the center, and the phone would rotate around the object in every axis, snapping pictures the entire time. Needless to say, a simpler design prevailed. That doesn’t mean the old version didn’t look awesome. The electronics are simply an Arduino clone, two stepper drivers, a character display for control and some headers for connections and power supplies. This is pretty normal stuff for the RepRap crew.

Running this machine is as simple as putting an object in the device and taking a few pictures. There is some support for remotely controlling some cameras, but everything is universal if you have a remote shutter release. This can be plugged into the electronics, and once everything is done you have a few dozen pictures of an object with optimal lighting conditions that can be thrown into your photogrammetry software of choice. (Ed note: at least one that doesn’t rely on the object remaining stationary with respect to the background to estimate camera position.)

Magnets Versus Laundry Detergent

Soap cleans clothes better than magnets. There, we are spoiling the ending so don’t accuse us of clickbaiting. The funny thing is that folks believe this is plausible enough to ask magnets experts so often that they dedicate a blog entry to comparing magnets and soap. Since you already know how this ends, let’s talk about why this is important. Science. Even though some magnet retailers, herein referred to as [the experts] can easily dismiss this question as fanciful or ridiculous, they apply the scientific method to show that their reasoning is sound and clean evidence is on their side. [The experts] detail the materials and techniques in their experiment so peers may replicate the tests and come to the same results themselves. We do not doubt that the outcome would be equally conclusive.

The experiment includes a control group which processes dirty clothes without detergent or magnets, one group with only magnets, one group with only detergent, and one group with both. White clothing was soiled with four well known garment killers and manually agitated in a bin of warm water. We guessed that magnets would be on par with the control group, and we were pleased to be right. [The experts] now have a body of work to reference the next time someone comes at them with this line. The only question now is if tricky spouses used science to get nerds to do the laundry.

In this age of spin, keeping facts straight instead of jumping to heartfelt conclusions is more vital than ever. We are all potentially citizen scientists so testing a conspiracy is within everyone’s grasp.

Continue reading “Magnets Versus Laundry Detergent”

How Much Wood Can A Woodpecker Chuck?

It’s probably clear to a Hackaday reader that we live in a golden era for hobbyist tool accessibility. Cheap single board computers can be bought at any neighborhood RadioShack or Maplin. 3D printers sell fully assembled and ready to run for less than $200. Even the humble CNC mill has come down the price curve, though as you might expect at the low end things can get pretty rough. Like a cheap 3D printer, a cheap mill tends to be missing some basic features you’d expect any reasonable machine to have. If you get your hands on one of these little wonders, [Shahada Abubakar] has a pair of great blog posts on the basic set of upgrades you’ll probably want to perform right out of the box.

Which cheap CNC mills are we talking about? They go by a few names. Last year our own [Kristina Panos] put together a review of a shockingly inexpensive “1610” type sold by Linksprite (go take a read if you’re already considering a purchase!). The “1610” class, so named for it’s 16 cm x 10 cm bed size, is pretty common under a wide variety of manufacturer names. You can find them in this size made of 8020 like [Kristina] did or as “upgraded” versions cut from 1/4″ mystery plastic (often referred to in the listings as Bakelite, but your guess is as good as ours as to the true material). 1610 is the smallest size but basically the same machine exists as an 1810, 2418, or 3018. Each has a 775 size spindle and a single PCBA that handles stepper drive and runs grbl.

So what’s the problem? Well for one none of these machines have limit switches, though the controllers support them. [Shahada]’s guide has handy instructions for what kind to buy, how to wire them, and where they can be attached. Plus an overview of the G-code instructions to send the controller in order to home and configure everything properly. The controllers also like to be driven continuously over serial (though some sellers seem to offer a separate board to drive them). This is fine if you have a computer handy, but like a 3D printer it can be nice to bolt a Pi Zero or similar onto the unit and control it over the network. [Shahada]’s second post has a link to a mounting plate you can print for exactly that setup, as well as some suggestions for configuring CNC.js to drive everything.

Do you have one of these machines? Done any upgrades? Tell us in the comments! We’re always looking for ways to upgrade our home shop.

Use A 3D Printer To Electrospin Textiles

We are all used to desktop 3D printers that extrude molten plastic in layers to build up finished items. A pair of researchers at the Human-Computer Interaction Institute at Carnegie Mellon University, [Michael Rivera] and [Scott Hudson], have added another capability to their printer: electrospinning of textiles.

Electrospinning is a technique in which an extruded material is accelerated from the extruder by an electrostatic charge to form an extremely thin fibre. By applying a many-kilovolt charge between the extruder and the bed, they can create a fibre and lay it down into a mesh from a height to create a felt-like fabric. The same extruder can also produce conventional solid prints, allowing the creation of composite fabric and solid items. They demonstrate a variety of prints including a folding mobile phone stand, a woven lamp, and an interactive wooly sheep, which along with others can be seen in the video below the break.

The full paper can be downloaded as a PDF, and makes for very interesting reading. The voltages involved mean that your Prusa clone may not have this capability any time soon, but we look forward to the moment when desktop electrospinning is a feature on affordable 3D printers.

Continue reading “Use A 3D Printer To Electrospin Textiles”

Driving A 16×2 LCD With Voltage Modulation

The basic 16×2 LCD is an extremely popular component that we’ve seen used in more projects than we could possibly count. Part of that is because modern microcontrollers make it so easy to work with; if you’ve got an I2C variant of the display, it only takes four wires to drive it. That puts printing a line of text on one of these LCDs a step or two above blinking an LED on a digital pin on the hierarchy of beginner’s electronics projects.

What’s that? Even four wires is too many? In that case, you might be interested in this hack from [Vinod] which shows how you can drive the classic 16×2 with data and power on the same pair of wires. You’ll still need a microcontroller “backpack” for the LCD to interpret the modulated voltage, but if you’ve got an application for a simple remote display, this is definitely worth checking out.

The basic idea is to “blink” the 5 V line so quick that a capacitor on the LCD side can float the electronics over the dips in voltage. As long as one of the pins of the microcontroller is connected to the 5 V line before the capacitor, it will be able to pick up when the line goes low. With a high enough data rate and a large enough capacitor as a buffer, you’re well on the way to encoding your data to be displayed.

For the transmitting side, [Vinod] is using a Python script on his computer that’s sending out the text for the LCD over a standard USB to UART converter. That’s fed into a small circuit put together on a scrap of perfboard that triggers a MOSFET off of the UART TX line.

We actually covered the theory behind this technique years ago, but it’s always interesting to see somebody put together a real-world example. There might not be too many practical uses for this trick in the era of dirt-cheap microcontrollers bristling with I/O, but it might make a fun gag at your hackerspace.

Continue reading “Driving A 16×2 LCD With Voltage Modulation”