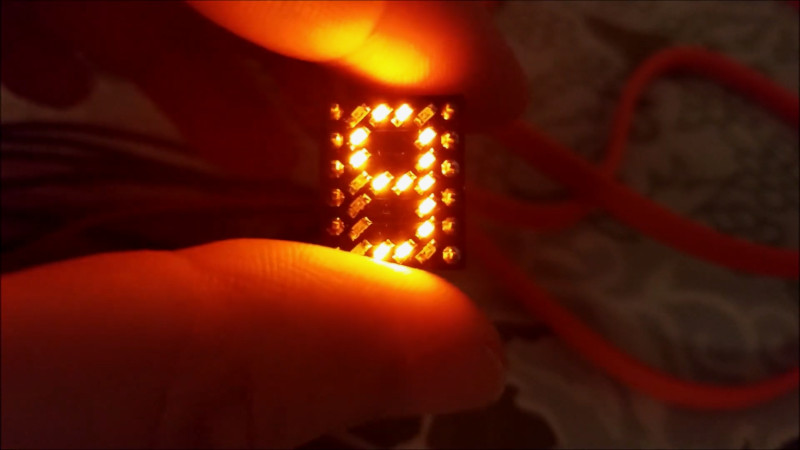
We live in an era in which all manner of displays are cheap and readily available. A few dollars spent online can net you a two-line alphanumeric LCD, a graphical OLED screen, or all manner of other options. Years ago however, people made do with little monolithic LED devices. [sjm4306] wanted to recreate something similar, and got down to work (Youtube link, embedded below).
The resulting device uses 0603 sized SMD LEDs, soldered onto a tiny PCB. 20 LEDs are used per digit, which can display numbers 0-9 and letters A-F. The LEDs are laid out in a pattern similar to Hewlett-Packard designs from years past. This layout gives the numerals a more pleasant appearance compared to a more-classic 7-segment design. Several tricks are used to make the devices as compact as possible, such as putting vias in the LED pads. This is normally a poor design technique, but it helps save valuable space.
[sjm4306] has developed a breadboard model, and a more advanced version that has a pad on the rear to mount a PIC16F88 microcontroller directly. We look forward to seeing these modules developed further, and can imagine they’d prove useful in a variety of projects.
For reference, check out these Soviet-era 7-segment displays. Video after the break.


Nice !
Have a look at https://hackaday.io/project/8270-pictil too !
It’s a bit sad how hackaday.com tends to swoon over projects from around the web, and at the same time completely ignores similar projects on hackaday.io — those LED displays actually have a whole series made by Alex:
https://hackaday.io/project/6568-tiny7
https://hackaday.io/project/8270-pictil
https://hackaday.io/project/15102-redot
https://hackaday.io/project/85515-redotmatrix
These were some of the projects that inspired me to try making my own! I just created a project page for mine this morning but havent had time to write up anything for it. I have bigger plans for what I intend to do with these displays, so I actually didnt intend on submitting it till everything was complete but looks like someone beat me to the punch.
Nice looking numbers, I did something similar using only the standard seven segments.
Recommendation: Move the pins to top and bottom, they will look better next to each other and be more breadboard friendly
https://www.youtube.com/watch?v=LUvhNfDEtwU
Thanks for mentioning me! I think there were already Acritcels about some of these in the past. Never the less I think i would had been nice to include similar projects from Hackaday.io. Not also mine, but there is also the DIYTIL305 projekt from [Mile] (https://hackaday.io/project/161694-diytil305) for example which shares a similar idea.
A great way to get noticed is to submit to the tip line! http://Hackaday.com/submit-a-tip
I don’t know this for sure and have found no internet confirmation, but my memory was that the Hewlett Packard 9830 calculator/computer we had when I was a kid, used an LED display mounted remotely and fiber optic cables that ran up to make the very tiny 80 characters wide, one character high display. Each character was something like 4mm wide by 7mm high. (They may just have stuck LED dies down on a pcb and then wirebonded them to the pcb: I have some copper core PCB’s from HP from that time period that used die-on-pcb technology.) But if you really wanted mini beautiful LED displays, lightpipes might be the way to do it.
Might consider also adding a decimal point and possibly clock colons if you want to generalize them. I worked on a similar idea for a sunlight readable display but this is a better implementation than mine.
A nice way to get the clock colon is by using the decimal point. Just put one display upside down and the decimal point of that digit will functions as the top point of the clock colon. Perhaps not perfect but it is good enough in most cases.
that’s a good idea…
If you want some real nice old school LED displays, get the HDLA-2416. From the ‘outside’ they are treated like an SRAM and give you 4 positions with 7×5 dots each, char set is built in. Useful if you only need to display 4 or maybe 8 characters
Some time in my foolish youth, I bought 12 of these from a surplusser. One of them got wired to an ATtiny2313 and (still!) occasionally sees duty as a simple serial numerical display. Which means that somewhere in my LED junkbox sit 11 of these awesome little gems. Thanks for reminding me of them.
Find them and make some sort of retro display with them!!! I love it when I find some random obscure parts that I bought years ago because they were cheap and I never got around to using them. I’ve got a stash of some pinlite minitrons/numitrons that I bought ages ago before they got stupid expensive and rare. I recently found them and threw together a clock in an afternoon.