For the past few months we’ve been running this series of Blacksmithing For The Uninitiated posts, exploring the art of forge work for a novice. It’s based upon my experience growing up around a working blacksmith’s business and becoming an enthusiastic if somewhat inexpert smith, and so far we’ve spent our time looking at the equipment you might expect to need were you embarking on your own blacksmith work. Having assembled by now a basic forge of our own it’s now time to fire it up and take to the anvil for our first bit of smithing.
Lighting a forge is easy enough. Some people do it with a gas torch, but I break a piece of firewood into sticks using a hammer with the fuller set in the hardy hole on the anvil as an impromptu splitter. Making a small fire by lighting some paper under my pile of sticks placed on the hearth next to the tuyere I start the blower and then pile coke on top of the resulting conflagration. After about ten minutes I will have a satisfying roar and a heap of glowing coals, and as they burn there will be some slag collecting in the bottom of the fire that I will eventually need to rake out.
Think About The Steel You Use
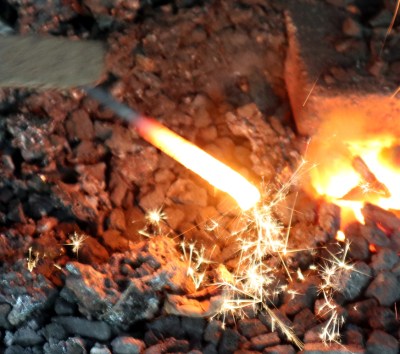
For your first experiment, select a piece of steel stock about 10 mm (3/8″) in diameter, either square or round, it doesn’t matter. I suggest one 300 mm (1′) or more long, such that you can handle the cold end without needing tongs. You will no doubt try a variety of materials depending upon what comes your way and you will discover what works best for you. Harder steels are correspondingly more difficult to work, so sometimes lower quality stock may be better for experimentation.
If you place the end of it, about 25 mm (1″) or so, into the hottest part of the fire where it is bright yellow, you can watch as it comes up to temperature. Ideally you want it to reach the point of being nearly but not quite as yellow as the coals around it at which point you can withdraw it and start work. If you leave it in too long it will first start to burn such that it will be sparking like a firework sparkler when you withdraw it, and if you leave it in longer still it will start to melt.
Your First Stroke Of The Hammer
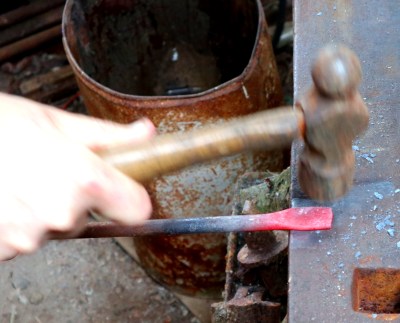
Given a piece of 10 mm steel with its end 25 mm yellow-hot, holding it by the cold end you can place it on the face of the anvil. Hammer the hot end repeatedly in the same place, and it will start to spread out. You’re not making anything here, instead it’s a simple exercise in getting used to both the metal and the hammering motion. Instead of lifting the hammer high for each stroke in the stereotypical image of a blacksmith, you are aiming to create a rhythm with it in your lower arm and wrist, taking full advantage of the rebound we mentioned when we looked at what makes a good anvil. As you hammer, you will see the work lose temperature, it will change from yellow through orange and red to a dull red with grey seeping in. At this point you will need to put it back in the coals as described above to bring it back up to temperature, and repeat the process.
As you continue hammering, if you are consistent you will see the end of the stock flatten out until eventually it will be a flat piece of steel on the end of your stock. It probably won’t be a consistent shape and you haven’t yet made anything useful, but you’ve started to gain a feel for both the metal itself and the hammering motion required. Quench it in a vat of water so it is cool enough that you can handle it and you will see that some grey oxides have flaked off its surface, this is normal.
From Round To Square, Or Vice Versa
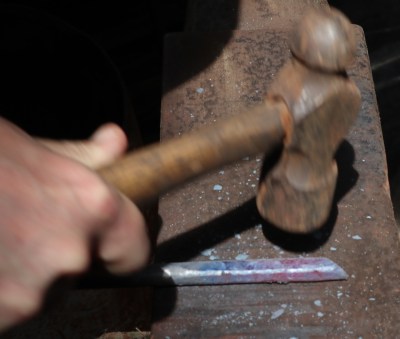
Now you have a bit of a feel for the metal, it’s time to learn something a little more useful. Take the other end of your piece of stock whose end you’ve just flattened, and heat it up in the coals as before for about 50 mm (2″). If it’s a square piece of stock you’re going to make it round, and conversely if it’s round you’ll hammer it square. Lay it down on the face of the anvil, and give it a set of blows with the hammer evenly spread across its length. If you continued you would end up with a longer flattened piece of metal as before, but in this case you are going to turn the stock as you hammer.
If it is a round piece you’ll hammer one face until it starts to flatten slightly before rotating it through 90 degrees and hammering the other, while if it’s a square one you’ll first hammer it on its corners to round them off, and then consistently rotate it as you hammer to ensure that the blows are distributed evenly across its surface. You may find that it starts to bend as you do this, in that case simply lay it on the face of the anvil in the axis you want to straighten, and hammer it flat. Throughout this process you’ll need to continue to return it to the fire to heat it up again, and you may surprise yourself by discovering that a lighter touch is needed with the hammer than you expect.
Eventually you will find yourself with either a newly squared piece on the end of a round piece of stock, or conversely a rounded piece on some square stock. There’s no shame in getting it wrong and trying again multiple times, but you will get the hang of it before too long. You will have learned more about the feel of the metal and the hammer, and what kind of effort is required in the process.
Giving It All A Point
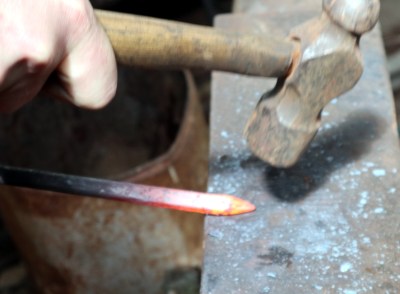
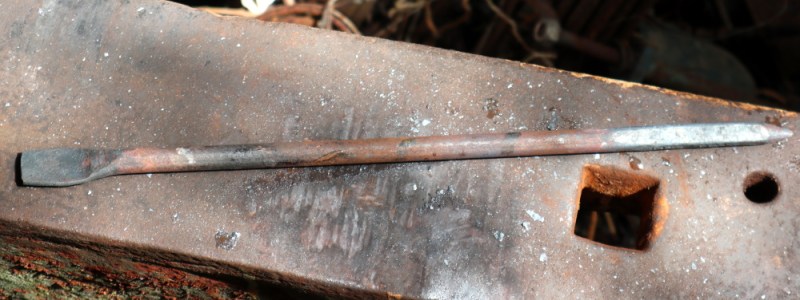
Finally for today, you’ll put a point on your newly squared-or-rounded piece of stock. Heat up the end 25 mm, and place its tip on the face of the anvil at an angle of about 20 degrees. Hammer at right angles onto its very end as you slowly rotate it, and you will see a point beginning to form. As you work the hammering back from the point it will become more pronounced. You’ll never get it to a pencil-like sharpness, but with a bit of practice you can produce a consistent result. Quench it, and all being well you should have a piece of stock with a leaf-like flat piece on one end, and a point on the other. You haven’t really made anything useful, but you have already learned quite a bit of basic blacksmithing.
This series will continue with more basic blacksmithing techniques, in the next installment we’ll have a go at bending steel, making curves, loops, and scrolls. You won’t be an expert blacksmith just yet, indeed though having grown up around expert blacksmiths I am not one of them either, however as you proceed you should amass a set of basic skills upon which you can build the ability to make more complex pieces of work.
My thanks to Henry List for taking the pictures used in this piece.



So, does there come a time where the metal is too fatigued from all the heating and hammering, it needs to be replaced with a fresh piece?
I believe that kind of fatigue only happens in cold working…. and heating resets it.
Typically, the biggest thing with heating and hammering on the same piece of metal for too long is material loss from scale.
Since the metal is very hot it oxidizes rapidly, especially outside of the fire. A charcoal hearth tends to be a fairly low oxygen environment and gas hearths can be adjusted for a neutral or reducing flame. Once you start forging the scale gets knocked loose.
Rinse and repeat enough times and you would be surprised how quickly the work piece can shrink.
When you heat above Curie Temperature (ferrite to austenite transformation) you have a complete recrystallization. If you did not overheat (inducing oxidized cracks), there will no traces of fatigue left.
If you perform low deformation (5%) you might encounter significant grain growth.
Therefore I like to use a bigger hammer than shown in the pictures. I prefer 6 to 8 lb.
Georg
Your shoulders must be massive, thats at the low end, more than double the max 3 lb weight I’m told most use to smith normal size items with. I myself use a 2.5 lb. I like your style.
No. As others have said, heating in effect “resets the clock”.
A future instalment will deal with tempering and annealing.
Depends on what you are doing. If you are just messing around and listening to seeing a hammer and how the metal moves it’s usually not an issue. It becomes an issue when you when you are using higher carbon steels and plan on quenching to harden the steel. Every time the steel is brought up to high temp, especially welding temp it loses carbon. Lose to much carbon and you can turn a good piece of high carbon steel into a lower grade medium or mild carbon steel. Now this will not happen over a few cycles of heat, it takes quite a bit of work to reduce the carbon that much. Your main issue will come from over quenching higher carbon steels. Your higher carbon steels really don’t like to be quenched more than once unless you normalize(bring to non magnetic and let it air cool or cool in sand) the steel before doing it again. By normalizing you reset the crystalline structure of the steel. The forging process alone distorts the crystalline structure which is why it’s always wise to normalize at least once before quenching but I prefer 2-3 times for more distortion and stress fracture prone steels. You will also notice with your higher carbon steels alot of times if you use water it will actually make the steel to brittle and will likely cause fractures in the steel. These fractures are near impossible to fix without significant knowledge and experience on folding and forge welding the steel back into a homogeneous mass. Tip for all beginners, STAY AWAY FROM WATER! Instead use canola oil, Automatic Transmission fluid, used motor oil something of the sort. If it’s not mild steel or wrought iron and you quench it too much you will end up with steel that is brittle as glass. If you can afford to wait let the steel cool slowly on its own until you are ready to harden it and temper it. Even after hardening you still have to draw some of that hardness off. It can be done carefully in the forge or in an oven but doing so will make the steel durable enough to be abused without shattering when done right. Your going to screw it up multiple times, I promise. Don’t get discouraged and don’t let it get to your head, I have been doing this for over 24yr and I cracked a blade just 3 days ago in the quench because I put the wrong steel, in the wrong quench. I know this is alot of info to read but it’s the beginning of a lead to follow and start up some research. Get a notebook and start writing down how different steels react under different stresses. I have 3 or 4 notebooks with random notes and findings from all the years and still buy new published books when I notice them because you can never learn to much and even the greatest master can learn from an apprentice. Best of luck and most importantly, be safe and have fun.
Thanks for sharing your knowledge!
Very good post! I’m asking this out of ignorance, i genuinely don’t know the answer. But it surprises me to see ATF on your list of quenching liquids. In my experience with automotive work, ATF is scary flammable. I know all oils are, but ATF in particular. Is there any issue with ATF combusting during the quench? I mean beyond what you would expect from any oil? Again, great post and thanks for your knowledge and for making me smarter!
My dad and pretty much all the smiths I’ve encountered on this side of the Atlantic use water as far as I’ve been able to see. And thus so have I, it’s one of those things.
But then again, mild steel, and as I keep saying despite growing up steeped in a blacksmithing environment I am not the world’s best smith.
Reading again, you’re talking about blades. That explains it. My dad’s work was almost all in architectural ironwork, a very different requirement indeed.
This is a nice series. Long ago I was tooling up to get into blacksmithing fairly seriously, but after taking a week long course at a folk school I realized that beginning smiths really beat their hands up getting even small amounts of work done. My fingers hurt for a month after that course! So I had to pull the plug on getting too into it as a hobby. Seeing this series makes me miss it once again, but I need my hands. I know that as one’s skill grows you end up doing less damage to yourself, but I never made it over that hump, and at this point I don’t really have enough space/commitment to get a power hammer, etc.
Oh and I meant to ask. Do the professional smiths around you deal with medical issues around hand/arm pain, etc?
Yes. My dad had elbow pain at times, and in extreme old age has a hand tremor that may or may not be connected.
Yes, but like any profession that deals with long term impact there are precautions you can take like adjusting your anvil height, using proper form when swinging the hammer, though I detest wearing a glove on my hammer hand sometimes it’s necessary. You can also use bracers on the wrists and of course elbow compression sleeves. The hardest part is finding the personal protective equipment that is fire retardant. Last thing you want is a brace meant to help support and reduce damaging effects of impact melted to your skin. They are out there, they work and often they are a bit spendy. Just don’t over do it and depending on where the fatigue is it’s usually caused by bad anvil height or a bad hammer weight. You can also wrap a logging chain around the anvil to reduce vibration and noise especially on forged anvils.
>My finished piece of work. It doesn’t have a use, but it shows all three techniques from the session.
It looks useful for a burglary!
scnr
Make the flat end spoon shaped and you have a handy tool for adding flux to a forge welded joint. The pointy end is used for scrapping scale from tight areas
As someone who actually teaches blacksmithing. I find the biggest issue is safety. The Internet blacksmith is naive and I have lost count of how many times I have seen these folks attempt to give advise assuming they have learned enough to do so. Ventilation and affaire should be taught before even pickup up a hammer.
Very true. I’ve covered safety kit in an earlier instalment, did you read it? But I may not have made a big enough noise about ventilation. Probably because here I take it for granted.
This is exactly how we did it in eighth grade metal shop. Alas they were no longer doing it when my own children were eighth graders.
Really enjoying reading through this series. I’ve considered scraping together some tools and trying my hand at blacksmithing, and if I ever do, I’ll run back here for a refresher!
Excellent! Good luck.
I’ve been a smith as a hobby for maybe 4 years now, a member of 2 groups, and I’m spoiled, since the largest free forge in the US last I heard is the place I forge out in PA countryside.
I’ve been reading these carefully and have to say I like the series. Information given so far is generally spot on.
I like the way you use the hardy fuller as a kindling chopper. I’ll have to use that now.
Best way to start a fire if you’re using coal (Fort Allen Antique Farm Equipment Society is where I forge, mostly soft bituminous coal forges), taught to me by a smith that just died a couple weeks ago-
Bundle up a heavy wad of newspaper tight, about the size of a small plate in diameter, and light the loose end on surface. Turn on or crank your blower, and flip the flaming wad flame side down, where it would be too tight to burn normally- place over blower and ring with coal.
The blower will force the wad to burn, but it will last a while since its denser than what would naturally burn unaided. This will create a longer, hotter fire upfront to properly start your coal, or kindling and coal, if you’re going for a big fire.
Proper fire management is the hardest thing about forging with coal. You must tend it carefully and remove clinker (a kind of burning waste from the coal, rocks, impurity conglomerates that build up as glowing but not burning masses) or you will never keep the fire hot enough to heat steel even with forced air.
Good stuff, keep it coming.
Thanks!
And yes, fire management is something I do find a little taxing. My dad’s hearth has a side-blowing tuyere, and getting a larger fire bed can sometimes be challenging. He has the knack, but it’s something I am still attaining. We use coke, so maybe a little cleaner burn than the coal. One day I must try charcoal, just for curiosity’s sake.
Hmmm, maybe an RPi with camera to watch the flame, a couple of thermistor or pyro sensor inputs, a VFD, uh, Variable Frequency Driver, for the blower getting its marching orders from the Pi…
And a big red OFF button!
B^)
Thermal camera modules are getting downright affordable…
When I noticed that the picture of someone drawing out a point and the end of the bar was in the center of the anvil. WRONG! When drawing a point you always put the bar on the far side of the anvil so the hammer will not hit the anvil. Sorry this process is one of the first thing you teach.