Magic Record Stand Can Play Your Records For You

Vinyl remains a popular format, despite taking a huge hit in popularity for a couple decades while CDs ruled the roost. It has a charm that keeps it relevant, and likely will continue to do so until everyone who grew up with a record player dies out. In the meantime, [sp_cecamp] has come up with a great way to experience your collection, with the magic of modern technology. It goes by the name of Plynth.

Fundamentally, it’s a small record stand with an excellent party trick. The prototype consists of a 3D-printed body, which holds a record sleeve at an attractive angle for display. A camera built into the base then images the artwork. The first image taken is run through the Google Vision API, and further images are then run through OpenCV to identify the record. This data is then passed to the Spotify API to play the track. The whole process takes a couple of seconds, and the music is then pumped out of whatever streaming device is connected to the rig.

It’s a fun way to play your old records, and would be a welcome change to those tired of screaming at Siri to play Weezer (Blue Album), not Weezer (Green Album). For those interested, [sp_cecamp] has thrown up a site to gauge interest in the project, and may make a limited production run in future.

Of course, you could instead just go about building your own turntable. To each their own!

He Comes To Bury Sensors, Not To Praise Them

[Adosia] has some interesting videos about their IoT platform controlling self-watering plant pots. However, the video that really caught our eye was the experience in sealing up sensors that are going to be out in the field. Even if you aren’t using the exact sensors, the techniques are useful.

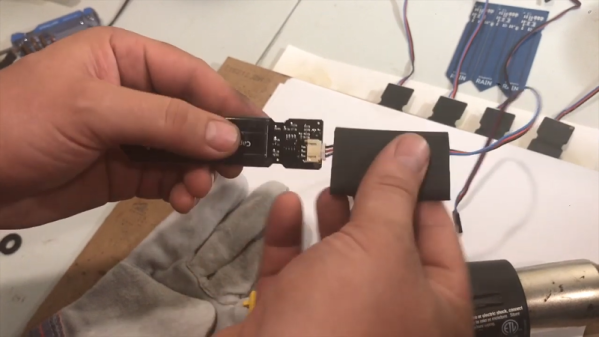
We would have expected to see potting compound, but that’s messy and hard to use so their process is simpler. First, a few coats of clear urethane sealant goes over the electronics. Next, heat shrink goes over the assembly. It isn’t ordinary heat shrink though, instead it’s the kind that has heat-activated adhesive inside.

Continue reading “He Comes To Bury Sensors, Not To Praise Them”

Mechanical Tremolo Does Things The Old-School Way

The word “tremolo” has a wide variety of meanings in the musical lexicon. A tremolo effect, in the guitar community at least, refers to a periodic variation in amplitude. This is often achieved with solid state electronics, but also recalls the sounds created by Hammond organs of years past with their rotating Leslie speakers. [HackaweekTV] decided to do things the old fashioned way, building a mechanical tremolo effect of his own (Youtube link, embedded below).

Electronically, the signal is simply passed through a linear audio potentiometer. The effect is generated by rapidly cycling this potentiometer up and down. The motion is achieved through a geared motor salvaged from a Roomba, which turns a cam. A sprung follower sits on top of the cam, and is attached to the potentiometer.

There were some challenges in development. Rigidity of the frame was an issue, and the follower had issues with snagging on the cam. However, with some careful iteration they were able to get everything up and running. The final project sounds great, and with the amplifier turned up, there’s no need to worry about the sound of the moving parts.

Naturally, you can always build a tremolo with a 555 instead. Video after the break.

Continue reading “Mechanical Tremolo Does Things The Old-School Way”

IKEA Cloud Lamp Displays The Weather With An ESP8266

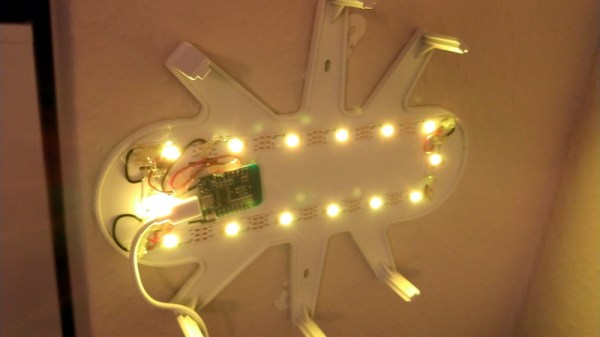
The IKEA DRÖMSYN is a wall mounted cloud night light that’s perfect for a kid’s room. For $10 USD, it’s just begging for somebody to cram some electronics in there and make it do something cool. Luckily for us, [Jodgson] decided to take on the challenge and turned this once simple lamp into a clever weather display. It even still works as an LED lamp, if you’re into that sort of thing.

After stripping out the original hardware, [Jodgson] installed a Wemos D1 Mini and a string of fourteen SK6812 RGB LEDs that run down the length of the cloud’s internal structure. Weather data is pulled down with the OpenWeatherMap API, and conditions are displayed through various lighting colors and effects.

Sunny days are represented with a nice yellow glow, and a cloudy forecast looks like…well it’s already a white cloud so that one’s pretty easy. If rain is expected the cloud turns blue and the bottom LEDs flicker a bit to represent raindrops. When there’s a thunderstorm, the cloud will intermittently flash random LEDs on the strip a bit brighter than their peers; a really slick effect that gets the point across immediately.

This isn’t the first time we’ve seen somebody take a cheap light from IKEA and turn it into something much more impressive with the ESP8266. Just like with that previous project, we wouldn’t be surprised to see this particular modification popping up more in the future.

The Pianist Octopus

MIDI has been around for nearly forty years, but what do you do if you have an old ‘toy’ keyboard without MIDI? Or really any way to make it sound good? You could turn it into a player piano, and that’s exactly what [Alessandro] did with an old toy keyboard. It’s The Pianist Octopus, and it is perhaps the coolest, neatest pianist you’ve ever seen.

This build uses 24 individual 9 gram hobby servos, which of course means you need to drive those servos somehow. There are plenty of ways to attach a few servos to an Arduino board, but when you need to drive 24 servos, your options become somewhat limited. The electronics consist mostly of a Fishino Octopus, an Arduino shield that can drive sixteen individual servos. Slap two of these shields on an Arduino and you have something that will drive twenty four servos.

The mechanical part of the build consists of a 3D printed frame that allows the servos to be mounted across an arc, something like a harp. Metal rods connect the servos to tentacle-shaped actuators. These were designed in Google SketchUp and printed in PLA.

Attached to these servos and Arduino is a character LCD and a few buttons that allow the user to cycle through a few functions. The play button plays the current melody (based on old Nokia ringtones, by the way), a few more buttons adjust the position of the individual servos, and there’s another button to stop playing. Since this is a complete electronic-to-mechanical interface for a toy piano, a MIDI-in port isn’t out of the question; all a MIDI implementation would need to do is move a servo down on a note on event and move it back up on the note off event.

Blacksmithing For The Uninitiated: Your First Time At The Anvil

For the past few months we’ve been running this series of Blacksmithing For The Uninitiated posts, exploring the art of forge work for a novice. It’s based upon my experience growing up around a working blacksmith’s business and becoming an enthusiastic if somewhat inexpert smith, and so far we’ve spent our time looking at the equipment you might expect to need were you embarking on your own blacksmith work. Having assembled by now a basic forge of our own it’s now time to fire it up and take to the anvil for our first bit of smithing.

Lighting a forge is easy enough. Some people do it with a gas torch, but I break a piece of firewood into sticks using a hammer with the fuller set in the hardy hole on the anvil as an impromptu splitter. Making a small fire by lighting some paper under my pile of sticks placed on the hearth next to the tuyere I start the blower and then pile coke on top of the resulting conflagration. After about ten minutes I will have a satisfying roar and a heap of glowing coals, and as they burn there will be some slag collecting in the bottom of the fire that I will eventually need to rake out. Continue reading “Blacksmithing For The Uninitiated: Your First Time At The Anvil”

Hack My Wired Heart

Liner notes? Passé. In Berlin, the release of a special edition synth-wave record came with an accompanying experimental synthesizer called Wired Heart.

At the core of this adorable heart-shaped synth, designed by music technology enthusiast [tobi tubbutec], is the classic 74HCT14 chip with six Schmitt trigger oscillators. The bright red PCB has eight gold touch and humidity sensing pads that activate and modulate these oscillators. As well as changing the sounds by playing with pressure and conductive liquids you can use the six sets of header pins on board to plug in your own components for noisy experimentation. Wired Heart ships with LEDs, photoresistors and a potentiometer, but we’ve also plugged our own DIY fabric pressure sensors into this synth to make some excellent electronic sounds.

In the Hackaday.io post linked above, [tobi tubbutec] walks us through a number of the circuit design decisions he made while prototyping his “cardiotronic human-touch hexoscillatric stereo esoteric snythespacer”. We enjoyed his creative and sometimes unconventional designs, from his inclusion of non-functioning traces for aesthetic reasons to his chosen method of hard syncing — injecting a small pulse of one oscillator into the other. If you want to examine his layout in more detail, [tobi tubbutec] has helpfully included the KiCad schematic file in his write up.

This adorable, hackable synth caught our eye at this year’s SuperBooth — an annual indie electronic music conference in Berlin that’s well worth checking out if odd noises and handmade electronics are your thing —  but it’s recently been listed on Tindie too. To listen to the upbeat synth-wave record Wired Heart originally shipped with, visit the artist Hyboid’s bandcamp.

If you’re interested in experimental musical instruments and synthy chip tune you’ll also love [jarek319]’s Sega Genesis synthesiser.

Check out a demo of the Wired Heart synth in the video after the break.

Continue reading “Hack My Wired Heart”