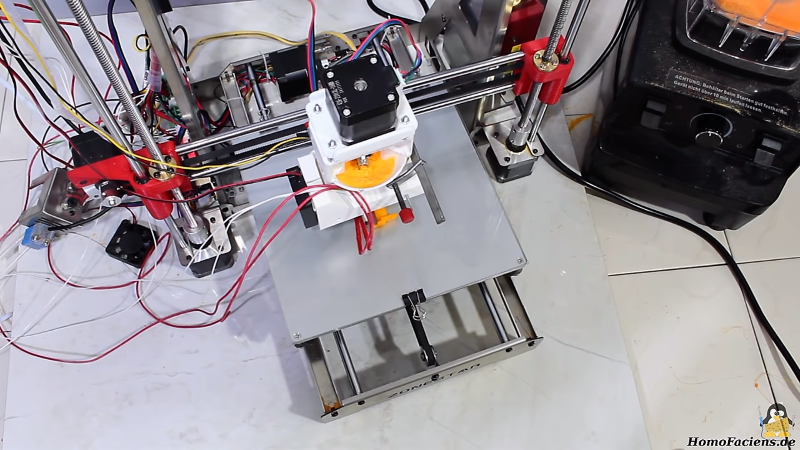
Ground plastic bits go in one end, finished 3D-prints come out the other. That’s the idea behind [HomoFaciens]’ latest build: a direct-extrusion 3D-printer. And like all of his builds, it’s made from scraps and bits most of us would throw out.
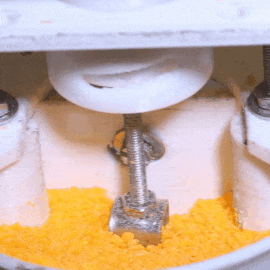
Take the extrusion screw. Like the homemade rotary encoders [HomoFaciens] is known for, it appears at first glance that there’s no way it could work. An early version was just copper wire wrapped around a threaded rod inside a Teflon tube; turned by a stepper motor, the screw did a decent job of forcing finely ground PLA from a hopper into the hot end, itself just a simple aluminum block with holes drilled into it. That worked, albeit only with basically powdered PLA. Later versions of the extruder used a plain galvanized woodscrew soldered to the end of a threaded rod, which worked with chunkier plastic bits. Paddles stir up the granules in the hopper for an even flow into the extruder, and the video below shows impressive results. We also picked up a few tips, like using engine gasket paper and exhaust sealant to insulate a hot end. And the slip coupling, intended to retract the extruder screw slightly to reduce stringing, seems brilliant but needs more work to make it practical.
It’s far from perfect, but given the inputs it’s pretty amazing, and there’s something attractive about reusing all those failed prints. It reminds us a bit of the trash printer we featured recently, which is another way to stick it to the filament man.


I could see that this big mass on the extruder could cause ghosting, doesnt seem on the small prints, but what if it prints larger, also the whole platform is going to flex more with this kind of contruction. better to use a (flexible) cork-screw in a tube and feed it from a static – not attached feeder. might even helpt with consistency of the grains.
eh, depends on the acceleration settings of the printer. Agreed that additional mass on the toolhead is not ideal but this is a great proof of concept.
I’d be far more concerned about jams on longer prints, but this tech-demo of re-use instead of re-cycle is pretty damned cool.
Not much of a concern on my printer. Velleman K8200 modded for CoreXY. It’s an XY bedflinger, the hotend only moves in Z
This
Perhaps an air hopper, to the side, could deliver precrushed granulars with hoses, much like powder coating. This would eliminate the need for that big hopper on top. The collection chamber above could have pumice rock like the hopper for air release. However screw feed maybe turned with air that feeds the granulate. Pneumatic system would be lighter.
Results look promising so far, I am quite surprised how good the results are with such a small screw and motor I would have expected something quite a bit bigger. A larger diameter screw with a shallower pitch (maybe a hardwood screw?) may help with keeping the prints consistent as you up the feedrates.
The small diameter and small pitch of the screw is what make this ting work better than other extruders I have seen so far. As stated in the video, it’s the higher “transmission” of my construction that enables to control extruding small amounts of plastic through a 0.4mm nozzle with higher precision. Smaller is better!
Like it, though as others have said might be better on a moving bed printer so the mass doesn’t force a slower print. Assuming you can actually supply plastic fast enough to do a faster print with that set up.
Can your screw manage to supply for a larger or smaller nozzle? The large diameter nozzles are great for larger parts and part strength and an extension of your comment on control means the tiny nozzle might be too small for precision with this screw.
I will check nozzle diameters other than 0.4 as soon as I really like the results I get with that one.
Smaller isn’t always better in this case, although it has some advantages. I’ve spent a fair bit of time playing with screw feeders and extruders and while small systems can be easier to manage they can be noticeably temperamental outside of a narrow operating window.
I do like the use of the narrow screw that doesn’t fill the whole width of the material path as it looks like it has some benefits with respect to reducing air entrainment and probably reduces the risk of the whole system snapping itself in the event of a heater failure, it is worth being mindful of some of the issues that can creep in with large un-swept volumes in the extruder; they can be a pig for causing demixing of materials and the dead spots can also cause material to cook in place, leading to sporadic problems on longer runs. (You can do a bit to minimise this by having a gradual tapering at the nozzle and making sure the internal surface finish is really good).
Given the scale you are working at it may be far more hassle than it is worth but adding some interruptions to any flights in the heated section to give a bit of mixing (have a look at some of the larger commercial twin-screw extruders for ideas) as this may make the system a bit more tolerant of variations in incoming material.
Thanks, a couple of good points to have a look at as soon as I start printing faster, larger and other materials than PLA.
Excellent work.
It can be improved, a lot, but the idea is neat.
Seemecnc has been doing this for years with their partdaddy, albeit on a scale that most of us could never obtain. What I’m excited about is this can open the door to printing with bound metal powder bits just like they use when they injection mold green metal parts. Good work!
Thanks! I have ordered 1kg of iron powder for experimenting. First I’d like to make the PLA setup work better…
Extruders handling abrasive materials tend to have a fairly short life, although in many ways this design could be pretty tolerant of it as doesn’t seem to rely on tight tolerances in the feed path. You’d need to be fairly confident you’d not got any stagnant zones near the nozzle though or you will likely end up with segregation leading to poor homogeneity or if it is really bad lumps of metal lodging in the nozzle. A quick and dirty test is to drop a selection of different coloured contaminants into the feeder, wait a while then stop the feeder and cut open the slug of material in the melt zone to assess how uniform it is. This is obviously a bit of a pain to do (or down right impossible depending on the design of the extruder) but is a lot less effort than doing it properly (extruding a load of material and quantitatively analysing for the contaminants).
Yes, for non uniform materials to print I will have to add some sort of “mixer” in the hot zone. One step after the other…
I’ve often wondered what it would take to synthesise the plastic from raw materials right at the head and mix dyes there too. Would be closer to a replicator.
If by raw you mean the monomers, like lactic acid, that’s going to take a lot. A batch of polimerization takes some time ,can involve more than one reactor and requires purification steps to remove unreacted acid, solvents and the catalyst.
such a brilliant solution that seems almost obvious in hindsight; rather than processing and attempting to re-extrude plastic into filament, using it directly in it’s pellet form. Super cool
Have you tried dirt cheap raw plastic pellets used for industrial manufacturing? That seems like a great goal for this. Although I suspect there is a reason why that isn’t already done.
The industrial pellets are larger than my crushed plastic granules. The size of the granlues has a huge impact on the print quality. Of course I will try pellets as well, but it’s not on top of the list of things to do next.