Tool changing on 3D printers is hot right now, and it’s going to be really interesting to see the ideas that reliable tool changing lets people try out. One such idea is having the 3D printer use a marker to label the enclosure and buttons it just 3D printed.
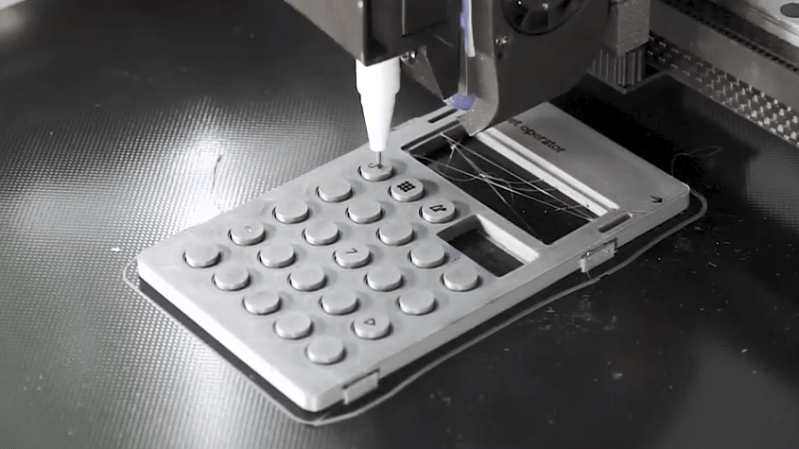
The 3D print shown is an enclosure for a Pocket Operator by Teenage Engineering. [Marc Schömann] made the enclosure on Blackbox, a tool-changing 3D printer that he designed. The video below shows a pen holder drawing the labels directly onto the printed object. Pocket Operators may look like calculators, but they are clever electronic musical devices capable of producing real music. (The best way to learn about what they are and what they can do is to watch a tutorial video or two.)
Enclosures have improved immeasurably as a result of advances in 3D printing. Customized and stylish enclosure designs are easily accessible to hobbyists, and if tool changers means a printer can turn itself briefly into a plotter in order to label what it just made, so much the better.


What’s old is new again! Reminds me of when I was in college and we used pen plotters for any kind of small graphic line art:
mainly 2D plots of our data with the computer-driven HP 7470A which moved the paper for the long axis and moved the pen for the short axis.
At my first employer everyone was so excited when we got a large format plotter that could plot D-size CAD drawings in house (paper was fixed and pend moved along both axes). I remember how some drawings would take so long and had so many pen srokes you had to watch the plotter and make sure the pen did not dry out.
This looks awesome.
I’ve had a lot of trouble writing on 3d printed surfaces with fine tip sharpies as they always bleep along print lines. I don’t think automating that process will prevent the bleeding, but perhaps the marker they’re using doesn’t have the same issue?
I used Schneider and Faber Castell permanent marker and both worked very well. But i guess the real reason it worked so well was that i used ironing surface before plotting.
Ironing surface? I’m intrigued by whatever that is… I didn’t see that in the video, is there more details on what you mean?
It´s a function in cura, when enabled the printhead “irons” the top surface without extruding. You can accomblish a great surface finish with this!
You want the printed surface to be ”engraved” with the symbols/letters right from the 3D design. This helps to protect the surface from wearing. Freshly painted surface can be cleaned to remove the bleeding as ink remain trapped in the grooves.
I don’t do 3d printing, but have at times draws over letters of injection molded plastic. I also notice grooves tends to trap dirt from dirty greasy fingers and in turn increases contrast with white material.
It’s a nice idea, but my printer wouldn’t put out a good enough surface to write on. Plus I would image the ink will wear off. I’m experimenting with the cricut vinyl cutter to print a label for a keycap with a clear layer over it. So far so good, but we’ll see if the adhesive hangs in there
Hey Matt, the trick is to use ironing surface beforehand!
Thanks Marc, that’s worth a try.
Seems fine for one offs and proofs but if you need more than a dozen I bet screen printing or pick-n-place stickers start being more cost effective.
I wonder what the most reliable marking device for something like this would be?
For 3d printer mounting I suspect a hypodermic needle filled with solvent and colour for the type of plastic printed. Apply the right amount at a time and it will leech into and etch its way beneath the very top surface layer – so being a bit more durable than just marking on the the very top. If the print is detailed enough to have deliberate grooves to pool solvent for the marking even better.
Lots of folks have used such needles with leadscrews for precision applications now so easy to get started with one of the available designs. Keeping the dye in solution could be tricky but even if its not supremely stable it will be ok. Only needs to last as long as it takes for the job to be finished. Easy to clean out and go again.
Isn’t a laser a better tool for this?
https://www.keyence.com/ss/products/marking/marking_central/select/resinmarking.jsp
That’s neat.
Seems it would also be good to use actual plastic for the sight impaired. (Raised profile)
It depends on what you want to do.
Ex: if the buttons are large enough, then you can do Braille (which prints out as a size 29 point font). Your buttons would need enough space for a 3.78mm x 5.12mm area if you were putting a single braille character per button.
You could use some sort of alternative raised marking on the button to give each specified key a distinctive identifier by touch, but that would not necessarily be in braille.
Can you write on the glass and then print on top of the ink? Sometimes the best surface is the one on the heated bed.