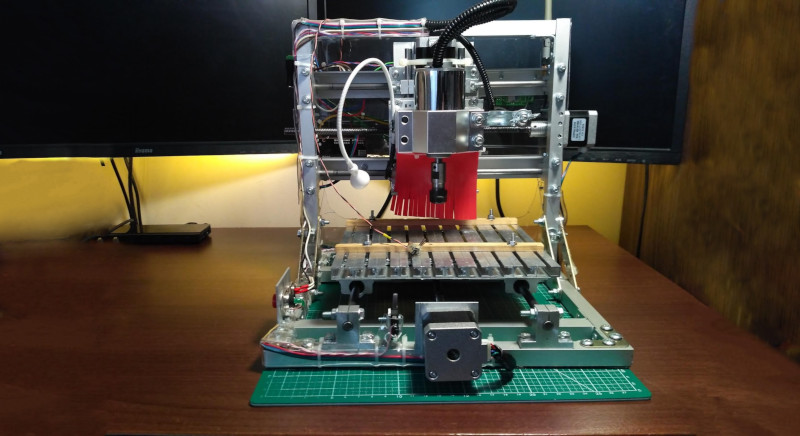
CNC machine tools are highly useful for when you want to take a CAD design and make real parts as quickly and as easily as possible. Typically, they’re employed in large-scale industrial settings, but CNC machines come in all shapes and sizes. It’s possible to build a useful machine that’s just right to sit on your desk, as [More Than User] demonstrates.
The build consists of an aluminium-framed CNC engraver, designed primarily for the production of PCBs. However, it can also handle plastic jobs, and aluminium if run slowly enough. Like most garage CNC projects, it runs with a combination of stepper motors and an Arduino. The cutting area is 16 cm x 16cm – more than enough for most hobby PCBs.
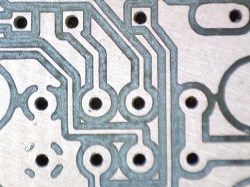
There are plenty of interesting details, such as the T-slot bed made from U-section steel bolted together, and the simple probe made from a microswitch. Perhaps most impressive though is the tight precision of the cuts. This is particularly important for PCB work, where otherwise minor issues could cause short or open circuits and make the resulting parts useless.
It’s a project that we’re sure will come in handy for [More Than User]’s future projects, and there’s nothing quite like making your own tools. If you’re new to CNC as a whole, consider picking up some design tips before you get started.


Nice work. Question to the builder: would you have used one of the Chinese kits if one had been available/on sale, instead of scratchbuilding? Certainly this one has more solid mounts and guides.
I notice that the stepper drives are also the only thrust bearings on the screw-drives. Is this sufficient for a few years of intermittent service?
Hey, thanks!. I always wanted to build cnc with minimal set of tools and effort, just to see if it’s possible. So it’s nice that it has quite good precision (in my opinion).
About Chinese kits, i’ve seen them on the internet and the Z axis is made from plastic or sth. so … nope. If I would need “real stuff” I would rather design all the parts and pay to make them on industrial machine, but this won’t be DIY anymore.
I won’t bother about the parts, if it breaks I’ll fix it and probably improve here and there. I’m glad that it’s working ;) This was totally improvised build, you can see that I’ve used nits for the frame, then I’ve added better connections with screws, because it wasn’t stable enough.
I think it won’t last for years, but I know that I will have fun fixing it. It’s my hobby, doesn’t need to be perfect ;)
Regards,
Igor.
lol, s/nits/rivets/g
I have bought one of those kits a couple of years ago. It was terrible and I did not spend much time with it in the end. Production grade PCBs have spoiled me.
The problem with the kit was that a lot of things were not so straight and connecting properly. Clearly the thing was not built with serious tolerances.
I’ve got one of the Chinese kits. Yes, the z-axis and some of the supports are 3d-Printed, which i was initially a bit sceptical about, but it doesn’t seem to impact its capabilities. The plastic can handle more force than I’d want to put on the small bits I’m using with it.
The limiting factor appears to be the spindle power, rather than the chassis or steppers. It’s successfully cut parts from 3mm aluminium, albeit slowly.
The accuracy and repeatability is fine, though it took a long time to ensure everything was right angles whilst building it.
Though I should add, to make it usable, I added:
– MDF wasteboard, and bottom/left fences to align parts (milled to be accurate)
– endstops, so it can zero (and not destroy itself!)
– dust extraction – it’s small so a shop-vac nozzle fixed to the side of the chassis does the job, along with a fan attached to the z-axis to blow dust towards the shop vac.
– CNCjs on a pi, because the software that came with it was a virus-infected crack.
The picture shows neither accuracy or precision.
I think, you are both right and wrong. If you consider this picture as is, you’re in fact right. But if you dive deeper and see how this cnc was build (how inaccurate it was), you could say that it has both – pretty good accuracy and decent precision.
You could say the same about a Haas if you’re comparing it to a Kern, so your comment is neither accurate or precise either as it lacks any frame of reference.
For a DIY CNC machine, it looks like it performs really well. Well enough to make parts to improve it further. I’ve wanted to make a miniature CNC machine a. just to see if I could do it, and b. for my son to play with while he’s still too young to let loose on my mill. This inspires me to actually do it, so thanks! And well done on your machine!
That’s not “desk sized”! It is small enough to fit ON a desk!
(my desk in the 1st Grade was larger than that device)
Toner transfer can easily make 0.008″ tracks without all that FR4 dust. Stick with SMT and you’ll need a lot less drilling.
Those looks like 0.010″ tracks. The drill hole is towards left and bottom off the pad. It also wondered a bit.
Tekkieneet: I think the word you were going for is “wandered” not “wondered”
I’ve build some time ago “The” PCB laminator, and yes It has good precision, maybe better than this cnc. But I would never achieve such drill precision doing toner transfer. So this is more convenient to me. Just press play and grab some snack …
If I would build this one more time, for sure I would choose thicker screws and rollers. The Z head is quite heavy and it bends slightly Y-axis, so Z head movement is more parabolic then linear, and I have only a microswitch as a probe to correct this ;)
There is one case when CNC beats toner transfer: when you need to add routes to already finished PCB. Once I’ve added additional step-up converter to working PCB. Now when making PCB prototypes I’m not cutting them tightly, just to leave extra space for future routes.
Regards,
Igor.
Milling PCBs is of course less precise than etching, but I still like milling actually. It is faster for simple PCBs and cleaner (no chemicals), at least when you vaccuum away the FR4 dust while milling. And you can carve, drill and cut out in one go (with changing tools in between that is).
I use FR1 rather than FR4 and still wear a respirator, but totally agree with the no-chemical benefit
[insert “Why not both” meme here.]
For the experts: How would I go about building one that can engrave granite?
use a die grinder and the right bits, and a water table.
Look at the CNC machines that machine glass. Big, heavy cast iron castings and diamond tooling. Everything sealed to keep out the dust. That stuff is insta-death for linear slides and ball screws. One place I worked at we had a 5 axis CNC that was specifically designed for working granite. Massive machine, it was intended to make granite countertops and stuff like that and do all the beveling, sink cut-out, and even polishing. Though we used it to machine glass.
Thats great use of common materials and having the abilty to punch out a board at the press of a button looks like it would be great.
the accuracy and precision looks good enough for most home spun boards and its got the ability to engrave a front pannel to go with it.
I like the work and design details! (Hey, looks similar to my machine on my HaD.io page).
Especially the home made T-slot table is really clever.
Dust control is key here. Epoxy glass dust is not a good thing to inhale.