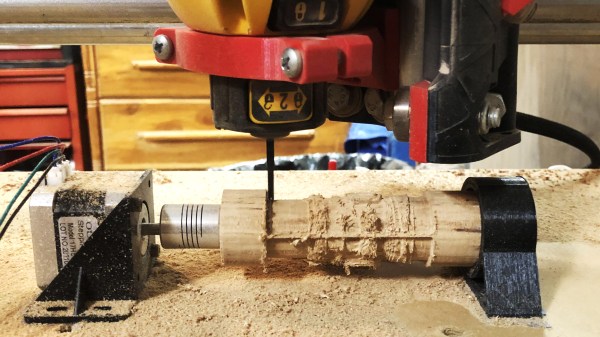
Wood game piece being carved by a CNC mill with a hacked rotary axis

This $12 CNC Rotary Axis Will Make Your Head Spin

[legolor] brings us a great, cheap rotary axis to add to your small 3 axis CNC mills. How are you going to generate G-Code for this 4th axis? That’s the great part, and the hack, that [legolor] really just swapped the Y axis for the rotation. To finish the workflow and keep things cheap accessible to all there’s a great trick to “unwrap” your 3D model so your CAM software of choice thinks it’s still using a linear Y axis and keeps your existing workflow largely intact. While this requires an extra step in Blender to do the unwrapping, we love the way this hack changes as little of the rest of your process as possible. The Blender script might be useful for many other purposes too.

Wood game pieces carved from wood by a CNC mill with a hacked rotary axis

The results speak for themselves too! We thought the 3D printed parts were suspect in a CNC setup, but for the small scale of game pieces and milling wood, the setup is stable enough to produce a surprisingly accurate and detailed finish. If you want to try the same approach with something larger or a tougher material, [legolor] has a suggestion of a tailstock setup that’s still under $100 USD. Continue reading “This $12 CNC Rotary Axis Will Make Your Head Spin”

3D Print A PCB The Hard Way

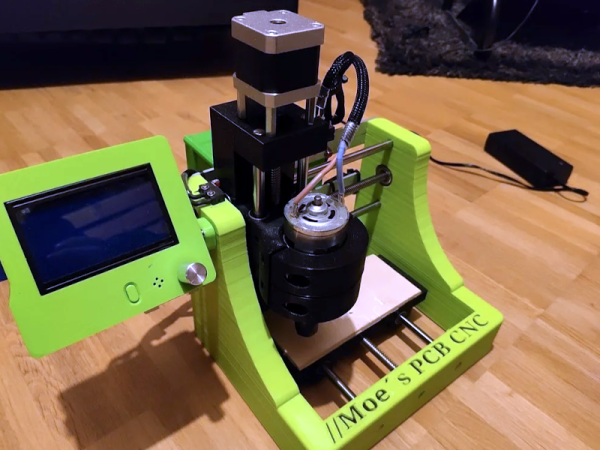
There’s an old joke about the physics student tasked with finding the height of a building using a barometer. She dropped the barometer from the roof and timed how long it took to hit the ground. Maybe that was a similar inspiration to [Moe_fpv_team’s] response to the challenge: use a 3D printer to create a PC board. The answer in that case? Print a CNC mill.

[Moe] had some leftover 3D printer parts. A $40 ER11 spindle gets control from the 3D printer software as a fan. The X, Y, and Z axis is pretty standard. The machine can’t mill metal, but it does handy on plywood and fiber board and should be sufficient to mill out a PCB from some copper clad board.

Continue reading “3D Print A PCB The Hard Way”

Hackaday Podcast 082: DJ CNC, NFC Black Box, Sound Of Keys, And Payin’ For 3D Prints

Hackaday editors Elliot Williams and Mike Szczys check in on the best hacks from the past week. All the buzz is the algorithm that can reverse engineer your house keys from the way they sound going into the lock. Cardboard construction goes extreme with an RC car build that’s beyond wizard-level. Speaking of junk builds, there’s a CNC mill tipped on its side grinding out results worlds better than you expect from something made with salvaged CD-ROM drives. And a starburst character display is a clever combination of laser cutting and alternative using UV-cured resin as a diffuser.

Take a look at the links below if you want to follow along, and as always, tell us what you think about this episode in the comments!

Take a look at the links below if you want to follow along, and as always, tell us what you think about this episode in the comments!

Direct download (60 MB or so.)

Continue reading “Hackaday Podcast 082: DJ CNC, NFC Black Box, Sound Of Keys, And Payin’ For 3D Prints”

Desk-Sized CNC Engraver Does The Job

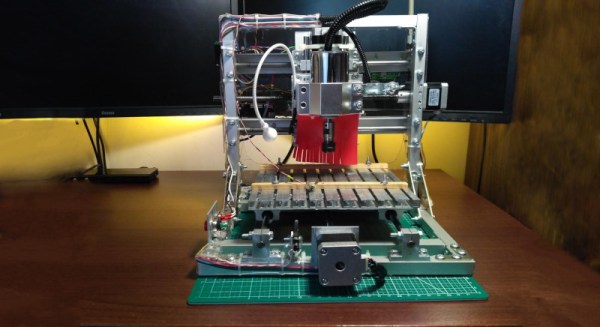
CNC machine tools are highly useful for when you want to take a CAD design and make real parts as quickly and as easily as possible. Typically, they’re employed in large-scale industrial settings, but CNC machines come in all shapes and sizes. It’s possible to build a useful machine that’s just right to sit on your desk, as [More Than User] demonstrates.

The holes pictured were made with a 0.5mm tool, showing off the precision and accuracy of the machine.

The build consists of an aluminium-framed CNC engraver, designed primarily for the production of PCBs. However, it can also handle plastic jobs, and aluminium if run slowly enough. Like most garage CNC projects, it runs with a combination of stepper motors and an Arduino. The cutting area is 16 cm x 16cm – more than enough for most hobby PCBs.

There are plenty of interesting details, such as the T-slot bed made from U-section steel bolted together, and the simple probe made from a microswitch. Perhaps most impressive though is the tight precision of the cuts. This is particularly important for PCB work, where otherwise minor issues could cause short or open circuits and make the resulting parts useless.

It’s a project that we’re sure will come in handy for [More Than User]’s future projects, and there’s nothing quite like making your own tools. If you’re new to CNC as a whole, consider picking up some design tips before you get started.

Design Tips For Easier CNC Milling

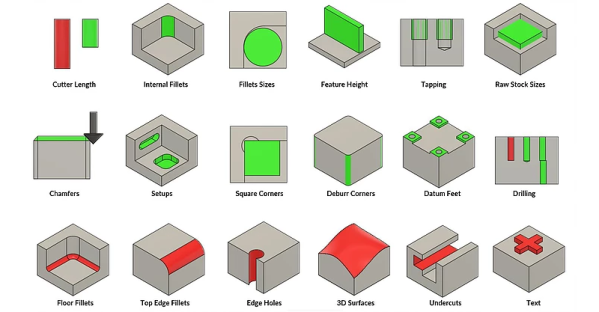
CNC machining is a wonderful thing, taking away a lot of the manual work required in machining and replacing it with accurate, repeatable computer control. However, this doesn’t mean that you can simply click a few buttons and become a great machinist overnight. There are a wide variety of skills involved in utilizing these tools effectively, and [Adam Bender] has created a guide to help budding makers learn the skills of design for CNC milling. 

[Adam]’s guide starts from a basic level, considering 3-axis CNC milling with the most commonly used tools. From there, a whole range of tips, tricks, and potential pitfalls are discussed to help new machinists get to grips with CNC milling. Everything from dogbone corners, to tool selection and feature heights are covered, as well as cost-saving techniques like minimising the number of setups required.

These are skills any engineer will learn in a hurry when approaching an experienced CNC machinist, but it’s always better to go in forewarned and forearmed. Of course, for those eager to not just work with, but build their own CNC machine, we’ve covered that base too. Video after the break.

Continue reading “Design Tips For Easier CNC Milling”

How Much Wood Can A Woodpecker Chuck?

It’s probably clear to a Hackaday reader that we live in a golden era for hobbyist tool accessibility. Cheap single board computers can be bought at any neighborhood RadioShack or Maplin. 3D printers sell fully assembled and ready to run for less than $200. Even the humble CNC mill has come down the price curve, though as you might expect at the low end things can get pretty rough. Like a cheap 3D printer, a cheap mill tends to be missing some basic features you’d expect any reasonable machine to have. If you get your hands on one of these little wonders, [Shahada Abubakar] has a pair of great blog posts on the basic set of upgrades you’ll probably want to perform right out of the box.

Which cheap CNC mills are we talking about? They go by a few names. Last year our own [Kristina Panos] put together a review of a shockingly inexpensive “1610” type sold by Linksprite (go take a read if you’re already considering a purchase!). The “1610” class, so named for it’s 16 cm x 10 cm bed size, is pretty common under a wide variety of manufacturer names. You can find them in this size made of 8020 like [Kristina] did or as “upgraded” versions cut from 1/4″ mystery plastic (often referred to in the listings as Bakelite, but your guess is as good as ours as to the true material). 1610 is the smallest size but basically the same machine exists as an 1810, 2418, or 3018. Each has a 775 size spindle and a single PCBA that handles stepper drive and runs grbl.

So what’s the problem? Well for one none of these machines have limit switches, though the controllers support them. [Shahada]’s guide has handy instructions for what kind to buy, how to wire them, and where they can be attached. Plus an overview of the G-code instructions to send the controller in order to home and configure everything properly. The controllers also like to be driven continuously over serial (though some sellers seem to offer a separate board to drive them). This is fine if you have a computer handy, but like a 3D printer it can be nice to bolt a Pi Zero or similar onto the unit and control it over the network. [Shahada]’s second post has a link to a mounting plate you can print for exactly that setup, as well as some suggestions for configuring CNC.js to drive everything.

Do you have one of these machines? Done any upgrades? Tell us in the comments! We’re always looking for ways to upgrade our home shop.

How To Build A Mill With Epoxy

The typical machine tool you’ll find in a workshop has a base and frame made of cast iron or steel. These materials are chosen for their strength, robustness and their weight, which helps damp vibrations. However, it’s not the only way to make a machine tool. [John McNamara] has been working on a CNC mill with an epoxy base, with impressive results.

The molds were designed in CAD prior to casting, ensuring there was room for all required components.

The build is one that could be readily achieved in any decently equipped makerspace. [John] used lasercut steel parts to construct the molds for the epoxy base, with some custom turned parts as well. The precision cut parts fit together with great accuracy, and with proper control of the casting process there is minimal post-processing of the final cast piece required. The mold is built with zero draft angle, and is designed to be taken apart to remove the finished pieces. By using steel, the same mold can be used many times, though [John] notes that MDF could be used for a one-off build.

The base is cast in epoxy, mixed with granite aggregate and sand to create a strong, heavy, and vibration damping material. There are also steel reinforcements cast in place consisting of threaded rods, and conduits for various electrical connections. After casting, [John] has spent much time measuring and truing up the mill to ensure the best possible results from the outset.

It’s an impressive build, that shows that building your own accurate machine tools is quite achievable with the right tools and knowledge. We’ve seen similar work before, too – epoxy really does make a great material for casting at home.