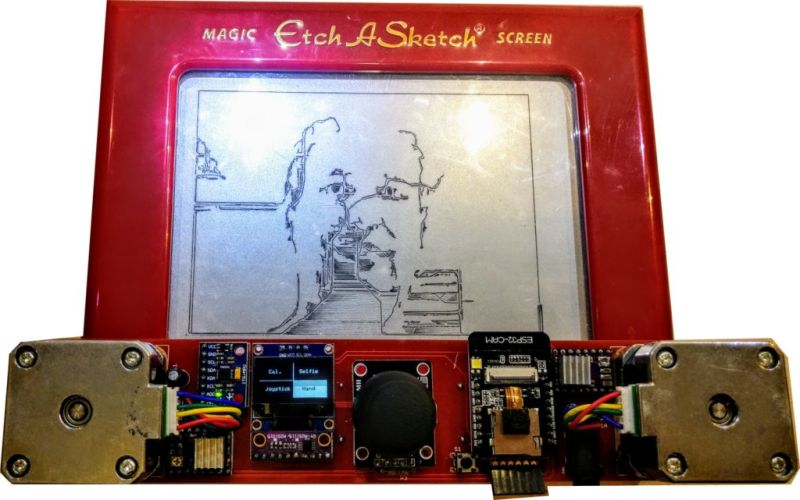
Taking a selfie before the modern smartphone era was a true endeavor. Flip phones didn’t have forward-facing cameras, and if you want to go really far back to the days of film cameras, you needed to set a timer on your camera and hope, or get a physical remote shutter. You could also try and create a self portrait on an Etch a Sketch, too, but this would take a lot of time and artistic skill. Luckily in the modern world, we can bring some of this old technology into the future and add a robot to create interesting retro selfies – without needing to be an artist.
The device from [im-pro] attaches two servos to the Etch a Sketch knobs. This isn’t really a new idea in itself, but the device also includes a front-facing camera, taking advantage of particularly inexpensive ESP32 Camera modules. Combining the camera features with [Bart Dring]’s ESP32 Grbl port is a winner. Check the code in [im-pro]’s GitHub.
Once the picture is taken, the ESP32 at the heart of the build handles the image processing and then drawing the image on the Etch a Sketch. The robot needs a black and white image to draw, and an algorithm for doing it without “lifting” the drawing tool, and these tasks stretch the capabilities of such a small processor. It takes some time to work, but in the end the results speak for themselves.
The final project is definitely worth looking for, if not for the interesting ESP32-controlled robot than for the image processing algorithim implementation. The ESP32 is a truly versatile platform, though, and is useful for building almost anything.


tl;dw
A bit of image processing and a servo driver. What’s the point of 14 mins video?
And a diy instructions :-)
s/servo/stepper/g
Excellent write-up on Instructables – thanks im-pro (Patrick K.).
However, since this project relies heavily on software from Adafruit, it would have been nice to see links on the project’s page to Adafruit’s website.
Even if you’re not supporting Adafruit through direct purchases (or product links) on your own project, you should give them some credit and link to the Adafruit page. People should make an effort to support the open-source resources they benefit from.
Thanks to [Bart Dring] for his ESP32 Grbl port – excellent to see this used on yet another cool project!
Cheers
Wow, that is awesome. Great idea, really impressive job getting it all working. And the detailed instructions and video are just amazing… people are so used to engineers-turned-youtubers like Mark Rober that they don’t appreciate the huge amount of work it takes to do a write-up and simple video, let alone detailed build instructions. Sorry I missed this when it was posted two years ago.