We’ve covered etch-a-sketch robots before, but usually they’re not quite as fast as [Every Flavor of Robot]’s “video” etch-a-sketch, capable of drawing a full portrait in as little as a minute.
Continue reading “Drawing Videos On An Etch-a-Sketch”

We’ve covered etch-a-sketch robots before, but usually they’re not quite as fast as [Every Flavor of Robot]’s “video” etch-a-sketch, capable of drawing a full portrait in as little as a minute.
Continue reading “Drawing Videos On An Etch-a-Sketch”

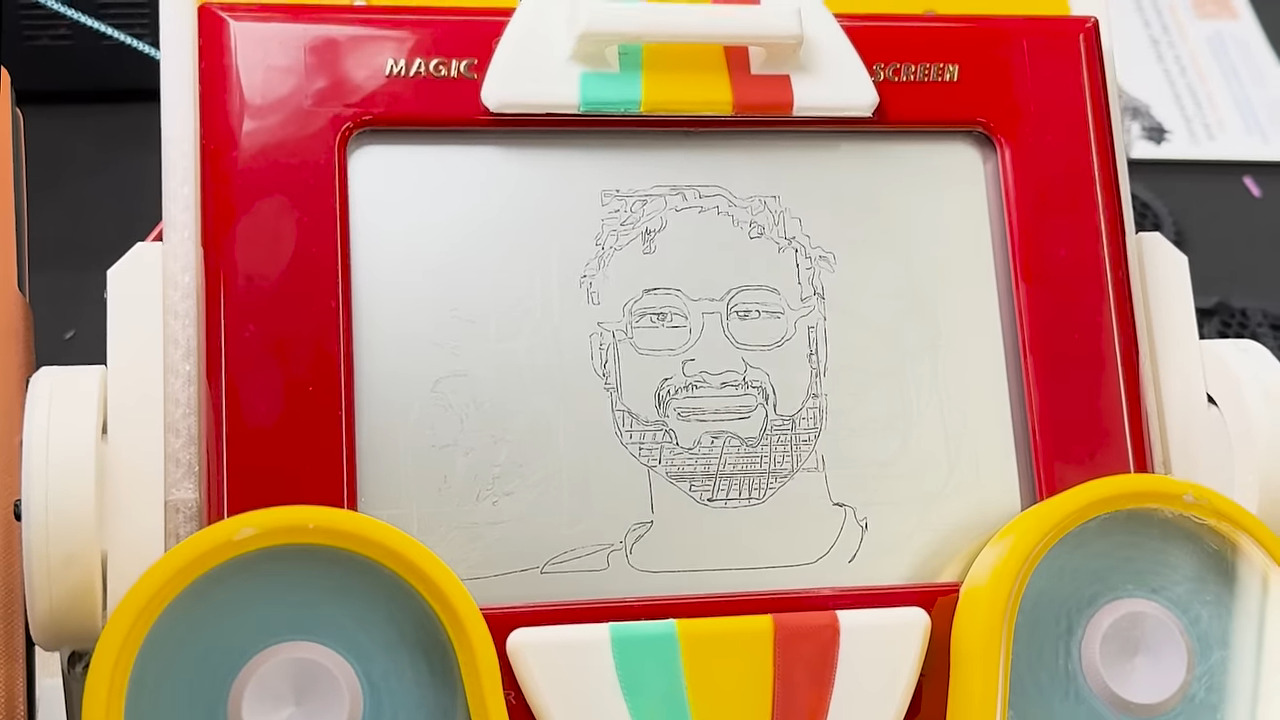
The Etch A Sketch was never supposed to meet a Raspberry Pi, a camera, or a mathematical algorithm, but here we are. [Tekavou]’s Teka-Cam and TekaSketch are a two-part hack that transforms real photos into quite stunning, line-drawn Etch A Sketch art. Where turning the knobs only results in wobbly doodles, this machine plots out every curve and contour better than your fingertips ever could.
Essentially, this is a software hack mixed with hardware: an RPi Zero W 2, a camera module, Inkplate 6, and rotary encoders. Snap a picture, and the image is conveyed to a Mac Mini M4 Pro, where Python takes over. It’s stripped to black and white, and the software creates a skeleton of all black areas. It identifies corner bridges, and unleashes a modified Chinese Postman Algorithm to stitch everything into one continuous SVG path. That file then drives the encoders, producing a drawing that looks like a human with infinite patience and zero caffeine jitters. Originally, the RPi did all the work, but it was getting too slow so the Mac was brought in.
It’s graph theory turned to art, playful and serious at the same time, and it delivers quite unique pieces. [Tekavou] is planning on improving with video support. A bit of love for his efforts might accellerate his endeavours. Let us know in the comments below!
Continue reading “TekaSketch: Where Etch A Sketch Meets Graph Theory”

The Etch-A-Sketch has been a popular toy for decades. It can be fun to draw on, but you have to get things right the first time, because there’s no undo button. [Tekavou] decided to recreate this popular toy in digital form instead to give it more capabilities.
The build relies on an Inkplate e-paper screen as a display, which is probably as close you can get in appearance to the aluminium dust and glass screen used in an Etch-a-Sketch. The display is hooked up to an ESP32 microcontroller, which is charged with reading inputs from a pair of rotary encoders. In standard drawing mode, it emulates the behavior of an Etch-A-Sketch, with the ESP32 drawing to the e-paper display as the user turns the encoders to move the cursor. However, it has a magical “undo” feature, where pressing the encoder undoes the last movement, allowing you to craft complex creations without having to get every move perfect on your first attempt. As a fun aside, [Tekavou] also included a fun Snake game. More specifically, it’s inspired by NIBBLES.BAS, a demo program included with Microsoft QBasic back in the day.
We’ve seen all kinds of Etch-A-Sketch builds around these parts, including this impressive roboticized version. Video after the break.

The Etch A Sketch is a classic children’s toy resembling a picture frame where artwork can be made by turning two knobs attached to a stylus inside the frame. The stylus scrapes off an aluminum powder, creating the image which can then be erased by turning the frame upside down and shaking it, adding the powder back to the display. It’s completely offline and requires no batteries, but in our modern world those two things seem to be more requirements than when the Etch A Sketch was first produced in the 1960s. Enter the Tilt-A-Sketch, a modern version of the classic toy.
Rather than use aluminum powder for the display, the Tilt A Sketch replaces it with an LED matrix and removes the stylus completely. There are no knobs on this device to control the path of the LED either; a inertial measurement unit is able to sense the direction that the toy is tilted while a microcontroller uses that input to light up a series of LEDs corresponding to the direction of tilt. There are a few buttons on the side of the device as well which allow the colors displayed by the LEDs to change, and similar to the original toy the display can be reset by shaking.
The Tilt-A-Sketch was built by [devitoal] as part of an art display which allows the visitors to create their own art. Housed in a laser-cut wooden enclosure the toy does a faithful job of recreating the original. Perhaps unsurprisingly, the Etch A Sketch is a popular platform for various projects that we’ve seen before including original toys modified with robotics to create the artwork and electronic recreations that use LED displays instead in a way similar to this project.

In a lot of ways, Etch-A-Sketch is the perfect toy; simple, easy to use, creative, endlessly engaging, and as a bonus, it’s completely mechanical. We find that last attribute to be a big part of its charm, but that’s not to say an electronic version of the classic toy can’t be pretty cool, especially when it’s done without the aid of a microcontroller.
This is one of those “because I can” projects that we always find so interesting, and more so because it wasn’t entirely clear to [BigZaphod] that he had the skills to pull it off. While his initial design centered around a bunch of 8×8 LED matrix displays and a 256×4-bit RAM chip, the rest of it was a lot of hand-waving. After a few experiments with addressing the LEDs, [Zaphod] started filling in the blanks with a refresh circuit using a 555 — naturally — and a pair of counters. Properly debounced encoders for the horizontal and vertical controls came next, along with more counters to track the cursor and a host of other circuits that ended up looking like a “one of each” selection from the 7400-series catalog.
While we do wish for a schematic on this one, it’s still a pretty enjoyable video, and the end product seems to work really well. The electronic version has a few features the original lacks, such as wrapping the cursor to the other side of the screen. We’d imagine that the buttons on the encoders could be put to work, too; perhaps a click could make it so you can move the cursor without leaving a trail behind. That might be a challenge to execute in logic, but then again, that was the point of the whole thing.
Still jonesing for that mechanical Etch-A-Sketch experience? Not a problem.
Continue reading “Electronic Etch-A-Sketch, No Microcontroller Required”

The Etch-a-Sketch was a great toy if you were somehow born with the talent to use it. For the rest of us, it was a frustrating red brick filled with weird grey sand. [Every Flavor of Robot] has taken the irritating knob-encrusted oblong and turned it into something we can all enjoy, however, by building an Etch-a-Sketch camera!
The build is simple. It uses an ESP32 microcontroller to run the show, equipped with a camera. The camera is used to take a photo of the subject, and the image is then sent to a desktop computer. The desktop runs the image through an AI pipeline that generates a simplified version of the image, and the necessary G-Code to draw it on the Etch-A-Sketch. The toy’s knobs are operated by a pair of brushless motors which have been geared down to provide more torque.
It’s a neat project, and more details are available on GitHub. We’ve seen some other great mechanized Etch-a-Sketch builds before, too.
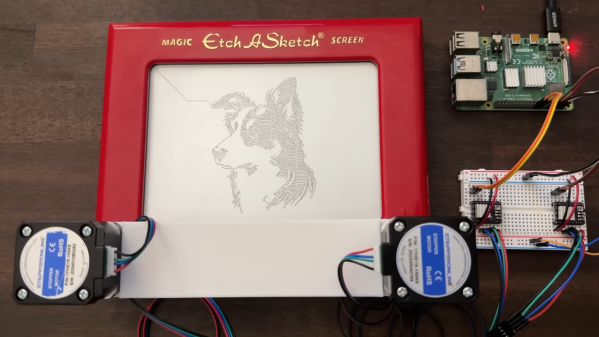
The Etch-a-Sketch was a popular toy, but a polarizing one. You were either one of those kids that had the knack, or one of the kids that didn’t. [Micah] was pretty firmly in the latter group, so decided to roboticize the Etch-a-Sketch so a computer could draw for him instead.
The build uses a pair of stepper motors attached to the Etch-a-Sketch’s knobs via 3D-printed adapters. It took [Micah] a few revisions to get the right design and the right motors for the job, but it all came together. A Raspberry Pi is charged with driving the motors to draw the desired picture.
Beyond the mechanics, [Micah] also does a great job of explaining the challenges around drawing and the drive software. Namely, the Etch-a-Sketch has a major limitation in that there’s no way to move the stylus without drawing a line. He accounts for this in his code for converting and drawing images.
The robot draws slowly but surely. The final result is incredibly impressive, and far exceeds what most of us could achieve on by hand. We’ve seen some similar builds in the past, too. Video after the break.


