Chiptunes Via USB MIDI With The AY-3-8910

There are many venerable soundchips in the chiptune pantheon, of which the AY-3-8910 is perhaps one of the lesser known. Having not served on active duty for Nintendo or Commodore it’s somewhat unloved in the USA, but it made its name in a variety of arcade and pinball machines and has quite a European following due to its appearance in machines bearing the Amstrad and Sinclair names. [TheSpodShed] decided to whip up a USB MIDI interface for the chip, with the help of the Arduino Pro Micro.

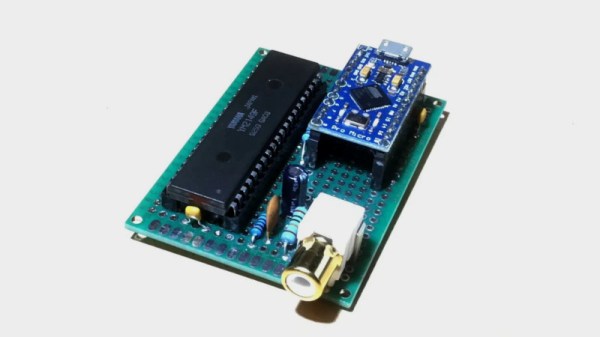
The Arduino Pro Micro is a Sparkfun creation, using the ATmega32U4 microcontroller. Its USB MIDI functionality makes it a perfect candidate for such a build, and it also packs enough digital IO to run the AY-3-8910, with 13 lines required to get things going. [TheSpodShed] whipped up the project on protoboard, with only a few passives needed along with the sound chip and Arduino.

The Arduino code was written with an eye to making the most of the chip’s limited polyphony. The synth prioritises the most recent received notes, while also aiming to keep the highest and lowest of the currently requested notes still playing where possible. This gives the synth the best chance of keeping the expected bass and melody intact when playing a wide variety of MIDI content.

It’s a tidy build, and one that shows some love for a soundchip some have forgotten. Of course, it’s not the only option – we’ve also seen the SAM2695 and YM2612 given the same treatment. Video after the break.

Continue reading “Chiptunes Via USB MIDI With The AY-3-8910”

Four Years Of Learning ESP8266 Development Went Into This Guide

The ESP8266 is a great processor for a lot of projects needing a small microcontroller and Wi-Fi, all for a reasonable price and in some pretty small form factors. [Simon] used one to build a garage door opener. This project isn’t really about his garage door opener based on a cheap WiFi-enabled chip, though. It’s about the four year process he went through to learn how to develop on these chips, and luckily he wrote a guide that anyone can use so that we don’t make the same mistakes he did.

The guide starts by suggesting which specific products are the easiest to use, and then moves on to some “best practices” for using these devices (with which we can’t argue much), before going through some example code. The most valuable parts of this guide especially for anyone starting out with these chips are the section which details how to get the web server up and running, and the best practices for developing HTML code for the tiny device (hint: develop somewhere else).

[Simon] also makes extensive use of the Chrome developers tools when building the HTML for the ESP. This is a handy trick even outside of ESP8266 development which might be useful for other tasks as well. Even though most of the guide won’t be new to anyone with experience with these boards, there are a few gems within it like this one that might help in other unrelated projects. It’s a good read and goes into a lot of detail about more than just the ESP chips. If you just want to open your garage door, though, you have lots of options.

Put A Smoke Detector To Some Use

While we’re certainly not denying that smoke detectors are useful, there’s a certain kind of tragedy to the fact that most of them will never realize their true purpose of detecting smoke, and alerting us to a dangerous fire. On the other hand, [Ben] really unlocks the potential hidden deep in every smoke detector with his latest project which uses the smoke-detecting parts of a smoke detector to turn on the exhaust fan over his stove.

The project didn’t start with the noble aim of realizing the hidden and underutilized quiescent nature of a smoke alarm, though. He wanted his range exhaust fan to turn on automatically when it was needed during his (and his family’s) cooking activities. The particular range has four speeds so he wired up four relays to each of the switches in the range and programmed a Particle Photon to turn them on based on readings from an MQ-2 gas-detecting sensor.

The sensor didn’t work as well as he had hoped. It was overly sensitive to some gasses like LPG which would turn the range on full blast any time he used his cooking spray. Meanwhile, it would drift and not work properly during normal cooking. He tried disabling it and using only a temperature sensor, which didn’t work well either. Finally, he got the idea to tear apart a smoke detector and use its sensor’s analog output to inform the microcontroller of the current need for an exhaust fan. Now that that’s done, [Ben] might want to add some additional safety features to his stovetop too.

Preserving Historic NASA Display Technology

When [Patrick Hickey] spent a tidy sum on eBay to purchase a pair of seven-segment displays used in the Launch Control Center at Kennedy Space Center during the Apollo program, he could have just put them up on a shelf. It’s certainly what most people would have done. Instead, he’s decided to study and document their design with the hope of eventually creating 3D replicas of these unique pieces of NASA history.

With a half century now separating us from the Moon landing, it’s more important than ever to preserve the incredible technology that NASA used during mankind’s greatest adventure. Legitimate Apollo-era hardware is fairly scarce on the open market, and certainly not cheap. As [Patrick] explains on the Hackaday.io page for this project, being able to 3D print accurate replicas of these displays is perhaps the best way we can be sure they won’t be lost to history.

But more than that, he also wants others to be able to see them in operation and perhaps even use them in their own projects. So that means coming up with modern electronics that stand-in for the 60s era hardware which originally powered them.

Since [Patrick] doesn’t have access to whatever (likely incandescent) lighting source these displays used originally, his electronics are strictly functional rather than being an attempt at a historic recreation. But we have to say, the effect looks fantastic regardless.

Currently, [Patrick] is putting most of his efforts on the smaller of the two displays that he calls “Type A”. The chunk of milled aluminum with integrated cooling fins has a relatively simple shape that should lend itself to replication through 3D scanning or even just a pair of calipers. He’s also put together a proof of concept for how he intends to light the display with 5mm LEDs on a carefully trimmed bit of protoboard, which he plans on eventually refining to reduce the number of wires used.

One aspect he’s still a little unsure of is how best to replicate the front mask. It appears to be made of etched metal with an integrated fiberglass diffuser, and while he’s already come up with a few possible ways to create a similar front panel for his 3D printed version, he’s certainly open to suggestions from the community.

This isn’t the first time we’ve seen a dedicated individual use 3D printing to recreate a rare and expensive object. While the purists will say that an extruded plastic version doesn’t compare to the real thing, we think it’s certainly better than letting technology like this fade into obscurity.

Pick And Place Robot Built With Fischertechnik

We’d be entirely wrong to think that Fichertechnik is just a toy for kids. It’s also perfect for prototyping the control system of robots. [davidatfsg]’s recent entry in the Hackaday Prize, Delta Robot, shows how complex robotics can be implemented without the hardship of having to drill, cut, bolt together or weld components. The added bonus is that the machine can be completely disassembled non-destructively and rebuilt with a new and better design with little or no waste.

The project uses inverse kinematics running on an Arduino Mega to pick coloured objects off a moving conveyor belt and drop them in their respective bins. There’s also also an optical encoder for regulating the speed of the conveyor and a laser light beam for sensing that the object on the conveyor has reached the correct position to be picked.

Not every component is ‘off the shelf’. [davidatfsg] 3D printed a simple nozzle for the actual ‘pick’ and the vacuum required was generated by the clever use of a pair of pneumatic cylinders and solenoid operated air valves.

We’re pretty sure that this will not be the last project on Hackaday that uses Fischertechnik components and it’s the second one that [davidatfsg] has concocted. Videos of the machine working after the break! Continue reading “Pick And Place Robot Built With Fischertechnik”

Teardown: Catel CTP300 Restaurant Pager

I have a problem. If I go to a swap meet , or even a particularly well stocked yard sale, I feel compelled to buy something. Especially if that something happens to be an oddball piece of electronics. While on the whole I’m a man of few vices, I simply can’t walk away from a good deal; doubly so if it has a bunch of buttons, LEDs, and antennas on it.

Table for one, by the window.

Which is exactly how I came into the possession of a Catel CPT300 restaurant paging system for just $20 a few months ago. I do not, as you may have guessed, operate a restaurant. In fact, as many of my meals take the form of military rations eaten in front of my computer, I’m about as far away from a restaurateur as is humanly possible. But I was so enamored with the rows of little plastic pagers neatly lined up in their combination charging dock and base station that I had to have it.

The man selling it swore the system worked perfectly. Even more so after he plugged it in and it didn’t do anything. But appearances can be deceiving, and his assurance that all the pagers needed was a good charge before they’d burst back to life seemed reasonable enough to me. Of course, it hardly mattered. The regular Hackaday reader at this point knows the fate of the CPT300 was to be the same whether or not it worked.

Incidentally, those cute little pagers would not burst back to life with a good charge. They may well have burst into something, but we’ll get to that in a moment. For now, let’s take a look at a gadget that most of us have used at one time or another, but few have had the opportunity to dissect.

Continue reading “Teardown: Catel CTP300 Restaurant Pager”

Vintage Computer Festival West Is Almost Here

If you’ve got an interest in technology, a penchant for that particular shade of yellowed plastic, and happen to be located in the California area, then we’ve got the event for you. The Vintage Computer Festival West is happening this weekend, August 3rd and 4th, at the Computer History Museum in Mountain View, California.

The Vintage Computer Festival offers a truly unique experience for anyone with a passion for all the silicon that’s come before. Where else could you sit in on a roundtable of early Apple employees discussing the bevy of authentic ultra-rare Apple I computers that will be on display, or get up close and personal with a restored Apollo Guidance Computer? If you really want to dive in on the deep end, Hackaday’s own Bill Herd will be in attendance giving his lecture about the effects of heat and time on the internal components of decades-old pieces of hardware.

Still skeptical? Perhaps you’ll get a kick out of the exhibit that celebrates more than two decades of Quake by hosting a LAN game where the classic game is running on less common platforms like the RS/6000 series or the Sun Ulta. If you’re interested in seeing modern reconstructions of classic technology, there will be plenty of that on display as well. Eric Schlaepfer will be showing off his transistor-scale replica of the iconic 6502 microprocessor, and you won’t want to miss the Cactus in all its rainbow colored toggle switch and blinkenlight glory.

Of course, if you’re in the market for your very own piece of computing history, there’s no better place to be. The consignment area gives showgoers a chance to buy and sell all manners of vintage and unique hardware, harking back to the days where the best way to get your hands on a computer (or the parts to build one) was by attending a dedicated event. Plus, no shipping fees!

Put simply, there really is something for everyone at the Vintage Computer Festival. Even if you weren’t around to experience Apple II or Commodore 64 in their prime, these events are a rare opportunity to learn about the early days of a technology that today we all take for granted. Have you ever wondered how programs were entered into those early computers with nothing more than a bank of toggle switches and an array of LEDs? One of the passionate exhibitors at VCF will be more than happy to walk you through the process.

At the end of the day, preserving this technology and sharing it with future generations is really what it’s all about. Just as in previous years, Hackaday is proud to sponsor the Vintage Computer Festival and further their goal of ensuring this incredible shared heritage isn’t lost.