Year over year, the Queercon badge is consistently impressive. I think what’s most impressive about these badges is that they seemingly throw out all design ideas from the previous year and start anew, yet manage to discover a unique and addictive aesthetic every single time.
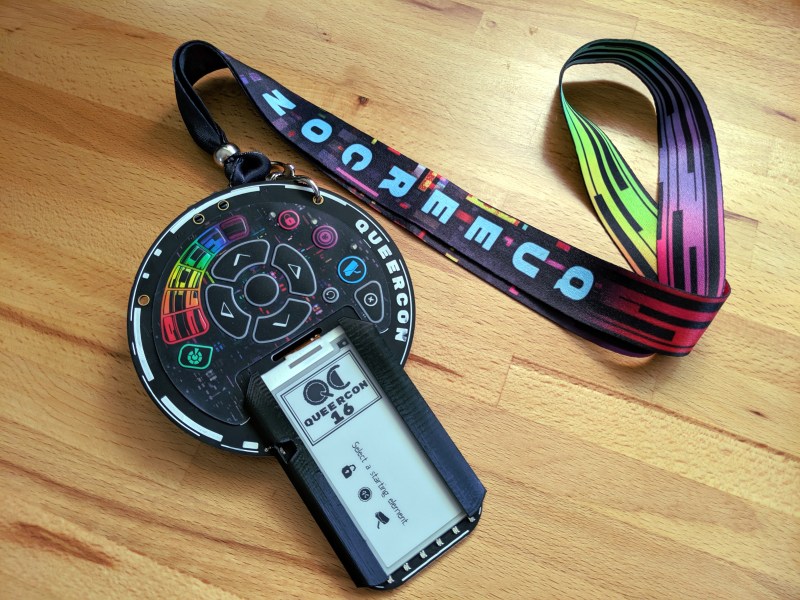
This year, there are two hardware badges produced by the team composed of Evan Mackay, George Louthan, Tara Scape, and Subterfuge. The one shown here is nicknamed the “Q” badge for its resemblance to the letter. Both get you into the conference, both are electronically interactive, but this one is like a control panel for an alternate reality game (ARG) that encourages interactivity and meaningful conversations. The other badge is the “C” badge. It’s more passive, yet acts as a key in the ARG — you cannot progress by interacting with only one type of badge, you must work with people sporting both badge types so that Queercon attendees who didn’t purchase the Q badge still get in on the fun.
The most striking feature on this badge is a custom membrane keyboard tailored to playing the interactive game across all badges at the conference. But I find that the eInk screen, RJ12 jack for connectivity, and the LED and bezel arrangements all came together for a perfect balance of function and art. Join me after the break for a closer look at what makes this hardware so special.
How Many Badges Have a Custom Keyboard?
At first glance it’s easy to miss how special that keyboard is. It takes up the circular area on the face of the badge and three things catch my eye, challenging what I thought these membrane keyboards could be. First, the full-color printing and surface finish are both incredibly well-done. Second, this is not a boring key layout (okay, the direction keys are slightly boring) but one custom tailored to the ARG. And finally, there are LEDs lurking behind this keyboard!


Evan MacKay says he warmed to the idea of using a membrane keyboard when he discovered they can be printed in CMYK full color. The process is actually rather easy, requiring a mechanical drawing and the art for the printing process, both sent as a PDF file. The manufacturer gave them samples of the spacers used to incorporate LEDs under the membrane — these come in 5, 7, or 10 mils. Looking at the underside of the keyboard you can see the spaces for both LED and the domes of the buttons. The stackup was delivered with adhesive layer already installed. Just peel off the backing and stick it to your PCB.
These keys are embossed into the membrane which means there is not a separate mechanism to spring them back. This caused an occasional failure of a stuck button, but usually the button could just be popped back out again. The next level up would have been to include metal domes that pop back after pressing, but of course this adds to the cost.


A stunning 2.9″ 128×296 eInk display delivers a hi-res playground for displaying your name and playing the ARG. It delivers a lot more versatility than the character LCD screens used in last year’s badge (but I must say I loved that idea too!).
On the two long sides of the screen you’ll find six side-view RGB LEDs. Originally these were not meant to have bezels, but early testing proved too much light was leaking on the top side of the parts so black 3D printed brackets were added. The outer edge of the PCB has twelve more full-color LEDs, six on top (top view style) and six on bottom (side-view style).
The badges are powered by a TI CC2640R2 which has an ARM Cortex-M3 core and brings Bluetooth to the party. Control of the LEDS is provided by a Holtek HT16D35B LED controller which is a 28×8 constant current driver. A pair of AA batteries powers the badge using Evan’s favorite Skyworks voltage regulator which keeps the badge running even as the cells droop down as low as 1.2 V — I think it’s the AAT1217.
The C Badge and the ARG
This is the C badge available to all Queercon attendees who chose not to purchase the Q badge. The Crew badge pictured here is unpopulated, but on the attendee version you can see a jack that looks like Ethernet or telephone. It is neither, and I’m amused by the silk screen on the back that reads “DO NOT PLUG INTO PHONE JACK PLZ!”. It’s an RJ12 6P6C connector that works with the cable provided with each Q badge. It is the method for connecting between badges to further the ARG.
People pursuing the interactive game must seek out holders of both Q badges and C badges to exchange digital tokens. The Q badges hold locks, coins, and cameras while the C badges hold keys, cocktails, and flags. As the game progresses, missions can be downloaded from handlers (the staff badges). There’s even a base station in the chill out room that can report your progress. Each time someone checks at one of these pillars, their overall progress is added to the sum total and the pillar begins to change color — it’s a scoreboard for the common good.
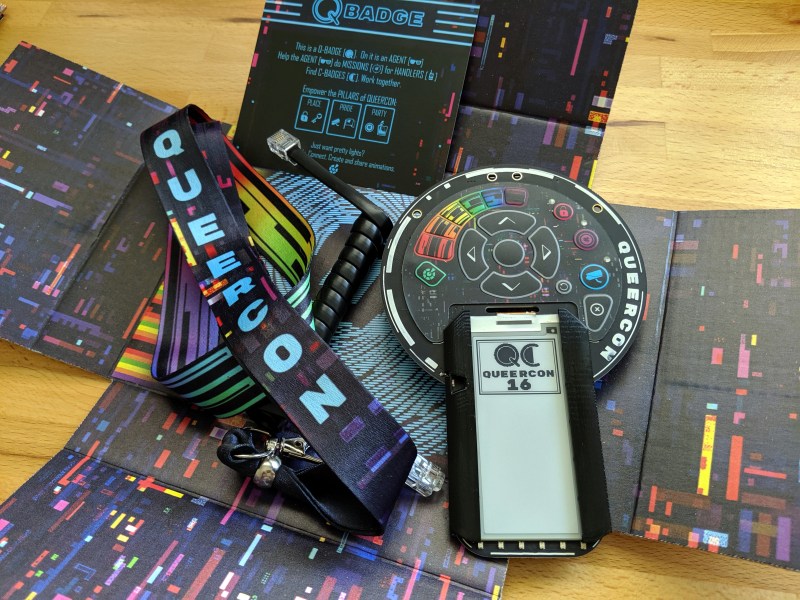
The overall presentation for the Queercon 16 badge is a home run. Tara Scape headed up the art design for this year’s conference and incorporated it into the badge, from the PCB art to the membrane keyboard, and even the inside of the box. It’s a total package that feel like you’ve been given a gift and will be cherished by everyone who got to unwrap this colorful little gem that helped guide their experience at the conference.
Evan has been on the badge team for seven years now and I asked if it was taking its toll. He gave me an emphatic, no. It seems he has plenty of energy for the next big build. I can’t imagine how to top this excellent example of small-run hardware done right, but I’m sure they’ll pull it off somehow. From the first QC badge I ever saw (the floppy disk) to the swooping lines of the squid the brilliant cube of QC14, clever use of old-stock displays, and now onto the “Rainbow Blade Runner” motif this year, the back catalog from this badge team is a gilded tome of inspiration.


Wow. The round input pad, the irregular key layout, the offset ePaper display and the phone plug for communication are all really interesting inspirations for building handheld portable computing devices.
I agree with that what we read here at Hackaday can get creative juices flowing for many. Unfortunately they have a short life particularly if, an original projects use surplus or out of production components.
Queercon , this the first time I became of that group. Good to know, because I hope to be a motivating force in creating community workshop. Being an across the spectrum moderate, I care more about what you are willing to try to do for community at large, and not so much who your are. While researching what Queercon is, I discovered there at two costs of entry into the convention. The more costly electronic badge for tho with heavier wallets, and lower cos badge for those with lighter wallets, it that typical with most conventions?
Usually badges are optional and separate from the con ticket.
In the past, entry to Queercon events has been free. Last year, we added paid admission for a few of our bigger events, with some opportunities to get free entry by participating in our other free events.
This year, since we had a large (25k sqft) convention space, we had to charge admission. Think of the cbadge as Queercon’s version of a typical conference badge required for admission. Those were for sale on site.
The larger qbadge was the continuation of our full blown electronic badge – about half of them are available for paid pre-reservation. But once those sell out, the remainder are not for sale and are only distributed for free during the con, to people who participate in our events.
Either badge was good for access to our events this year, and having the bigger qbadge didn’t give any special or extra level of access.
If such a thing were done, one could re-use some of the badge design by rotating a Q-badge 90 degrees counter-clockwise and making a new printed cover that resembled the letter C. POOF! Instant Commodore con badge!
I see what you did there (ง •̀_•́)ง
Any chance to get a write-up about the design and procurement process of the custom keypad? Depending on cost and MOQ, this could inspire a ton of interesting applications.
Yes that. How to obtain. I’m not actually sure how the membrane switch is working in this example either. What is underneath the buttons?
We’ll have a detailed technical write up done in a week or two. Normally we get it done before the con but we’re behind on it this year.
TL;DR we paid about $5 per unit, including tooling and NRE, at qty 700 for the switch from a US supplier. Their manufacturing techniques seem to be largely compatible with short runs (e.g. laser cutting as opposed to tooled die cuts). The underside of the buttons is printed with a conductive material, and there is a 7 mil spacer layer between that and the adhesive, and the buttons are embossed to give them a bit of travel. The board has shorting pads (interlocking copper “fingers”) in a fairly typical matrix setup, which the rear of the buttons bridges.
Thanks :)