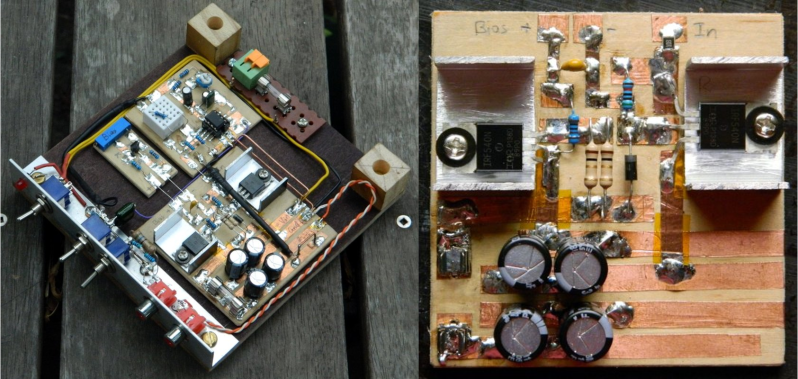
Somewhere between shoving components into a breadboard temporarily and committing them to a piece of protoboard or a PCB lies the copper tape method. This flexible Manhattan-style method of circuitry formed the basis for [Bunnie Huang]’s Chibitronics startup, and has since inspired many to stop etching boards and start fetching hoards of copper tape.
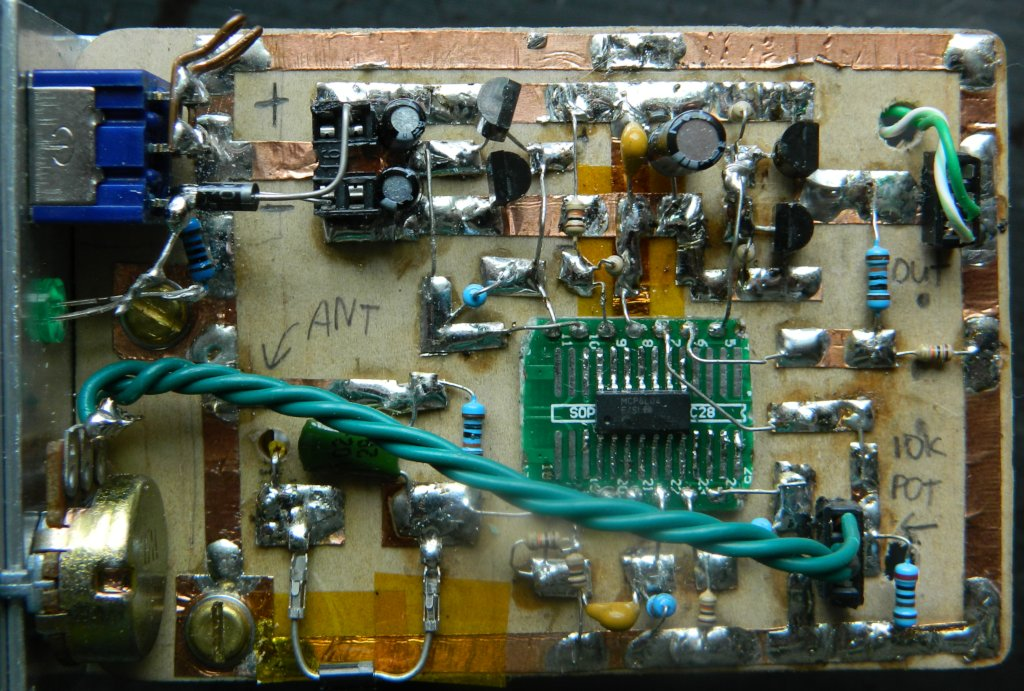 [Hales] hit the ground running when he learned about this method, and has made many a copper tape circuit in the last year or so. He offers several nice tips on his site that speak from experience with this method, and he’ll even show you how to easily work an SMD breakout board into the mix.
Generally speaking, [Hales] prefers plywood as the substrate to paper or cardboard for durability. He starts by drawing out the circuit and planning where all the tape traces will go and how wide they need to be. Then he lays out copper traces and pads, rubs the tape against the substrate to make it adhere strongly, and reinforces joints and laps with solder before adding the components. As you can see, copper tape circuits can get pretty complicated if you use Kapton tape as insulation between stacked layers of traces.
Copper and Kapton (polyimide) tape are just two of the many useful tapes you may not be aware of. Stick with us a moment and check out [Nava Whiteford]’s exploration of various adhesive marvels.


He’s got some interesting non-traditional attempts to make PCBs as well. Check out his links. Some of these could make for a good HAD fail of the week article.
https://halestrom.net/darksleep/blog/015_aluminium_silicon_pcb/
https://halestrom.net/darksleep/blog/016_veroetch/
Fifty years ago you could buy thin copper tape, specifically to do this. One company promoted the scheme, selling one sort of perfboard to go with it. I can’t remember which company, or it would be easy to find details in old magazines. There was at least one artifle about it around 1971 or 72 in “73” magazine.
An alternate was perfboard with copper traces along the width or length, you’d cut the traces where you didn’t need continuity, of course soldering to the foil when you needed a connection.
The 1970s were fifty years ago that means… The 1980s were forty years ago and we still complain
about stuff from then! Makes you wonder…
The “permanence” of Copper tape is limited by the adhesive. I had some thin copper tape from the old days that were all dried up and can’t stick any more.
If it was that old, maybe you were supposed to lick it…. it’s plenty safe until you get the green rings round your eyes… okay, moisten it with a sponge then, whatever.
Reminds me of the 80’s make up, is there a connection?
I was referring (A bit badly, I see now they are not very green in most instances) to https://en.wikipedia.org/wiki/Kayser%E2%80%93Fleischer_ring
Old post, but… if you have non-sticky copper tape laying around you still want to use, get some liquid “conformal coating” (applies from a bottle like nail polish) and go over it with that. Will stick it down as well as seal the surface to protect from shorts (or apply a bit of kapton tape as well, to really ensure sealing/stuck down). If it’s just “sorta” sticky, you can get it all laid out, cover the “exposure needed” bits, and use a spray conformal coating instead. Just some thoughts/ideas.
Nuclear weapon is really weird and dangerous thing. I think radiation can kill many people for short time. Many countries have problem with radiation. I also try to follow different blogs and news about this topic. Some info I found on ecotestgroup
While following this link I found a youtube vid with a nice overview of different prototyping methods:
https://www.youtube.com/watch?v=kH110yjYZ2g
And that video references:
http://qrpme.com
which has a bunch of kits targeted at easy prototyping, for example the little brass vice cubes:
https://www.youtube.com/watch?v=mwiv5eGqOxk
Dude, you gave me a nice idea.
Re/create a flat cable with stripes of copper cable and (transparent) duct tape.
The whole assembly does not need to have the right pitch, only the ends to connect existing things if needed.
This method of construction is interesting, but with the ease of free cad and almost overnight pcb delivery it is only useful for prototyping. And DO NOT rub the tape on the substrate with bare fingers or you’ll get the deepest cuts!
One can get a 5 double sided PCBs with plated through holes and 6 mil traces on 6 mil spaces in 6 days for $2.00. Why use copper tape or even a breadboard?
Because it is fun.
Prototyping. Same idea woodworkers, metalworkers, furniture builders, etc. often use cardboard, foam, and some other cheap and easy to cut material to test fit parts before cutting the final design.
I do have a question regarding the copper tape, though, how does the backing adhesive stand up to being heated during soldering? I’d have imagined any adhesive would just melt into a gooey mess it’s heated up to that high of temperature.
I used some of this tape in a school project. You really need to pay attention to your heat flow if you are using this method. If the tape gets to hot it looses its stickiness, however if you heat things up just enough to solder your devices it works fine.
I wonder if they’ve tried that as an advertising slogan “When every second counts, your PCBs are only slightly less than a week away.”
Some of us RF engineers were doing this before you were born with Wainwright in bare copper groundplain
I use breadboards because I don’t plan things out. I root around in my various parts bins and start clicking then together like Lego to see if I get the desired outcome. Then usual Google some stuff and start troubleshooting. Not everyone wants to design a PCB for a one off project.
Not in Australia. $2 PCBs + 30-40 AUD shipping if you want them in 6 days. Even two-week shipping is still magnitudes more than the PCB cost.
It simply takes too long. I want to make something today or even over the next few days, not weeks in the future.
I have been cutting & laying this entirely by hand. No issues with sharp edges, I have not even thought of it. Feels completely safe to handle.
In various other experiments I have also used aluminium tape (aluminium foil + double-sided adheseive). It feels almost identical to the copper stuff. I suspect that in this format it is too structurally weak to cut skin, just as normal kitchen foil is.
For sake of correctness, while kapton is a brand-name of a polyimide tape, not all polyamide tapes are Kapton. Also, despite the naming convention there are other blends of polyimide.
I have been buiding circuits using copper pads glued to pub material which involves gluing pads but I have stared to experiment with copper slug tape its good but take care not to put heavy parts on this has the glue will pull off pcb the glue on back is non conductive who’s is good looks neat I will use it a lot now