Like most of us, I sometimes indulge in buying a part for its potential or anticipated utility rather than for a specific project or purpose. That’s exactly how I ended up with the WSX100 Wi-Fi Stepper, a single board device intended to be one of the fastest and easiest ways to get a stepper motor integrated into a project. Mine came from their Crowd Supply campaign, which raised money for production and continues to accept orders.
What’s It For?
The main reason the Wi-Fi Stepper exists is to make getting a stepper motor up and running fast and simple, in a way that doesn’t paint a design into a corner. The device can certainly be used outside of prototyping, but I think one of its best features is the ability to help quickly turn an idea into something physical. When prototyping, it’s always better to spend less time on basic bits like driving motors.
In a way, stepper motors are a bit like RGB LEDs or LCD displays were before integrated drivers and easy interfaces became common for them. Steppers require work (and suitable power supplies) to get up and running, and that effort can be a barrier to getting an idea off the ground. With the Wi-Fi Stepper, a motor can be fired up and given positional commands (or set to a speed and direction) in no time at all. By sending commands over WiFi, there isn’t even the need to wire up any control logic.
Why Use Steppers?
Stepper motors are great for any project that needs to do physical work in the real world with any sort of exactitude. Every 3D printer, laser cutter, and other CNC device uses them. They’re inexpensive, come in standardized shapes and sizes, can be precisely controlled, and can interface with many things directly without needing a gearbox. The downside is that steppers aren’t quite plug-and-play. They may be common, but they are also relatively complex electromechanical devices that require more than just applying power to get them to move. If you’re new to the idea of steppers, this project explains the theory and inner workings beautifully by using an oversized, 3D printed stepper as a visual aid.
What the Wi-Fi Stepper Delivers
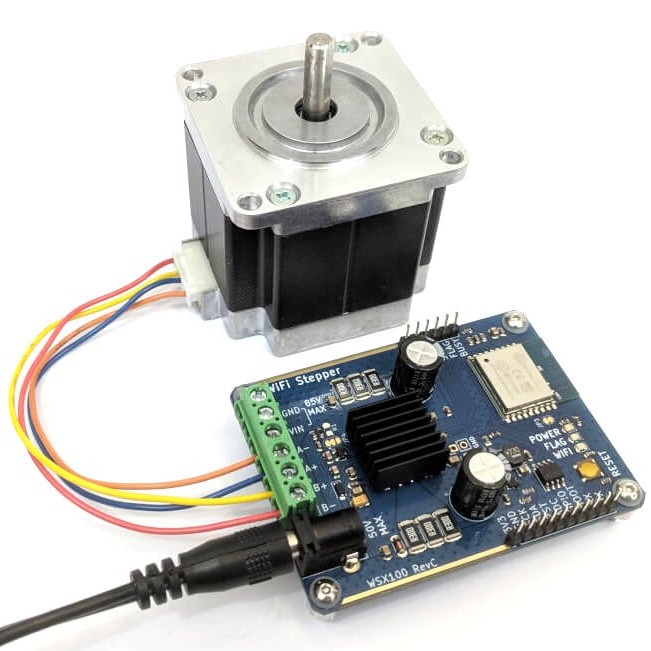
All that’s really needed for the WSX100 to work is to hook up a DC power supply (input range of 9-80 V supported) and attach a stepper motor; there are convenient presets for NEMA 11, 17, 23, 34, and 42 motors. Once power is applied, the board will by default create a wireless access point named wsx100-ap with a unique id appended to the name.
Easy operation consists of connecting to the device’s network, then opening a browser window to 192.168.4.1 (or wsx100.local if enabled) and using the Quickstart section of the web interface. From there, the motor can be set to either servo mode (motor moves to a position on command) or speed mode (motor is given a direction and speed), and is then ready to move.
All configuration and basic movements are accessible via this web interface; simply drag the shaft position or click a direction and the motor will immediately do it. There are also Python and RESTful interfaces, so all commands and configuration can be done using HTTP GET requests, usually from python or a bash script (the latter uses curl piped to jq, a tool for command-line JSON processing.)
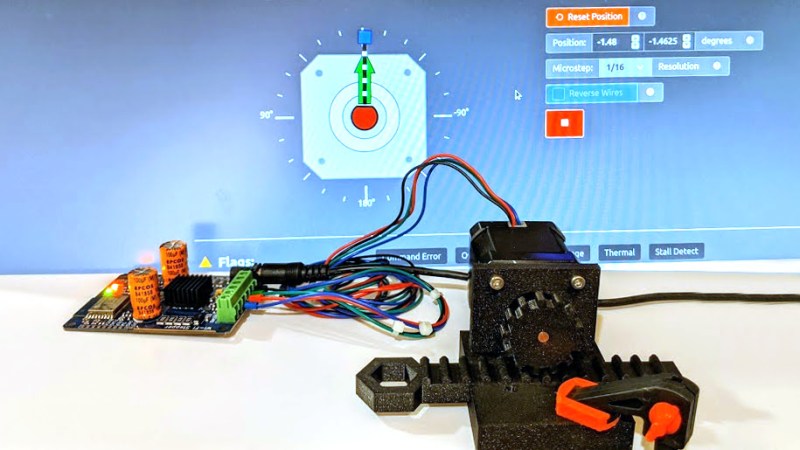
Embedded below is a short video demonstrating Servo Mode with a NEMA17 motor attached to a simple 3D-printed assembly. First the servo is moved by dragging the handle in the web interface, then a simple bash script is run that demonstrates bouncing between two points with a one second delay between each position. The commands in the script came from copying and pasting from the Quick Code section of the web interface, one of several handy features.
‘Quick Code’ Feature
There’s a particularly handy section in the web interface I want to highlight. After setting all desired configuration options (and there are presets for everything from NEMA 11 to 42 as well as stall detection, shutdown parameters, and everything else) and optionally giving a movement command, a Quick Code window provides matching sample code for both Python and Bash scripts. Therefore, after using the web interface to test things, a cut and paste will provide code to do exactly the same thing.
What the Wi-Fi Stepper board doesn’t have is a hardware encoder for absolute motor position sensing. This isn’t uncommon, but don’t misunderstand “Servo Mode” as implying the presence of such an encoder. Servo Mode in this context refers to moving the motor shaft by telling it to go to a specific position, which it then does and holds that position until further notice.
There’s one more feature I’d like to get into: wireless security.
Let’s Celebrate That Security Wasn’t An Afterthought
Something that caught my eye on this project was how seriously security was taken during development. Being mindful of security is good practice in principle, but there’s a practical consideration as well. The developers made a valid point that since the board can support large motors at high currents, there is potential for real damage to result from someone mistreating or compromising the unit and telling it to do things it shouldn’t. Security is always worth taking seriously, but as the developers put it:
Security is hard. Really hard. In a world where IoT devices are notoriously bad at security, we hope [our efforts are] a step in the right direction.
You can gain some insights into security design by reading the developer update that explains how exactly they approached securing a device like this. Briefly, it starts by stating some assumptions about how the device will be used and in what context, and letting the security design flow from those points.
In the case of the WSX100 Wi-Fi Stepper it is assumed that the device will be provisioned and configured in a secure environment, no sensitive information will be transmitted as part of commands, and physical security (e.g. tamper protection and detection) is out of scope. Working from these assumptions, the WSX100’s security focused on ensuring that only commands from an authenticated source are considered valid (thwarting things like man-in-the-middle and replay attacks.)
To do this, the WSX100 uses the ATECC508A by Microchip to provide an authentication key framework, and if enabled, implementing it is made painless by the API. Once the master key is set on the device, commands are transmitted unencrypted but with a computed signature attached. If a command’s signature is not valid, the command is not legitimate. It is not possible to deduce the master key from the signature, and by not encrypting transmissions there is minimal overhead and latency added.
The team also explains possible security issues that have not been addressed or could still cause problems. For example, for a wireless device denial of service or jamming is a possibility. While not much can be done to prevent attacks of that nature, it is possible to use timeouts to ensure that motors are parked in safe positions in the case of a loss of connectivity.
It’s wonderful to see security taken seriously, and not as an afterthought.
How Does It Fare?
The Wi-Fi Stepper is easy to get up and running, supports a wide range of motors and voltages, and security hasn’t been ignored. So far so good, but what does it do best, and are there any shortfalls?
As someone who doesn’t live and breathe steppers in my usual projects, some of the best value comes from making them almost plug-and-play. Any projects that do physical work (like automatic pet feeders or automated curtains) are better to develop the easier it is to play with the motors. Also important to consider are the things it doesn’t do.
The Wi-Fi Stepper absolutely does a great job of getting a motor moving, but it doesn’t have any external sensors (like limit switches) or simple ways to add them. That means it’s ridiculously easy to tell a motor “start turning” but adding “…until this switch is hit, then stop” is up to the developer. [Update: Good news! Actually there is an input for this; it’s the SW pin and GoUntil command. See also below.] Likewise, there is no built-in support for an encoder with which to track and sense the motor’s real-world position, so applications that require an encoder will need one added and managed separately. The API and web interface won’t have any knowledge of them.
That all being said, position encoding isn’t necessary for using steppers effectively and the device’s Servo Mode — the ability to tell the motor to move to a certain position and stop there — can cover most bases. Still, being able to integrate a limit switch or two would have been a nice feature. [Update: The SW pin can be used to attach a zeroing or limit switch. It works with the GoUntil command, which I had embarrassingly completely missed until it was kindly pointed out to me.]
The ability to get a stepper going with minimal wiring and little more than a browser window is an awfully nice tool that I’m delighted to add to my workbench. The WSX100 Wi-Fi Stepper is, of course, open source. The Github repository is here and online documentation is at wifistepper.com. It’s available directly from Crowd Supply.


A bad idea whose time has come.
I can’t imagine any way this would be useful. Doing anything like sensing limits and then telling the motor to stop via commands over Wifi would be epic bad design.
If the control board had provision for GPIO and easy firmware changes, it might be useful.
109 people who gave an average of $108.75 each would disagree with you. It’s a small sample size, but nevertheless it’s there. But I get it, gatekeeper’s gotta gatekeep, and what is the internet for but to identify things we personally can’t see a use for and issue blanket statements about how little use they could possibly have.
As an aside, if you wanted GPIO, and easy firmware changes, wouldn’t you just go with an arduino/pi/[microcontroller/soc board of the week]?
People wanting to pay money for it doesn’t make it a good idea… not by a long shot.
+10 -a fool and such… Yeah, I’m sure some will find uses, but seems maybe limited for artsy type of things where safety/limit switches/absolute positioning aren’t really a need, where steppers would otherwise generally have strengths… Without those features seems like you might as well have a plain old DC motor, in my limited imagination. – It flies a nice ‘I’m easy’ flag, so maybe they’ll sell some.
I’m also having a hard time imagining a scenario where this is useful, except for maybe very basic demonstrations. But when I think of a stepper motor being useful, it’s always in conjunction with other parts.
The value to many people comes in the ease of integration. This device can be controlled directly from virtually any language using its RESTful interface. That makes it instantly accessible to python, java, .net, JavaScript, and every other flavor of web enabled languages, with no libraries or device drivers needed.
Is it missing stuff that you’d normally think of with a stepper motor? Heck yeah. Lack of position control might be a deal breaker for some. It might not be the most precise solution for an industrial controller, such as a 3D printer, router, etc. And it’s certainly not suitable for any life or safety applications.
But it might excel at something like a high school competition robot, where a high powered laptop can compute a real-time solution much quicker than an on-board microcontroller. So the kid who knows how to write java code can finish the program all the way to the motor, instead of waiting for the electronics expert to wire up an Arduino with a RAMPS board, or home-brewing a communications protocol.
Lots of people still want random single- or multi- axis devices to bring their ideas to life, like a motorized pointing arm on a billboard indicating real time progress of some data point, or a mannequin’s movements synchronized with video or audio. This puts those motors within reach of a lot of people by solving motor control and communications issues for them.
I learned long ago that just because I can’t imagine an immediate use for a thing doesn’t mean that others suffer from my lack of imagination. So if you don’t know what to do with it, it’s best to let other people figure something out. Because they will build cool stuff with it, even without your permission.
– it has to match the size of the back of a stepper
– it have to have a feedback and a position sensing
I’ll just leave this here then…
https://www.google.com/search?q=NEMA17+MKS+SERVO42B
No doubt you are expecting this custom design work to be done for free
A nice idea, but would be better to also have some wired inputs available, so you can quickly prototype with a servo in an environment where wi-fi is unreliable or where you want to control a servo from a computationally weak device like a microcontroller which prefers to use I2C or uart serial instead oif thye luxury overheads of IP layer communications and python which become available when using a powerful single board computer with an OS such as a Rasp Pi. Would also be good to add an absolute encoder to the stepper motor somehow, that way you get the best of all three worlds, servo, stepepr and DC combiend at once.
Provision for feedback or even limit stops is obviously redundant these days when all floors of habitable areas have smoke alarms, just keep driving it until you hear the beeping…
I have developed a number of IOT components like this that are designed to run on a small dedicated secured local network. Wifi WPA2 security is adequate with a long enough random key and with each network being dedicated to a small set of devices, although message signing is a nice addition. It is essential, though, that such devices are failsafe, so limit switches, watchdogs etc. must be hardwired to the devices. Also, I standardized on MQTT over TCP/IP for simplicity, and the easy use of Node-Red for prototyping, rather than supporting multiple interfaces. It would be great if a wide variety of such “components” were readily available to allow control systems to be quickly assembled. The addition of a hardwired interface, say supporting MQTT over something like RS485, would provide even more versatility.
” When prototyping, it’s always better to spend less time on basic bits like driving motors.”
It’s for version 0, proof of concepts. Artworks might be fun, too. Anything that requires synchronized movement of multiple motors will need something version-1-ish. What’s yer gripe, you whiners?
I’ve been thinking where this would come handy. and tell you what: I’m still thinking…
what is hard with steppers. you plug them in in a stepper driver board (no brainer) and control them with a direction pin and step pulses. how simple do you want it to be?
Oh wait…
but of course! i’ve foud it!
This is just perfect for a razor robot!. put three or four of them on a arm with a sharp razor blade and just code away!
Lol’d at the robot idea.
As a former engineer, I must warn users that operating without feedback sensors and limit switches can be very dangerous. Furthermore, no potentially unsafe operations should be conducted over a bluetooth link (no matter HOW secure). It sounds fine for messing around in your own shop.
you just might end up with a whole bag of cat food on the floor if you are not careful
Did you try to construct a cat feeding robot?
When I got my Prusa MkIII I was amazed at how well stall detection works in lieu of limit switches. As a result, I built something like this project, only wired (and with no security) over the last couple of weeks, for an ultra slow cross and longitudinal feed on my old manual lathe, where there’s no easy way to put in limit switches as the travel extent will change with every job so I’m just going to have to stop it by hand or if I screw up rely on stall detection. I wish I’d run across this project earlier. It’s worth the price.
Duh, it’s a stepper motor, not a servo motor. You certainly don’t need limit stops if you are driving an augur to dispense cat food, or for any other application like a clock where the motor just turns You don’t need limit stops for a stop-motion animation controller. These are the subjects of hackaday articles, for those who could not think of an application.
The fact that limit switches were left off severely restricts the use. Yes, it could be used for a cat food augur but not much more. I hope version 2 includes at least one input (more please) so there can be a defined home position. The main point of using a stepper is lost if you do not know where it is. You may as well just use a geared motor.
I’ve designed industrial control stuff for years, and some sort of watch dog is really recommended. Just imagine what can happen in a factory when the comms fails or some other bug occurs, and your great big motor driving a machine keeps going past the point it should stop.
I do realize this is aimed at hobby market, and it is a fun device. I’d quite like to play with one myself, but please consider the addition of an input or two.
An encoder would be nice, but not essential. Most 3D printers get away without then quite well.
But, add inputs, at least 4 I think. A home, then a pair that can be encoder signals, and another for an input switch.
An analog in would be nice too .
In the article I said that the device lacked an easy way to use a limit switch, but it turns out I completely missed that there is a little command in the API called GoUntil: https://www.wifistepper.com/commands/motor.html#gountil
There is an input on the board labelled SW. Attaching an external switch to that pin can make it work as a zeroing or limit switch, when used with the GoUntil command.
I had (embarrassingly) completely missed that, until the developer kindly pointed it out to me. Oops!
I’m not familiar with programming the ESP8266 in the WiFi Stepper. One quick question (hopefully not dumb):
How would one enter the GoUntil command? QuickCode in my browser shows the python script, and the parameters may be changed via the QuickCode menu. However I see no way of directly editing the script in the browser. Would I need to use OTA to modify the script? I would greatly appreciate if someone could steer me in the right direction. I am eager to learn.
Thank you.
Dear Jack: You need some means of “sending” commands back to the wifi stepper. I use bash with the cURL utility, which sends command in the form of http “get” requests. You choose bash on the quick start, and then cut and past to to cURL. once you can move the motor, you can then create your own Motor commands using their command list and cURL.
I usually write this stuff to a text file, CHMOD it to execute, and run in MACOS terminal. I forget where I got cURL.
The script sets a bunch of environment variables (for easier reading they say) and the last half issues the cURL commands.
This script just runs the motor in some direction. Using the RUN command. I suspect the GOUNTIL would be very similar.
The need thing about using HTML (bash), is that Node-Red has nodes to generate it programatically.
Note the cURL commands nearer the end!!!
# ================ EXAMPLE BASH CODE – Use chunks as needed ================
# For full documentation see https://www.wifistepper.com/interfaces
# Uses curl for network and jq for json parsing
HOST=”wsx100.local” # or “172.16.0.230”
# Ping motor api
curl -sS “http://${HOST}/api/ping” | jq
# All successful api calls will return ‘status: ok’. This means
# that the command was successfully interpreted and executed.
# However, errors may still be thrown during execution.
# Write motor configuration
MODE=”voltage”
STEPSIZE=”4″
OCD=”500″
OCDSHUTDOWN=”true”
MAXSPEED=”400″
MINSPEED=”0″
ACCEL=”10″
DECEL=”10″
VM_KTHOLD=”15″
VM_KTRUN=”15″
VM_KTACCEL=”15″
VM_KTDECEL=”15″
FSSPEED=”200″
FSBOOST=”false”
REVERSE=”false”
SAVE_EEPROM=”true”
# Advanced configuration settings
VM_PWMFREQ=”23.4″
VM_STALL=”750″
VM_VOLT_COMP=”false”
VM_BEMF_SLOPEL=”0.0375″
VM_BEMF_SPEEDCO=”61.5″
VM_BEMF_SLOPEHACC=”0.0615″
VM_BEMF_SLOPEHDEC=”0.0615″
curl -sS “http://${HOST}/api/motor/set?\
mode=${MODE}&stepsize=${STEPSIZE}&\
ocd=${OCD}&ocdshutdown=${OCDSHUTDOWN}&\
maxspeed=${MAXSPEED}&minspeed=${MINSPEED}&accel=${ACCEL}&decel=${DECEL}&\
vm_kthold=${VM_KTHOLD}&vm_ktrun=${VM_KTRUN}&vm_ktaccel=${VM_KTACCEL}&vm_ktdecel=${VM_KTDECEL}&\
fsspeed=${FSSPEED}&fsboost=${FSBOOST}&\
vm_pwmfreq=${VM_PWMFREQ}&vm_stall=${VM_STALL}&vm_volt_comp=${VM_VOLT_COMP}&\
vm_bemf_slopel=${VM_BEMF_SLOPEL}&vm_bemf_speedco=${VM_BEMF_SPEEDCO}&\
vm_bemf_slopehacc=${VM_BEMF_SLOPEHACC}&vm_bemf_slopehdec=${VM_BEMF_SLOPEHDEC}&\
reverse=${REVERSE}&save=${SAVE_EEPROM}” | jq
# Read motor configuration
curl -sS “http://${HOST}/api/motor/get” | jq
# Returns object with configuration map
# Send speed command
STEPS_PER_SEC=”1333.3333333333335″ # RPM / 60 * 200; RPM=400
DIRECTION=”forward”
curl -sS “http://${HOST}/api/motor/run?stepss=${STEPS_PER_SEC}&dir=${DIRECTION}” | jq
# Emergency Stop
STOP_HIZ=”true”
STOP_SOFT=”true”
curl -sS “http://${HOST}/api/motor/estop?hiz=${STOP_HIZ}&soft=${STOP_SOFT}” | jq
# Read state
curl -sS “http://${HOST}/api/motor/state” | jq
# Returns object with keys: busy, stepss, hiz, vin, pos, mark, dir, movement, stepclock, switch,
# flags: { switch, commanderror, overcurrent, undervoltage, thermalwarning,
# thermalshutdown, stalldetect }
I forgot to mention that the cURL commands are a sing long string, and only look broken here.
Eric, Thank you for your helpful explanation. As I understand it, the bash script controls the stepper and the web browser GUI plays no part. For my application, I need to control the stepper in real time, and the web GUI allows me to do so. Executing a script would mean that I need to know how to move the stepper prior to knowing the effects of such motion. In my case, the stepper controls a “device” which sends status data back to the human operator. The human operator would then adjust the parameters in the GUI to modify the stepper’s motion such the desired state of the “device” is achieved. A closed loop control is achieved.
My need for using the GoUntil command is to limit the motion of the stepper and protect the “device” from over-travel. I have successfully achieved this protection by using the stall detect feature enabled in the GUI. The “KT Run” parameter is adjusted such that when mechanical resistance is encountered the stepper stalls. Otherwise, the torque required to drive the stepper is less than the stall torque set by “KT Run.”
Once again, thank you for your input.
Jack
That is good there is an input switch.
I would recommend the switch input be opto-isolated to allow easy connection to any prox or switch. It also gived input protection to ESP chip. And have a couple of screw terminals for the input opto.
For a switch you do not need opto isolation, you need an accessible voltage which can be switched to the CPU pin. For input protection resistors were invented a long time ago. If necessary use them together with clamping diodes.
$65? Little pricey isn’t it.
Not really. Check out other high voltage high current stepper motor drivers.
Nifty, but I am waiting to hear if they can coordinate more than one of these. Latency of Wi-Fi is ridiculous for real-time control so moves would have to be fully handled by the module. In fact multiple moves would have to be handled leading to a need for a substantial buffer. Then, if more than one dimensional moves are needed, there would have to be some sort of synchronization between motors and that isn’t likely to happen over Wi-Fi again due to latency.
*cough*Mars Pathfinder*cough*
(Sorry, couldn’t resist *laugh* But if THAT ain’t an example of latency, I don’t know what is.)
Ah, my first stepper program was part of a tool process I wrote on a VT103. The program was stored on a TU58.
All this talk of VTs and TUs caused me to VAX nostalgic ..
ATECC508A is obsolete and “Not Recommended for new designs”. Newer chips available, so a bad design choice.
I love this product.
The WIFI-Stepper has been a great learning tool for me: In less than a week, I learned how stepper motors work and the nuances of controlling them well. It has also been a good excuse to learn a few new development environments.
The ability to control the motor with the built-in web interface gives instant results and then displays example code for HTML (cURL at bash) and Python; and has already helped me learn practical uses of both interfaces as the Good Robot people call them. (The built-in web pages also contain a little bit of documentation and other information – Nice of them to stuff something useful in whatever space was left available.) Great info in the article above!
Support for HTML and MQTT is important to me, since I hope to develop three applications. (Telescope aiming, 20CM antenna aiming for satellite work using the same basic hardware, and HF antenna tuning by winching the elements in and out.)
After a bit of “command-line” testing using cURL and then python by cut and paste, I started using Node-Red, which I have wanted to learn for a few years. Having an “appliance” that handles the hard stuff has given me a much easier path to completing these projects. I intend to develop using HTTP first, as Node-Red has an object for that – and then move to MQTT as I get things working. (My brain is full for now.))
BTW… I was able to create productive programs with Node-Red from zero in less than 4 hours – Including thee three hours it took to get it all installed on an old laptop. (The manual pre-req installs took most of that!)
The thing “just works”.
Eric.
Two cents more on the WifiStepper:
My previous post lists the virtues of the board for beginners. Now that I have 6 month’s experience with the board – I note some extra strengths of the board. While locked in the basement, I have completed the hardware and software for my adjustable 10 to 80 meter dipole. My intent was to replace the WIFIStepper with a cheaper board for production once I got things working. I investigated many options, including using the standalone powerSTEP01 and some hardware “glue” to make it “talk”.
Most available inexpensive driver boards require you to compute and control attributes like acceleration, speed, and position; and to manually set current, voltages, transitions, and other factors. Rather than generating my own pulse train, and keeping track of it. I just tell the controller to “GO to POSITION X” or “Turn this past” or “Move this many steps” in plain text commands. BTW… the BOM cost of using a cheaper driver ends up being more when adding the necessary hardware “glue” to talk to the world.
Too bad it seems that the Good Robotics guys have gone silent…
I forgot to mention that only a single power supply is needed, since the board has its own regulator, so I don’t have to mess with converting 24V power to 3 or 5 volts for the controller.