
Joule thief are small, fun circuits which exploit a few characteristics of electronics and LEDs in order to “steal” virtually all of the energy stored in a battery. They can operate at incredibly small voltages and are fairly simple to make. With a few modifications to this basic circuit it’s possible to drive other things than an LED, though, like this joule thief that lights up a neon bulb.
 The circuit from [suedbunker] aka [fuselage] is based on a pin from the Chaos Communication Camp which had a standard LED. To get a neon light to illuminate a few modifications to the standard joule thief are needed.
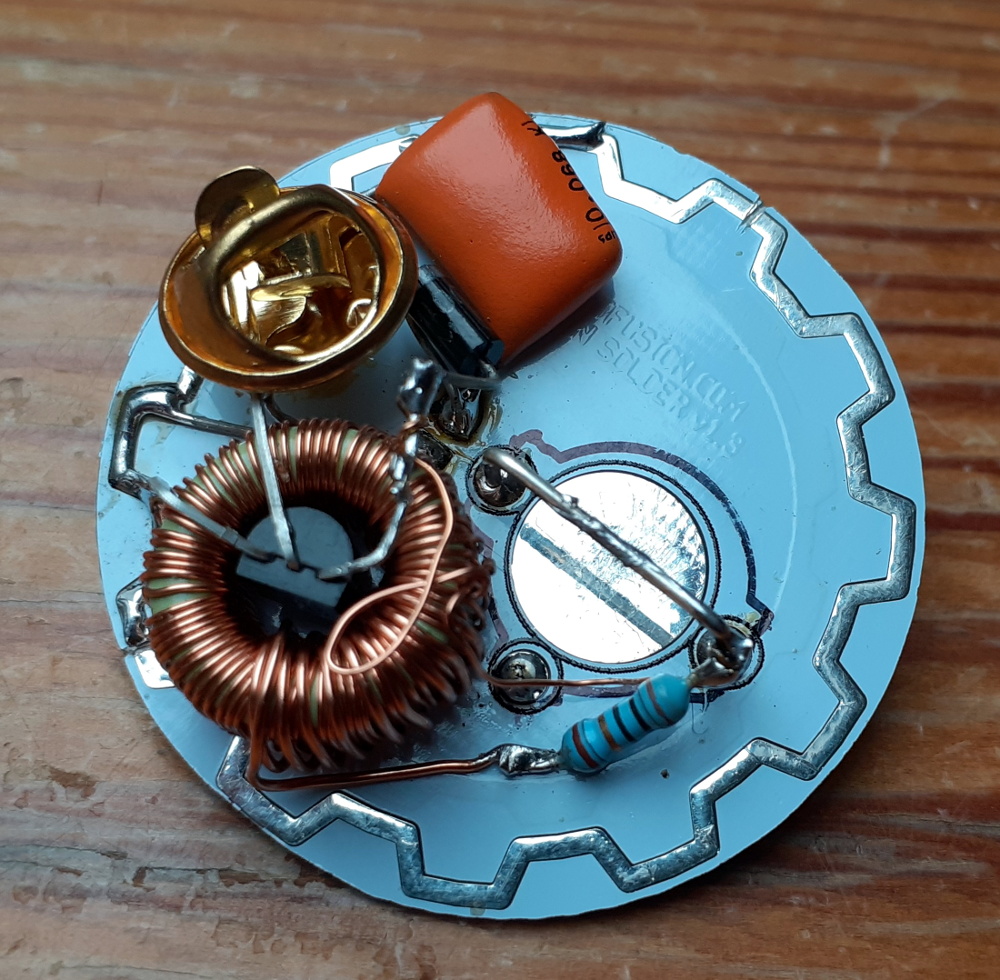
First, the windings have to be changed from 10:10 to 10:80 to increase the voltage across the bulb. Second, a transistor with slightly different characteristics was used than the original design. The capacitor was also replaced with a larger one.
While it might seem simple, the physics of how a joule thief works are anything but, and modifying the delicate circuit to work with something other than an LED is commendable. It also has a steampunk vibe which is a cool look even in projects that don’t involve steam at all.


It needs to have all the components on the front so you can still pin it on!
This is really cool. I wonder if leaving out the diode and capacitor rectifier would work just as well since it would ignite the gas at both electrodes running AC. Hmm, or maybe not since the collector would swing negative and put the transistor in reverse avalanche?
I’d be worried about the BC547 with the ignition voltage for a neon bulb, but hey, if it works, it works. Might have try making one.
Please explain the “It also has a steampunk vibe”, I only see a gear (or actually it more like a picture of it) and a brass pin.
Bit perhaps steam comes from your ears if you pin it to you shirt the wrong way?
Don’t get me wrong here, the project is interesting for what it does. But stop calling everything (that has a different type of light then an LED or shows an image of a gear has some glued on gears) steampunk. Using the word steampunk for every thing that has some brass in it makes the word “steampunk” loose its meaning!
For more info about steampunk:
https://www.youtube.com/watch?v=TFCuE5rHbPA
\o/ ____( +1 )
Steampunk people live in a delusional reality where fucking steampunk is somehow still cool. It only follows that they would harbor some other delusions as well.
That’s right, the cool people long migrated to Dieselpunk.
You can also power a neon light with four coffee cans, two wires, and a source of running water.
Actually, I’ve done that.
I need one that says “I can wind coils”.
They are always the hardest part for me in a project, unless it is spelled out in detail.
How many turns?
What gauge of wire?
Are the wires spaced or next to each other?
At the project page linked to in the post, it looks like suedbunker is doing 80 turns of .3mm enameled wire for the primary/high voltage coil, and 10 turns of .5mm enameled wire over top of that for the feedback coil. The specs for the toroid are: 13 mm outer 6 mm inner ferrite toroid, 6 mm height. Looks like a pale blue/green colored toroid, so the ferrite material might be sussed out from various manufacturers.
I’m playing around with a 3 coil toroid of similar physical size, but one of the ubiquitous green toroids on eBay from China. Using a 2n2222. The 3rd HV coil will light the neon lamp on one pole so far, but hoping to get both poles igniting with AC from that HV coil eventually. And on a “dead” (~1V) AAA battery…