
Digitizing film is a tedious process that becomes a lot more fun if you spend more of your time building a digitizer and less time actually working working with old film. [Heikki Hietala] has been at it for years and his Kotokino Mark IV film scanner is a masterpiece of simple machine building.
Since we first saw the film scanner four years ago it’s undergone a number of excellent improvements. Most notably, the point-and-shoot camera has been swapped out for a DSLR. With the use of a macro reversing ring a normal lens is flipped around to blow up the 8-millimeter-wide film to take advantage of all the megapixels available on the camera sensor.
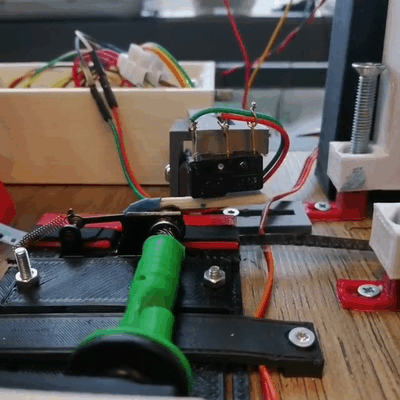 The key to the setup is the film advancer mechanism which takes care of both advancing the film and triggering the camera. As you can see, a servo motor rotating an axle provides the locomotion. The mechanism keys into the perforations in the film to pull it along on the down stroke and closes a switch to trigger the camera on the upstroke. Directly under the lens, the alignment jig uses lens cleaning fabric to avoid scratching the film, while perfectly positioning it over the light source.
Previous versions have placed the camera on the horizontal plane but it seems some vibrations in the system caused alignment problems between captured frames. This latest version places the camera pointed straight down to solve that issue, and brings the entire thing together into one beautiful finished project. Having gathered numerous fans of the build along the way, [Heikki] has made the design files available so that you may build your own version.


The clothes pin nice touch for a striking lever, very MacGyver. I would note a raspberry PI with a PI camera would be a cheaper choice for the media recorder. Arduino is nice and cheap. But the raspberry could serve as the controller, capture and post processor. All cheaper than the camera alone.
Did you just suggest using a Pi camera over a dSLR? While I haven’t used one of those modules myself, I have a hard time believing they would come anywhere close to the quality of a proper camera with a sensor that is bigger than the entire Pi camera module.
A good film has a resolution of about 160 lines per millimeter (old analog scanner metrics), so an 8mm film has an effective resolution of about 1280 lines. You really don’t need all the resolution of a dSLR to get everything that’s available out of the film. A 1.2 MPix webcam can resolve all the detail there is to be had – the question is merely about color and contrast accuracy, where the dSLR would be better than the Pi camera.
Also, that’s assuming the original camera used to shoot the 8mm frames had a lens that was focused well enough to draw 160 lines per mm. The cheap and cheerful 8mm film cameras were perfectly awful. You’re not going to be getting HD video out of the home films your grandparents shot on super-8 in the 70’s. A modern example:
https://www.youtube.com/watch?v=iP6E6ZqX9NQ
Pause a frame and see how awful it is. The reason to scan 8mm film in high resolution is to capture the “elegant grain” of the film, because that’s the reason why it is still used. The grain makes it appear sharper in motion, but that’s a trick of the eye – kinda like how the hiss of a vinyl record makes the record sound cleaner and sharper even though the groove has worn out to the point that any music above 10-15 kHz is essentially erased.
I use a Bolex D8LA from 1962, with Kern lenses. It’s a rather well made little thing, and works like a charm.
Sort of a counter point:
https://www.youtube.com/watch?v=3Nh9BTMWj9M
Actually many super 8 cameras had excellent lenses and you can get them dirt cheap nowadays. See: https://www.youtube.com/watch?v=QnUgsd1SiT4
Jakob: “Sort of a counter point”
That film was show with ISO50 film in bright sunlight (small aperture), so it has very little grain and a sharp image. For general all-around shooting you’d pick a ISO200 film or ISO500 for indoors, which introduces heavy grain and you need to open up the aperture which makes the image softer and loses contrast.
Uh Luke, ever compared the results between an 8 or 16mm scan done in SD with HD, then saw the same footage projected? If you hope to faithfully capture that grain, you’re going to need more than 4K and competition over scan quality is fierce. Don’t believe me, call up Pro8mm in Burbank, and see why people pay $80 per 100 feet for 4K Log service.
Sorry if I seem frustrated. For years, we were told that there is no point trying to get more than 12 Megapixels from a 35mm negative. I have made 50x wet print enlargements (110 film to about 1 meter wide) that look stunning on the wall up close, because grain is organic and beautiful at any enlargement. Raspberry pi camera is simply not going to cut it if you want the best quality you can get. Even an iPhone photo any larger than 8×10 is not pleasant, because pixels and digital artifacts don’t look good at scale. Motion picture films look amazing projected all the way up to motion picture screen sizes, even footage shot with bad lenses.
> If you hope to faithfully capture that grain
I’m not. The grain is an artifact that I wouldn’t want to capture. Others would, and they can do as they please.
To elaborate: what’s the sense of spending a gigaton of effort and storage space to what is essentially random noise? When a film is being copied from a negative to another negative to make a positive, plus years and years of wear, it loses about half of its sharpness anyways – so you may be dealing with a 4K or even 8K video of something that is equivalent to a 240p Youtube video with a gaussian noise filter added on top. Literally 99% of the data you’re handling is just noise. Then when it’s done, you sample it down to a 1080p video with some form of mp4 compression so you can actually stream it over to other devices, and the noise you have causes the actual image information to drown out in compression artifacts.
To my mind that’s kinda funny – like gold plated audio cables funny.
>Even an iPhone photo any larger than 8×10 is not pleasant, because pixels and digital artifacts don’t look good at scale.
A pixel isn’t actually square – its your monitor that makes them so – and a single pixel isn’t really enough to represent a point of visual information. For example, to distinguish between two points, you need a third pixel in between – that’s why the actual resolving power of your digital image is always less than the number of pixels in it, and why when scaling up a picture you really don’t care about preserving the pixels. You care about preserving the information that the pixels represent.
That’s why when you enlarge a digital image to poster sizes, you re-interpret the pixels into some sort of dithered pattern such as half-tone, or spread it around into grainy noise that represents the intensity and color distribution of your original image. If you find film-type grain pleasant, you can do exactly that.
> what’s the sense of spending a gigaton of effort and storage space to what is essentially random noise?
A counterpoint, why do you think every Hollywood director says to be his colorist,”let’s start by getting that film look”? You really do want extremely large files with no compression for postproduction: NLE and coloring grading. That’s the whole reason Raw formats exist. And why are more and more features switching from digital back to film? Because audiences connect to the aesthetic.
>When a film is being copied from a negative to another negative to make a positive, plus years and years of wear, it loses about half of its sharpness anyways
So that’s the whole reason I’m on this thread. As an artist and aspiring cinematographer, an excellent scan to motion picture is by far the most expensive component of a film workflow. In this age, most new productions that could benefit from a 3D printed film scanner aren’t doing optical or contact printing, they’re going straight from the source negative to digital. Most of the sharpness I’ve seen actually lost due to shitty scans.
>That’s why when you enlarge a digital image to poster sizes, you re-interpret the pixels into some sort of dithered pattern such as half-tone, or spread it around into grainy noise that represents the intensity and color distribution of your original image.
People go through such lengths (aka money) to produce an aesthetic that is so much more appealing the the format that is innate to film. You can try to imitate the subtleties and randomness in film from a digital source, but put that in front of an audience, and it looks looks cheap and artificial.
Really, if you plan to use a raspberry pi camera and you don’t care to preserve grain, it sounds like you’re not someone who has any business investing in using a 3D printed film scanner as a creative tool to push the boundaries of what’s possible!
>Hollywood director
That’s a different scope. We’re talking about preserving old 8mm home movies. In this scope it’s common to have contact prints of the original as they were developed from negatives by whatever lab that originally processed them – unless they were using reversal (positive) film, which has its own limitations including higher price.
>and it looks looks cheap and artificial.
That’s because people are trying to make a point of it being grainy, and it ends up not exactly subtle. They’ll get the hang of it eventually, and you won’t be able to tell a difference because there is no reason why you can’t have exactly the same type of random distribution of grains.
But one major problem is that digital compression does not work with randomness – at all – so it’s a constant battle between preserving the actual image features while preserving the film grain, and minimizing compression artifacts, because the noise is eating up all your bandwidth on a DVD or even on a BluRay disc. It never looks the same as real film grain because the medium cannot actually reproduce the effect, and this is why the film producers try to use a type of grain that isn’t exactly random – which then ends up looking fake.
It only works on the big screen where you can distribute the movies on a stack of hard drives. When it goes to home video, they have to kill the noise or kill the picture. You’ll never get a proper film-grain on e.g. Netflix even if you’re watching it on 8K because they have to mind their bandwidth.
>let’s start by getting that film look
Besides, grain is only one part of “the film look”. You also need heavy motion blur, slightly wonky optics with all sorts of focusing issues and limited depth of field, and a low frame rate between 18-24 fps. It is characteristic of 16mm film production, and that is what the Hollywood film producers are after. 8mm film is a step down from this, and very rarely used in actual movies because it’s just too gritty and soft.
35mm film production on the other hand looks pretty much identical to digital, or vice versa, whichever way you want to look at it. The “film look” is actually an artifact of _cheap_ film production, not film in general, and it “looks good” because your favorite classic films were shot on the cheap and you’re used to it.
Suppose you had the world’s best 8mm camera with the best film there was: it would have no discernible grain, no jitter, perfect sync to sound, sharp optics without chromatic aberration and a higher frame rate – the results would look like they were shot with a mid-priced DV camera – and you would complain that it looks like the soap operas on TV.
>That’s a different scope. We’re talking about preserving old 8mm home movies.
Why are we talking about just that? I guess the points you make are generally appropriate to someone like you wanting to preserve home movies. Less so for a library wanting to do film archiving. Remember, lots of creative people want so shoot film and want the quality of their work speak for itself. I process motion picture film at home, mostly 16mm, and if you ask me, I think the majority of people willing to invest the time into building a scanning rig are shooting fresh film today. Perhaps I’m wrong on this, and if it were accessible enough, you’d find more people would build such rigs because they want to scan old films than people doing new creations.
>Suppose you had the world’s best 8mm camera with the best film there was: it would have no discernible grain, no jitter, perfect sync to sound, sharp optics without chromatic aberration and a higher frame rate – the results would look like they were shot with a mid-priced DV camera – and you would complain that it looks like the soap operas on TV.
There, Luke, you go too far! I contend that you cannot compare the two. If you projected them side by side, people would say “hey that first one reminds me what life was like when [I was a kid]
/ [my parents were growing up]” and “oh that one, it was like a bad soap opera from the 80s.” Your average audience might not be able to tell you intelligently what was different, but I can assure you if you did a test, at least 9 out of 10 people would say not only there was a difference, but watching one triggered different emotions from the other!
Particularly so if you’re talking about color films which render color differently from digital. Let’s not forget about film response curves on film that you would need to try and match off the linear response of the dv camera. Then you have debayering, digial noise in the darks of the digital sensor, and the # readouts you get in the darks vs lights because, well, it’s linear. Finally, any mid-priced DV camera (I presume you mean an old one, but new ones have the same issue), you’re only going to get 8-bit color out of it. The gradations you get on film require at least a 10-bit scan, and improve when you scan up to a 16-bit color space. Only this year can you buy a consumer camera for under $5000 that can do raw video with > 8-bit. No, there are too many issues to consider doing a comparison such as this. People are sick of making digital look like film, because even if a big picture is willing to spend the money, people aren’t happy with the result.
And don’t get me started on sharp pictorial use of microfilms like Adox CMS 20, which you really can scan at 8,000dpi and get tack sharp images to print murals from 35mm.
>people would say “hey that first one reminds me what life was like when [I was a kid]
No they wouldn’t, because the difference between the two would be negligible. The entire point was that the best possible 8mm footage would be as good as the DV camera and have no visible grain, equal framerate, no softness (well, still 480p soft), and no optical problems that give away the fact that it was shot on a film camera.
>Particularly so if you’re talking about color films which render color differently from digital.
That’s a moot point, because we’re digitizing the film here, and if you have a 10 or 12 bit display you can have a reasonably good approximation of the color space that people can’t tell the difference.
Here’s a nice discussion about the color gamut of film:
https://www.photo.net/discuss/threads/whats-the-real-colour-space-of-film.464422/
Turns out it’s not that much different from AdobeRGB – overall the film has a smaller gamut than digital especially in the blue and green – but it goes deeper in the red, but that’s not very useful because your eyes are not very sensitive to red light. In other words, a modern digital process can easily reproduce the visual appearance of film color, and today with 16 bit processing it can also match the dynamic range of it.
The difficulty is in finding a monitor capable of displaying it – but mind that a printed photograph doesn’t really have the contrast ratio to show all of that dynamic range either, and neither does a film projector. A new clean print in a movie theater has a contrast ratio around 500:1. The film can capture a large difference in brightness, but you can’t show it by any practical means.
Noise, shitty optics, compression artefacts (an assumption on my part since I’m guessing you’ll be pulling JPEGs off these things) and as you mentioned bad colour.
Not saying it wouldn’t be doable, just saying that if you’re going to go through the hassle of scanning, you might as well get something decent to start with, one can always compress down the line if needed.
Correction, since the actual frame in a super-8 film is just 5.8x4mm then the resolution of each frame is about 928×640 with good quality film. That’s about half a megapixel, only slightly better than a VGA phone camera.
You’d want 2 – 3x oversampling to make sure you didn’t create any new noise though.
True, but oversampling to reduce noise can be done by multiple exposure stacking just as well, and you will want to do exposure bracketing anyways in order to get better dynamic range, so you kinda get 2-3x oversampling for the same price.
While you are quite correct more pixels isn’t going to magic up more data than stored on the film in the first place it does help hugely having many more samples – if you have 1 pixel of data per pixel of sensor any alignment errors, noise, contamination can wipe out data with ease where having 4 or 16 etc sensor pixels per data pixel the errors can be filtered out effectively (yes film doesn’t exactly have pixels its just a way of expressing the concept).
I really don’t think a 1.2 Mpix is enough in the real world to get the best possible results even if its a 1.2Mpix DSLR so the lens and sensor size etc are all in its favour.
That said the Pi camera modules are really quite good for what they are and would probably do a very nice job. Much like SD video vs HD in practice while they are playing both can give excellent results and even be indistinguishable by eye in some situations.
I’ve used a pi camera and a mirrorless DSLR on my converter. The DSLR does turn out a better picture, particularly if you take 3 pictures at low/mid/high exposure and tonefuse them together. But the pi gets pretty close; I removed the lens and project directly onto the image sensor and pull the raw data off for post processing. I stuck with the pi because my setup is part of a mostly-automated image processing flow and I haven’t found a hackable-enough DSLR.
The “pixels” of a film aren’t in a regular matrix, so it doesn’t quite work like that. You may think of a “point” on a film as a gaussian distribution of intensity, considering that the actual silver halide crystal grains are randomly distributed and there are many of them per each point of information you want to record. The resolving power of the film depends on the average size, shape, distribution and orientation of the crystals, so it is acting more or less like a continuous medium where there are no distinct lines or points.
When you quantize such information into a digital image, you have to mind that your resolution is high enough to avoid interference patterns appearing. You may still have detail that runs in and out of phase with your sensor grid. For general use, you need about 1.42 times the resolution of your film to remove this effect. This is known as the Kell factor:
https://en.wikipedia.org/wiki/Kell_factor
>I really don’t think a 1.2 Mpix is enough in the real world to get the best possible results
On the contrary. It may even be for the best to use a lower resolution camera – with bigger pixels to achieve lower sensor noise. All the types of 8mm film can be essentially approximated to achieve between 480p-720p resolution so it’s around 0.9 MPix max. With the Kell factor correction that becomes 1.28 MPix or slightly less.
@Luke we are both right from different perspectives.
If you have many many more samples with a very high pixel count than the final processing can give a very high degree of accuracy to the original effectively filtering out interference patterns and noise.
But to avoid possible interference patterns etc from entering your data stream at all you do want ‘matching’ grids. However if you have many extra pixels again there you can focus the image to a correct size for that sensor film combo changing the effective resolution. Which you can’t do when running near the lower limit.
Which is why I say in the real world 1.2Mpix is probably on the low side – it doesn’t have any headroom to tweak into.
Again, there is no “grid” in a film grain. The interference pattern that the Kell factor is concerned with comes from the actual features of the picture that was recorded, like fence posts or the stripes on Waldo’s shirt. If the film isn’t sharp enough to record these features then they just blur out and cannot cause an interference pattern with the digital sampling.
That is why the “optimum” resolution of the sensor is great enough that it captures however many lines of resolution the film is capable of resolving, plus a bit more to account for the interference, and then no more because the excess resolution starts to resolve the grains of the film instead of averaging them out – and then you have to get rid of them digitally or they’ll interfere with the compression algorithms and make a mess of your image quality.
There’s just one more argument for why you’d want more resolution out of your sensor, and that’s because digital cameras usually have a pentile matrix – but then again the film source doesn’t have the chroma resolution either – the colors tend to smear out a little.
That’s because different wavelengths of light have a different index of refraction so they focus on a slightly different image plane, and you need special apochromatic lenses to bring all three main colors focused on the same plane. True apochromatic lenses however tend to be too slow for a movie camera, so they compromise with the color accuracy a bit.
He was talking about “quality”, not resolution. And as you say yourself, a proper camera will be miles ahead of a cheesy little CMOS sensor with cheap colour filters and electronics, and real optics instead of a moulded plastic lens. The sort of camera the Pi uses isn’t intended for actual video work that matters.
When I see stuff like this though I have to wonder why Heikki 3D printed simple rectangles with holes in them. Isn’t filament expensive? Wouldn’t it be better just to buy a sheet of plastic and just cut and drill it? Cheaper and quicker.
Ummm, which parts would you be referring to? I modeled the entire set in Blender, thus getting everything done in proper scale and with all holes in place.
Filament costs about USD20 per kilo, or 400 meters, and the combined use of filament for these parts is about 80 meters, or, 4 dollars.
Much better and easier than cutting plastic.
It’s a question of diminishing returns. Something like a Pi camera will get you 95% of the way to extracting whatever there is to get out of 8mm film, and more with computational tricks.
There are bigger flaws in the setup, such as having a random halogen bulb with only an approximately known color temperature shining light onto a sheet of paper with unknown fillers and optical brighteners that results in an unknown spectrum of light through the film. The film color filters then may or may not match the camera’s color filters in any case, so the real color balance is anyone’s guess. With an uncalibrated setup like this you’re basically forced to eye-balling the color parameters anyways, so there’s no advantage in having a highly accurate camera.
It’s actually a 3400K bulb, matching the colour temperature of the camera setting.
That’s the nominal color temperature, which depends on the actual voltage you run it and other manufacturing variations. It’s only an approximation.
Then there’s the chemistry of the bulb: different halogen compositions vs. regular tungsten filaments vs. bulbs with correction filters etc. makes the spectrum variable. The copy paper is also often tinted ever so slightly blue to make it look whiter under normal 2700K lighting, but all the walls of the box also cast their hue onto the paper, which transmits it through the film.
Then there’s the camera, or what the manufacturer thinks of being “3400 K” vs. what it actually is – because the color temperature is an average of the spectrum as compared to an ideal black body radiator which rarely occurs in real life. Thereby the manufacturer often applies some sort of fudge factor to the color balance such that it looks more like you’d expect it to look.
All this introduces so much uncertainty that you’re playing voodoo if you think that you’re actually getting accurate color out of the system as it is. Without actually going through the trouble of measuring the spectrum of light as it changes at each step, you’re relying on your own subjective perception to say whether it is “right”, and that’s like wine tasting. The longer you keep staring at it, the more your perception shifts.
In the end it’s a pointless errand to try to get perfect color out of it, because while you could do that, what you’re really after is making it look pleasing to you. Technical accuracy doesn’t matter, so you may very well use the worse sensor and then just crank the saturation, color balance, etc. to wherever you like it to be.
Okay. I see the multitude of issues here, but as I said, it’s not a commercial quality machine in any case.
For reference:
https://www.intl-lighttech.com/sites/default/files/inline-images/Halogen_Lamps-TechDisc-ILT_Sources_Catalog_pg06.jpg
If there’s a 10% error in the driving voltage, there’s roughly a 10% error in the color temperature, so you may be running the bulb between 3000-3700K, which is complicated by the fact that the bulb itself may be manufactured to something like 10% tolerance in the first place so you don’t know exactly the voltage that you should be using in the first place.
These kind of reasons are why many things done in the name of “high fidelity” is just cargo cult science. It’s people measuring a piece of yarn with a micrometer and thinking they’ve got its length down exactly so.
>as I said, it’s not a commercial quality machine in any case
It’s just a comment towards all those who insist you need to have a dSLR or equivalent to have good quality output – when in reality the accuracy of the output is not guaranteed and the quality is defined by entirely different metrics.
It’s a misprint from another project actually, but worked better with shrink tube than anything else I could figure out in three minutes.
I was thinking along the lines of the PI V2.1 camera it’s 8 megapixel. It’s also possible to pop off the PI’s lens cap and use a DSLR lens on it. Many different SLR MFG’s lens are supported. Saving in RAW format more space but not having jpg lossy effects. Nice part of using the PI is post process. All the RAWS to generate your MP4. No need to offload to another system, unless processing speed is important. The PI does not have a lot of processing power.
I hope nobody’s using MPEG-4 for archiving. If you don’t have space for all the stills, use ProRes.
DSLR is probably better, but esp32-cam would be better than a pi.
The Pi cameras suck ass. All of them. I have every one, and they’re all trash. It’s really unfortunate, because I can’t find any decent camera at any price that uses the connection standard the Pi does.
Hey, thank you so much for returning to my little pet project!
I agree that this could be made simpler, and with less resolution, but I have had so much fun with this that I wanted to keep at it until this version.
Everything is described in detail on my blog, http://www.sabulo.com, and the printables are on my Thingiverse page, https://www.thingiverse.com/Heikki_Hietala/about
Cheers,
-h.
I read your blog, congratulations on keeping your father’s camera (and memory) alive. So could the printables be used for making a 16mm scanner?
Thank you for your kind words. I don’t see why not, it’s a matter of scaling up the film handling parts and figuring out the function of the film gate in a new format. My system relues on a film gate from a defunct Bolex, so this would need some work.
But overall I think it’s doable.
Years ago, I converted a slide projector to digitize my thousands of color slides.
Hardware involves an old slide projector, a DSLR, macro lens that scales a slide to the size of the camera sensor (camera looks straight on the film into the – dimmed – projector light), a Raspberry pi 3 and an I2C relay card.
Software involves some batch files that trigger the slide projector and the camera and to flip and crop the photos.
I could use a similar contraption that takes film strips of (6 to 8) 35mm negatives and digitizes those at a speed that does not kill me through total boredom (like my HP scanner). Someone must have done this? Maybe by stripping out the motorized film transport mechanism from an old DSLR? Who has been there & done that?
Hi Peter, no, I haven’t done that – I did my slides four at a time using a manual rack. It was slightly better than drying paint.
I could easily see this system converted to doing film strips. My only issue was the film movement at 4.5mm intervals, but using a recycled film port it was okay from the start. 35 mm film is so much larger as a format that any decent stepper motor can handle that accuracy.
Putting aside the above debate about dslr vs raspi cam;
The dslr shutter is going to die far before anything else.
The low end dslrs are rated to about 100k actuations; doing some quick math, this is only scanning about 55 minutes worth of film. Some of the higher end models have 250k or 500k ratings.
One solution might be shooting in “live view” mode, where the shutter and mirror arent constantly cycling.
Yes, that’s true. Luckily I shoot about 4 minutes per year, so I don’t expect a melt down any time soon.
I take it that you don’t have a Pentax with the solenoid problem.
B^)
No, I have a Canon 1000D I bought for 20 bucks. It had a shutter count of 8,000.
Valid point. I’ve switched to using my BlackMagic Production Camera 4K for time-lapse. Aside from not wearing out a mechanical shutter, I’ve found that the result is rock-steady, smoother in both stability and exposure consistency.
The nice thing is that the older BMD cameras can shoot uncompressed DNGs. But ProRes would still be a good option on newer ones.
That probably is the best solution, if you have more than one roll to process per year 😎👍.
A while ago, I modified an 8mm projector, optical system changed to ensure good enough quality, and directly film with a dlsr in movie mode. Some mechanical twaks had to be performed to get the right speed, and a software got rid of black / double pictures. Worked like a charm, and all tests scanning the film in high res showed the resolution of 8mm is too poor to justify a scan. And do not speak about colors, which have anyway gone south after 50 years.
Yes, I had that thought as well, but I wanted to build from the ground up.
I’m afraid that STR-alorman has a point predicting that the DSLR will wear out quickly.
But, having a DSLR with way more pixels than needed may come in handy…
Why not have the DSLR take a photo of 4 consecutive film frames at a time (or 8, scanning two film strips side by side).
Then use some fairly simple image recognition software to identify the transport holes in the film and crop to each of the individual frames using those holes as a reference?
That should reduce the wear of the DSLR while speeding up the scanning process manyfold. Relaxes the precision requirements of the film transport mechanism as well. Disadvantage is that the mechanism needs to hold flat (and shine the light through) a larger section of film.
Hello all,
First, let me thank you for the comments. I am really glad to have sparked duch a discussion with my little contraption.
I need to remind you though that I started this project to teach myself Arduino. To have come this far with Kotokino Mk IV is way past what I set out to do. I only shoot one or two rolls of film per year, so this machine delivers just what I need.
To cut the film in two and try to capture 4 frames at once sounds like an interesting idea, but managing the movement of one strip of 4.3mm x 3.5mm frames was tough enough.
This is a demo scan made with Mark II a couple of years ago. Mark IV can do better especially in the corners, but even this version captured the essence of life in 2015 as seen through 2962 technology.
https://youtu.be/uCxfIB59b1E
heikkihietala, Thanks for your contribution, you have done some impressive work! Did you by any chance look into kinograph.cc, an open source community devoted to building this kind of machine?
No, I wasn’t aware of that, many thanks for pointing it out to me!
I’m sure after seeing your accomplishment, they would be thrilled to welcome you as a contributor!
They seem to have moved, I need to look into this a little.
One other question – on the video you shared, there was some falloff in the upper left corner. Is that on the film, or the scan? Looks great, btw.
It’s a result of the less than perfect lens arrangement I had in V2. I will post V4 samples when the corona crisis is over and I can do more work in my Lab at the University.
And how about the audio?
8mm film does not contain audio capabilities. My father used to make 20 minute movies and splice in a sountrack on open reel magnetophones. He was rather hard-core.
Sound is rare on 8mm / Super 8 film. If it is there, it’s mostly magnetic but some used optical. In either case though just running it though a projector would be the easiest way. That’s not a problem, digitising sound is easy, a computer sound chip has better quality than the original film would have. This project is for the trickier business of getting the images.
In the rare case you had an optical sound track I suppose you could cobble together a script to extract sound from the captured images, but it’d be a lot of bother getting it working reliably, 8mm films tend to stutter and not be perfectly aligned, in the camera or projector. Many of the cameras were literally clockwork! The film is fiddly and the equipment, while not cheap, was only consumer-standard stuff made from maybe the 1950s to the 70s. So capturing the audio using anything other than a projector would really be asking for trouble.
TIL unlike the other 8mm formats, super-8 was designed from the start to leave room for a soundtrack. Unlike the other 16mm, Super-16 was designed to NOT leave room for the soundtrack. (wikipedia)
canon cameras has custom firmware – magic lantern
and it has module “silent picture” that takes pictures shutter less.
I used the Canon Hack Development Kit when I was using the Ixus 95. Do you have any links on this, sounds interesting!
https://www.magiclantern.fm/forum/index.php?topic=12523.0
it might even work on DSLR cameras with broken shutter
Thank you very much for this! It’s going to be very useful later on!