Radio may be dead in terms of delivering entertainment, but it’s times like these when the original social network comes into its own. Being able to tune in stations from across the planet to get fresh perspectives on a global event can even be a life saver. You’ll need a good antenna to do that, which is where this homebrew loop antenna for the shortwave radio bands shines.
To be honest, pretty much any chunk of wire will do as an antenna for most shortwave receivers. But not everyone lives somewhere where it’s possible to string up a hundred meters of wire and get a good ground connection, which could make a passive loop antenna like this a good choice. Plus, loops tend to cancel the electrical noise that’s so part of life today, which can make it easier to pull in weak, distant stations.
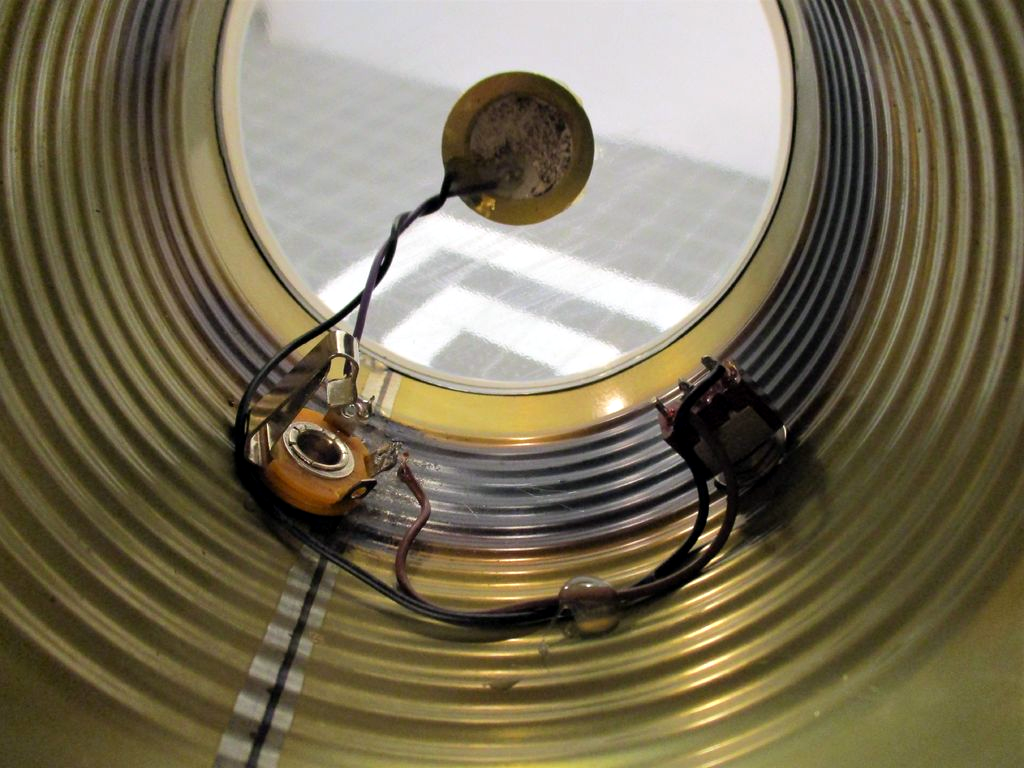
[Thomas]’s design is based on a length of coaxial cable, which should be stiff enough to give the loop some stability, like a low-loss RG-8 or RG-213. The coax braid and dielectric are exposed at the midpoint of the cable to create a feed point, while the shield and center conductor at the other ends are cross-connected. A 1:1 transformer is wound on a toroid core to connect to the feedpoint; [Thomas] calls it a balun but we tend to think it’s more of an unun, since both the antenna and feedline are unbalanced. He reports good results from the loop across the shortwave band.
The shortwave and ham bands are a treasure trove of information and entertainment just waiting to be explored. Check them out — you might learn something, and you might even stumble across spies doing their thing.
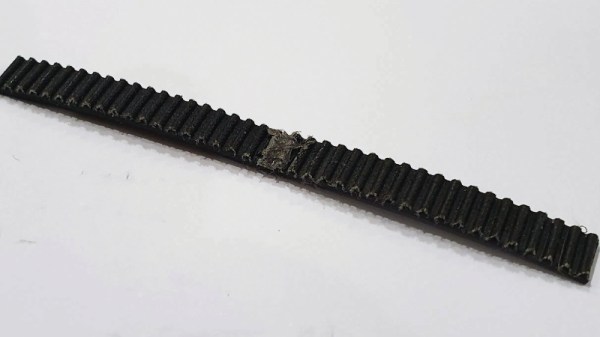
If you’ve got a 3D printer, you’re probably familiar with the reinforced belts that are commonly used on the X and Y axis. These belts either come as long lengths that you attach to the machine on either end, or as a pre-sized loop. Traditional wisdom says you can’t just take a long length of belt and make your own custom loops out of it, but [Marcel Varallo] had his doubts about that.
This is a simple tip, but one that could get you out of a bind one day. Through experimentation, [Marcel] has found that you can use a length of so-called GT2 belt and make your own bespoke loop. The trick is, you need to attach the ends with something very strong that won’t hinder the normal operation of the belt. Anything hard or inflexible is right out the window, since the belt would bind up as soon as it had to go around a pulley.
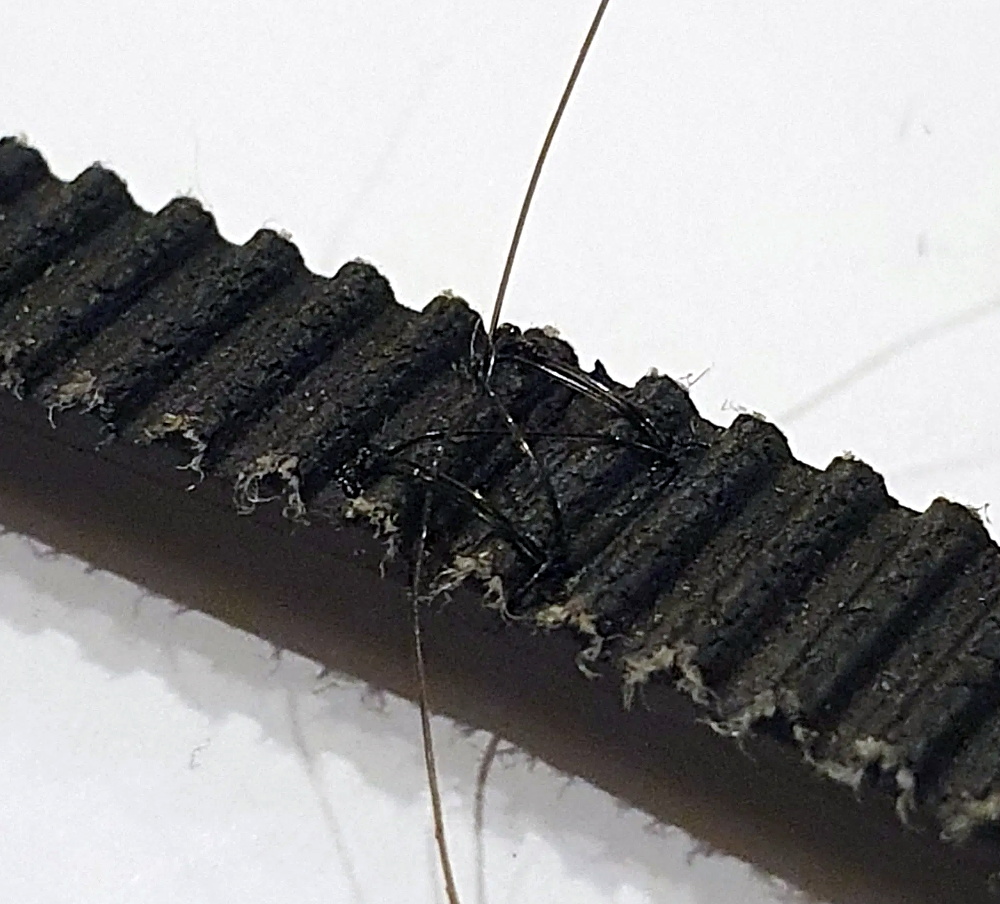
It seems the key is to cut both ends of the belt very flat, making sure the belt pattern matches perfectly. Once they’ve been trimmed and aligned properly, you stitch them together with nylon thread. You want the stitches to be as tight as possible, and the more you do, the stronger the end result will be.
[Marcel] likes to follow this up with a bit of hot glue, being careful to make sure the hardened glue takes the shape of the belt’s teeth. The back side won’t be as important, but a thin layer is still best. The end result is a belt strong enough for most applications in just a few minutes.
Would we build a 3D printer using hand-stitched GT2 belts? Probably not. But during a global pandemic, when shipments of non-essential components are often being delayed, we could certainly see ourselves running some stitched together belts while we wait for the proper replacement to come in. Gotta keep those face shields printing.
Anyone who worked in the tech field and lived through the Y2K bug era will no doubt recall it as a time seasoned with a confusing mix of fear and optimism and tempered with a healthy dose of panic, as companies rushed to validate that systems would pass the rollover of the millennium without crashing, and to remediate systems that would. The era could well have been called “the COBOL programmers full-employment bug,” as the coders who had built these legacy systems were pulled out of retirement to fix them. Twenty years on and a different bug — the one that causes COVID-19 — is having a similarly stimulative effect on the COBOL programmer market. New Jersey is one state seeking COBOL coders, to deal with the crush of unemployment insurance claims, which are killing the 40-year-old mainframe systems the state’s programs run on. Interestingly, Governor Phil Murphy has only put out a call for volunteers, and will apparently not compensate COBOL coders for their time. I mean, I know people are bored at home and all, but good luck with that.
In another throwback to an earlier time, “The Worm” is back. NASA has decided to revive its “worm” logo, the simple block letter logo that replaced the 50s-era “Meatball” logo, the one with the red chevron bracketing a starfield with an orbiting satellite. NASA switched to the worm, named for the sinuous shape of the letters and which honestly looks like a graphic design student’s last-minute homework assignment, in the 1970s, keeping it in service through the early 1990s when the meatball was favored again. Now it looks like both logos will see service as NASA prepares to return Americans to space on their own launch vehicles. Wait a minute, what happens when we stand this thing upright?
Looking for a little help advancing the state of your pandemic-related project? A lot of manufacturers are trying to help out as best they can, and many are offering freebies to keep you in the game. Aisler, for one, is offering free PCBs and stencils for COVID-19 prototypes. It looks like their rules are pretty liberal; any free and open-source project that can help with the pandemic in any way qualifies. Hats off to Aisler for doing their part.
And finally, history appears to have been made this week in the amateur radio world with the first direct transatlantic contact on the 70-cm band was made. It seems strange to think that it would take 120 years since transatlantic radio became reduced to practice by the likes of Marconi for this accomplishment to occur, but the 70-cm band is usually limited to line of sight, and transatlantic contacts at 430 MHz are usually done using a satellite as a relay. The contact was between stations FG8OJ on Guadaloupe Island in the Caribbean — who was involved in an earlier, similar record on the 2-meter band — and D4VHF on the Cape Verde Islands off the coast of Africa, and used the digital mode FT8. The 3,867-km contact was likely due to tropospheric ducting, where layers in the atmosphere form a refractive tunnel that can carry VHF and UHF signals much, much further than they usually go. While we’d love to see that record stretched a little more on each end, to make a truly transcontinental contact, it’s still quite an accomplishment, and we congratulate the hams involved.
In these dire times of self quarantining, social distancing, and life as know it coming to a halt, time itself can become rather blurry, and even word clocks may seem unnecessarily precise — especially if you happen to have a more peculiar circadian rhythm. And let’s face it, chances are your usual schedule has become somwehat irrelevant by now, so why bother yourself with dates or an exact time anyway? If you can relate to this, then [mwfisher3] has the perfect clock for you, displaying only the day of the week and a rough estimate of how far that day has progressed.
Using a Raspberry Pi and a spare touch screen, [mwfisher3] had an easy game to begin with, so the clock itself is just Chrome running in Kiosk mode, displaying a local web site with the hours of the day mapped to an array of their textual representation. A few lines of JavaScript are then updating the web site content with the current day and “time”, and a Python script is handling the screen’s back light based on the readings from a Philips Hue motion sensor, using the phue library.
While this is definitely one of the simpler clock projects we’ve seen, this simplicity offers actually a great introduction to some easy JavaScript-based web displays on a Raspberry Pi without much fuzz and distraction. But if that’s not your thing, and you like things more mechanical, we’ve recently covered this day clock that follows the same idea, and then there’s also this light box for an artistic approach of getting a rough estimate of the time.
If there’s any psychological good to be gleaned from quarantine, it’s that people are using the time to finish old projects while starting plenty of new ones. If you’re running out of ideas, or just want to feel better by doing some in-house recycling, dump out that bin and make a simple microphone.
All you need is some PETE #1 plastic, a piezo disk, and the right kind of tin can. The plastic gets heat-fused to the rolled edge of the can, and since it gets stretched and shrunk in the process, it forms a tight membrane that doubles as a percussion instrument.
You do your shouting into the other end, and your sound waves vibrate the membrane. The piezo picks up the vibrations and sends them to a 1/4″ jack so you can plug it into an amp.
Even if you are somehow sidestepping the blues, you can always use this to yell at people who threaten to get too close to you. This fun project is about as open as it gets, but we’re sure that you can think of ways around using a piezo disk. Let us know in the comments after you check out [Ham-made]’s music video.
We like [Ham-made]’s method for cutting down the juice jug without cutting into yourself. Just clamp a razor blade into your vise and move jug against it. Reminds us of another way to easily reuse plastic soda bottles by making them into rope.
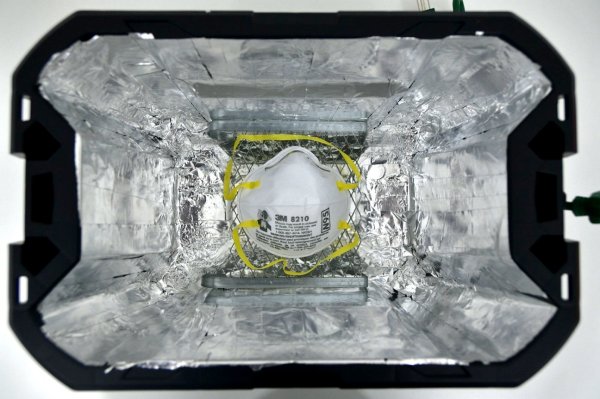
The current situation has given closet germaphobes the world over a chance to get out there and clean the hell out of everything. Some of it may be overdone; we ourselves can cop to a certain excess as we wipe down cans and boxes when returning from a run to the grocery store. But sometimes disinfection is clearly indicated, and having an easy way to kill the bugs on things like face masks can make a big difference by extending the life of something that would normally be disposable. That’s where this quick and easy UV-C germicidal cabinet really shines.
The idea behind [Deeplocal]’s “YouVee” is to be something that can be quickly cobbled together from parts that can be picked up at any big-box home store, thereby limiting the number of trips out. You might even have everything needed already, which would make this a super simple build. The business end is a UV-C germicidal fluorescent lamp, of the kind used in clarifiers for backyard ponds. A fluorescent droplight is modified to accept the lamp by snipping off a bit of plastic, and the lamp is attached to the inside of the lid of a sturdy black plastic tote. The interior of the tote is lined with aluminum tape and a stand for items to be disinfected is made from a paint roller screen. The clever bit is the safety interlock; to prevent exposure to UV, the lamp needs to be unplugged before removing the lid. Check out the full build tutorial for details.
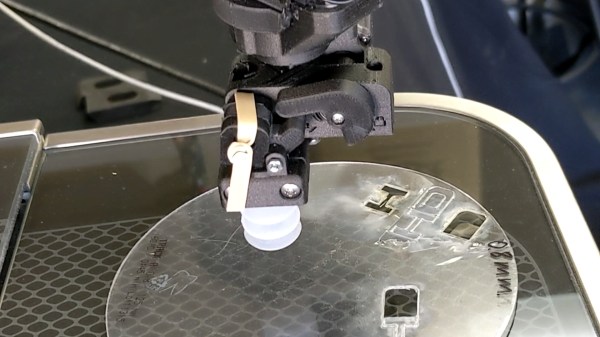
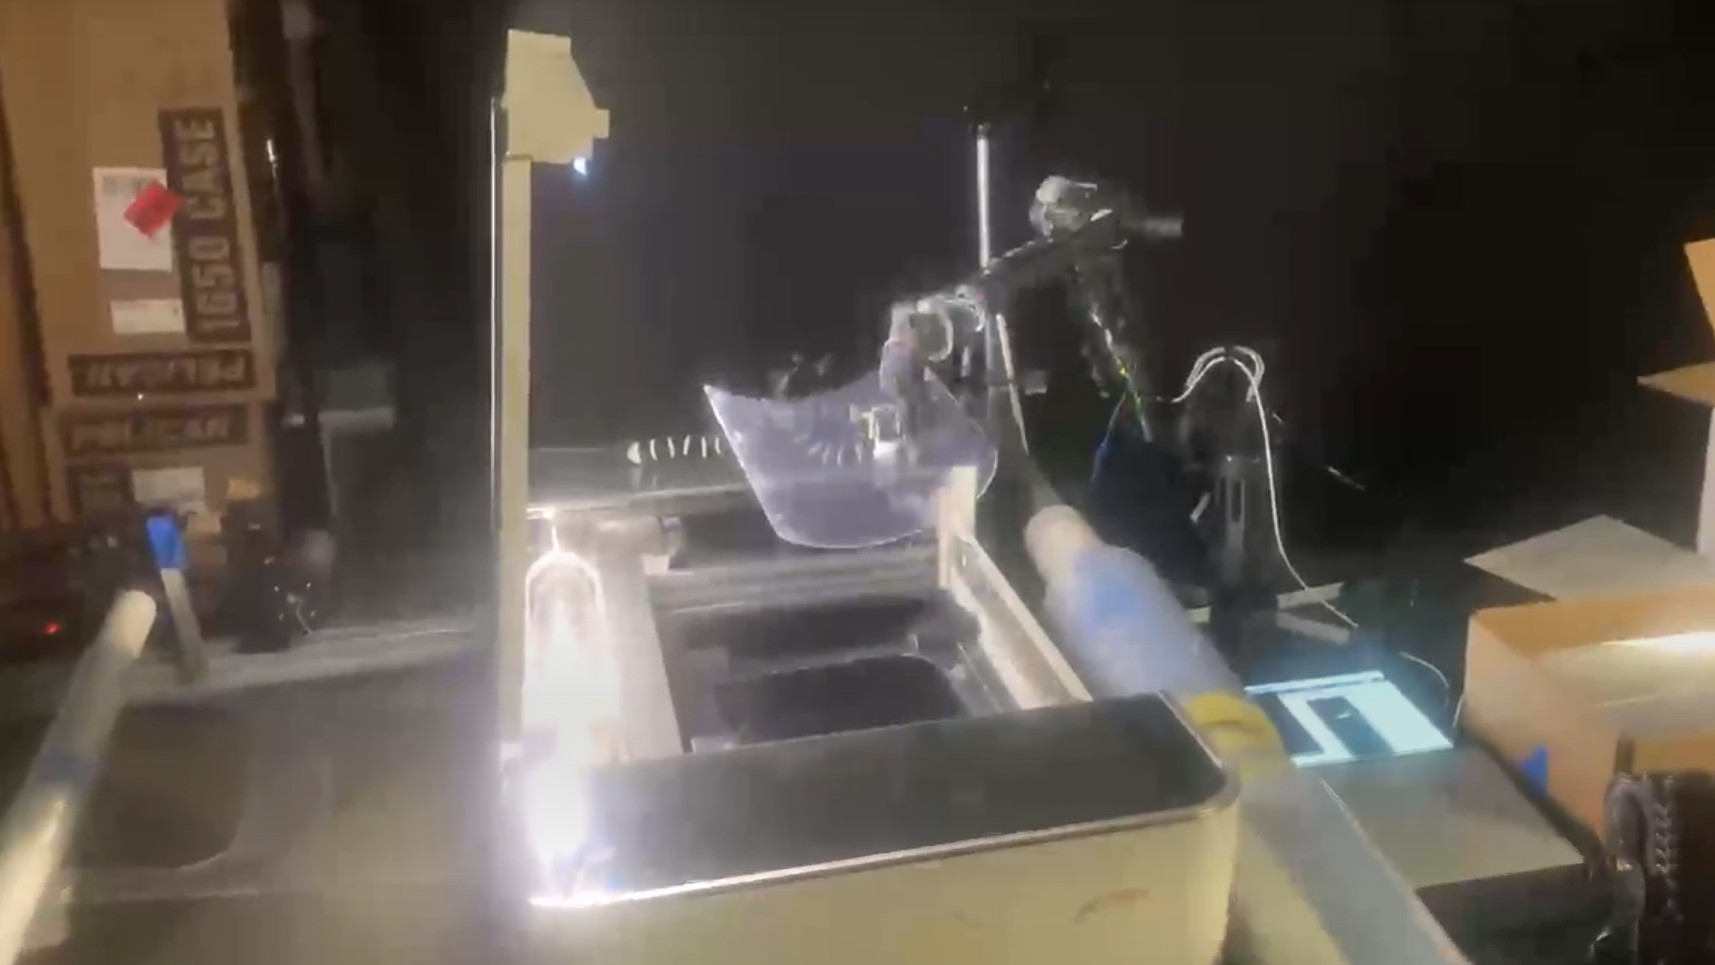
We’re certainly familiar with vacuum grabbers used in manufacturing to pick items up, but this is a bit different. [James Wigglesworth] sent in some renders and demo video (embedded after the break) of the Dexter robot arm and a laser cutter automatically producing face shields.
It’s a nice little bit of automation, where you can see a roll of plastic on the right side of the Glowforge laser cutter feeding into the machine. Once the laser does its thing, the the robot arm reaches in and grabs the newly cut face shield and stacks it in a box neatly for future assembly. There are a lot of interesting parts here, but the fact that the vacuum grabber is doing it’s job without a vacuum air supply is the one we have our eye on.
The vacuum comes from a corrugated sleeve that makes up the suction cup on the end of the robot arm. A rubber band holds a hinged piece over a valve on that sleeve that can be opened or closed by a servo motor. When the cuff is compressed against the face shield, the servo closes the valve, using the tape as a gasket, and the corrugated nature of the cuff creates a vacuum due to the weight of the item it is lifting. This means you don’t need a vacuum source plumbed into the robot, just a wire to power the servo.

 To be honest, pretty much any chunk of wire will do as an antenna for most shortwave receivers. But not everyone lives somewhere where it’s possible to string up a hundred meters of wire and get a good ground connection, which could make a passive loop antenna like this a good choice. Plus, loops tend to cancel the electrical noise that’s so part of life today, which can make it easier to pull in weak, distant stations.