Anyone who’s spent some quality time with a desktop 3D printer is familiar with the concept of supports. If you’re working with a complex model that has overhanging features, printing a “scaffolding” of support material around it is often required. Unfortunately, supports can be a pain to remove and often leave marks on the finished print that need to be addressed.
Looking to improve the situation, [Tumblebeer] has come up with a very unique modification to the traditional approach that we think is certainly worthy of closer examination. It doesn’t remove the need for support material, but it does make it much easier to remove. The method is cheap, relatively simple to implement, and doesn’t require multiple extruders or filament switching as is the case with something like water-soluble supports.
 The trick is to use a permanent marker as a release agent between the top of the support and the area of the print it’s actually touching. The coating of marker prevents the two surfaces from fusing, while still providing the physical support necessary to keep the model from sagging or collapsing.
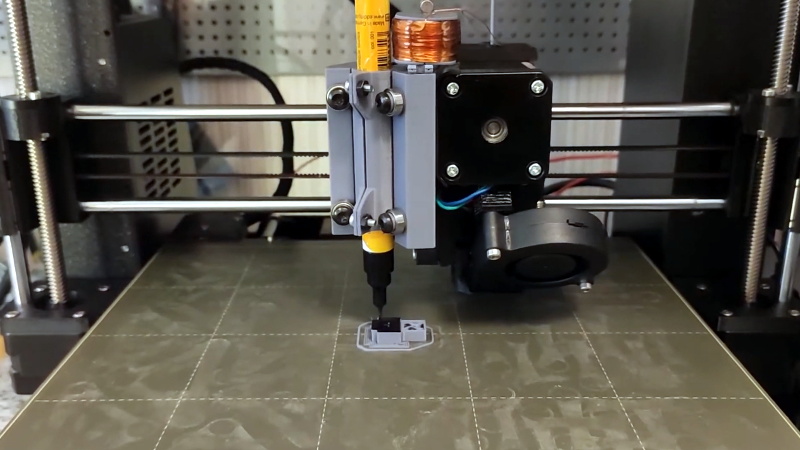
To test this concept, [Tumblebeer] has outfitted a Prusa i3 MK3S with a solenoid actuated marker holder that hangs off the side of the extruder assembly. The coil is driven from the GPIO pins of a Raspberry Pi running OctoPrint, and is engaged by a custom command in the G-code file. It keeps the marker out of the way during normal printing, and lowers it when its time to lay down the interface coating.
[Tumblebeer] says there’s still a bit of hand-coding involved in this method, and that some automated G-code scripts or a custom slicer plugin could streamline the process considerably. We’re very interested in seeing further community development of this concept, as it seems to hold considerable promise. Having a marker strapped to the side of the extruder might seem complex, but it’s nothing compared to switching out filaments on the fly.


Wow the surface looks so clean.
To try this you could maybe simply pause the printing at the specific layer height and manually paint the support interface.
You are right! good point.
I recently paused the print manually and put some bluetape on the junction point. Z-distance needs to be 0.2 mm.
I would be a bit worried about the marker drying out. Maybe a sharpie retractable instead? Could be maybe set up as a second extruder option in the firmware as well….Very nice.
Maybe replace the ink with vegetable oil or some different non-drying compound? There is a lot of room for improvement in this area. You can experiment with a lot of different possible release agents… Sharpie ink is readily available in sharpie pens, but can be replaced with various different liquids…
Maybe water with a bit of starch would last longer than solvents used in permanent markers, while leaving water soluble residue unlike the markers which are not water soluble…
Chapstick works really good. If we can make it extrude neatly in a very thin line even better.
Maybe if Carmex was used. It’s more of a liquid state and could be applied like that.
That’s An interesting Solution to the problem.
Yes as has been mention e the pen drying out would be an issue but as a proof of concept it’s a great start.
But would it be easier than a dual extruded – I guess if you don’t have a dual extruded it would be.
I wonder if you could use the dual extruder functions to drive the pen mechanism.
Nice idea!
I’ve used pritt-stick (PVA glue stick) in exactly this way to make supports removable.
It works very well, but I just don’t have the skill to do this in code, so it was all very manual pause and apply.
I wonder if there is a something as easy and cheap use as a marker but with properties like PVA ?
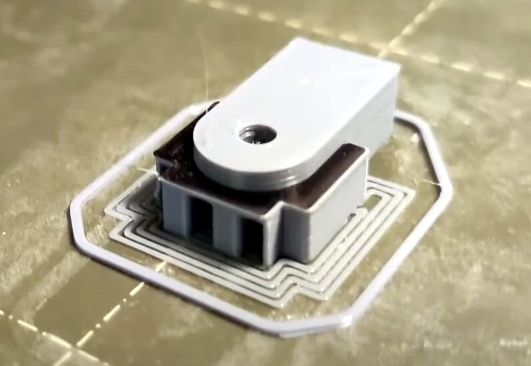
Interesting technique. I wonder how well it could work with supports that don’t have smooth, flat tops. Also, I can’t help but wonder why the demo was done with a part that doesn’t need support anyway if it’s printed the right way up.
The hole in the center can not be as clean if printed in the other direction (and I think it’s the master function of that part).
Smooth flat tops are the biggest problem for support material as they have an uninterrupted interface boundary between support and part.
He appears to have taken something designed to be printed and flipped it upside down, He turned a best case print into a worse case. The added benefit is that he can easily compare it to the part printed right way around.
Just to clarify, the part itself has no functional purpose.
I designed it purely for testing the system. The hole and the curved perimeter are features that are usually quite distorted when printing on normal supports.
Could also mention that adding a pause in the print and painting the interface layer manually works great as well, though it gets a bit tedious.
That’s exactly what I was about to comment — that you designed and printed this part, in this orientation, specifically to test your solution. At any rate, excellent work! I look forward to trying this out.
Nice work, Tumblebeer!
brilliant!
A really promissing concept, simple but (which I did not expect) very effective.
Thanks for posting!
Very innovative (at least in the budget price range – I assume the more expensive segments have similar/other solutions).
How does it work when you don’t have an overhang that is anchored on one side? Does it slide around if you try to print directly on top of the painted surface?
I was using PLA+, which sticks perfectly on the marker ink. The inner perimeter of the hole on this part was printed without any attaching parts, and it came out perfect.
Yes, RIZE 3D introduced this concept couple of years ago. Although they use an inkjet head instead of a sharpie ;)
What materials have you tried this with?
PLA, ABS, PETG, Nylon, PC.
Literally the perfect hack. I hope Prusa folds it into their next revision.
Reminds me of the mod that Stuff Made Here did on his plasma cutter. Sharpie drops down to mark bend lines on sheet metal parts.
https://www.youtube.com/watch?v=c3LhK2SAusk
Great use of the click type sharpies! Keeps the felt from drying out.
Very similar in function to the “chapstick support removal” method I posted here a while back. I was just about to add a pen tool to my carriage anyways for other reasons so this will be great to test.
I should do a side by side with the chapstick method on something large again like this https://flic.kr/p/24E6tMR
I wonder how this would work as a film between PETG and a PEI build plate to help avoid over adhesion.
Interesting. I have no experience with 3d printing, but I might have an interesting idea. How practical/beneficial is it to print the support material once and then reuse it for several prints?
Could be savings of material if you need to make several copies of a complex print…
You just take a ready to use support structure and then apply some separating layer on it to prevent the additional material from sticking. Makes sense?
Good idea, but the problem is that a pre-built support will obstruct the print head. Most if not all current fused-filament fabrication printers have only a small amount of clearance between the current print layer and parts of the print head, sometimes only a millimeter or two vertically, and usually many centimeters of clearance horizontally. Even if you had a custom design with more clearance in other parts of the print head, the nozzle itself requires at least one nozzle radius clearance from the extrusion path which makes pre-built supports very difficult if not impossible in the general case.
I don’t think it can work – the extruder will crash into the support material you leave on the bed.
But if the required support is big enough, you might be able to use some as reusable support and some as throwaway. The tip of the extruder is usually angled, so you might be able to print the throwaway support as a slope upwards where it meets the reusable.
Y’all forget one thing: the added support block doesn’t have to go all of the way up. If you, for example, had an arching doorway that needed support at the top, you could leave the gap empty until it started to curve in, pause for a rectangular block to be inserted, then print the support on top of that. Essentially, the support blocks act as a raised bed surface. (…and should be heated to bed temp somehow, ideally.)
I need to see a caged roller bearing done like this
neat-o free-toe.
so common sense and simple, it’s a wonder one of the big guys didn’t come up with it already. Oh wait, something useful like this might cut into profit margins…. also, might cause someone to use less filament. hmmmmm #designedfrustration
It does? This hack doesn’t change the amount of filament used; it just makes it easier to detach the supports. Perhaps it would make it easier to use normal instead of dissolvable filament for supports, but you’re still printing the same amount.
That’s correct but printing time can be a lot faster since it’s the same material for build and support, also build material is normally cheaper than support material.
The support and build material can always be the same–you’re never required to use a different support material. Indeed, 95% of my prints and I suspect most hobbyist’s prints use the same material for the build and support. The original assertion by Antiestablishmentprusanism still doesn’t hold water–this hack doesn’t change the amount of filament used.
Wonder if you could use the marker to paint the outside of the nozzle.. so when you get a failed print/spaghetti incident you can just pull the failed filament right off without risking damaging the nozzle.
I REALLY want to see how this works on a curved overhang. I print a lot of electronics enclosure prototypes that have curved surfaces, and support removal is a PIA.
I had a similar idea, involving nozzle temperature. You could theoretically lower the nozzle temp enough to make one layer not stick enough. the problem is the time needed for the nozzle to cool down. but at least it’d be a drop-in upgrade, just make the code and use
Great Idea!
SOLVED: we figured that you could print a tiny support interface layer with the pen portion as a 2nd extruder in cura. we basically deleted the z offset, and set a z hop, also the pen can be loaded on a spring to engage when the printer sees fit (activate relay when 12 volt is applied)
Christian Patrick Galles
I’m seeing a bit of residue from the marker. Do you think other sharpie colors would work?