
It should have been another fine day, but not all was well in paradise. Few things bring a creeping feeling of doom like a computer that hardlocks and then refuses to boot. The clicking sound coming from the tower probably isn’t a good sign either. Those backups are up to date, right? Right?
There are some legends and old stories about hard drive repair. One of my favorites is the official solution to stiction for old drives: Smack it with a mallet. Another trick I’ve heard repeatedly is to freeze a hard drive before trying to read data off of it. This could actually be useful in a couple instances. The temperature change can help with stiction, and freezing the drive could potentially help an overheating drive last a bit longer. The downside is the potential for condensation inside the drive. Don’t turn to one of these questionable fixes unless you’ve exhausted the safer options.
For the purpose of this article, we’ll assume the problem is the hard drive, and not another component like a power supply or SATA cable causing problems. A truly dead drive is a topic for another time, but if the drive is alive enough to show up as a block device when plugged in, then there’s hope for recovering the data. One of the USB to SATA cables available on your favorite online store is a great way to recover data. Another option is booting off a Linux DVD or flash drive, and accessing the drive in place. If you’re lucky, you can just copy your files and call it a day. If the file transfer fails because of the dying drive, or you need a full disk image, it’s time to pull out some tools and get to work.
As a hard drive degrades, individual sectors can become unreadable. This is an expected process, and modern drives are built with spare sectors to fend off the inevitable. As sectors begin to become unreliable, they are retired, and spare sectors are used instead. When the spare sectors are gone, the disk begins accumulating unreadable sectors. An unreadable sector in the middle of a file will kill a file transfer, or maybe even make the device unmountable. The ironic part is that it’s usually only a tiny percentage of the disk that’s unreadable. If only there was a way to manage those unreadable sectors.
Turning to DDRescue
The amateur sysadmin has a potent tool in his toolkit: ddrescue. It’s a descendant of sorts of the venerable dd disk copy tool, but with an important difference. When dd encounters a read error, it stops the transfer and displays the error. ddrescue makes a note of the error, leaves a blank spot in the output file, and continues transferring what data it can. Because there is record of the missing chunks, we can keep trying to read the missing parts, and maybe recover more data.
To get ddrescue running, we give it an input, an output, and a mapfile.
ddrescue /dev/sda diskimage.img mapfile.log
By default, ddrescue goes through three phases of rescue. First, it copies a sector at a time until it hits an error. For a drive that’s working perfectly, this operation completes without issue and the whole drive is copied. If a sector can’t be copied, or is even particularly slow in responding, ddrescue jumps ahead, hopefully beyond the problem.
The second phase is trimming. To put it simply, ddrescue starts at the end of each skipped section, and works backwards till it hits a bad sector. The purpose is to recover the largest amount of data as quickly as possible, and to establish exactly which sectors are the problematic ones. The last phase is scraping, where each unread sector is examined individually, attempting to read the data contained. Each time a sector is read, the mapfile is modified to keep track.
A sector might fail to read 15 times in a row, and on the 16th attempt, finally read successfully. Because of this, ddrescue supports making multiple scraping passes in alternating directions. Part of the theory is that the read head alignment might be slightly different when approaching the sector from a different location, and that difference might be enough to finally get a successful read.
When It’s Not So Simple
While the ideal operation of ddrescue is straightforward enough, there are some potential problems to be aware of. The first is heat. The process of trying to recover data from an already dying drive can quickly overheat it, and make further reads impossible. The best and simplest solution is a fan blowing cool air over the drive. The other common problem I’ve encountered is a bit harder to explain, but it’s identified by a specific error message: ddrescue: Input file disappeared: No such file or directory. When trying to read from the drive, something went wrong badly enough that the drive has disappeared from the system. My theory in this case is that the firmware on the drive itself has crashed and halted. Regardless, unpowering and repowering the drive is usually enough to get back to work.
This means that for a particularly stubborn drive, the process of recovering bits feels a lot like babysitting. Power cycle the drive once it crashes, and restart ddrescue — over and over and over again. Since the read fails as a result of the crash, that sector is marked as bad, and the rescue attempt jumps past it. Sectors in good shape might not trigger the crash, so some data gets read.
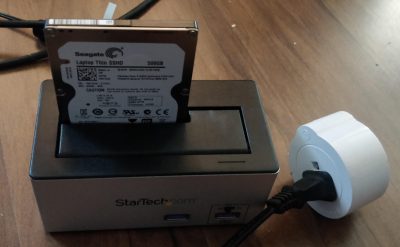
If you think that spending hours power cycling a hard drive doesn’t sound like a fun task, and is something that should be automated, then you’re right. It’s easy enough to wrap our ddrescue command in a loop, ideally along with five seconds of sleep. That handles half the problem, but power cycling the drive isn’t a software problem. I’ve used Adafruit’s power switch tail in the past, connected to a Raspberry Pi GPIO pin, to kill the drive’s power supply every 30 seconds. It’s not ideal, but it works. Unfortunately that device is discontinued, and I’m not aware of a direct replacement.
The last time I ran into this problem, I used a WiFi power switch, pictured above. Whenever the device disappeared, the script triggered the plug to power cycle the drive. This worked, and on a 500 GB drive, I recovered all but the last 1.5 megs. The only downside is that the smart plug only works via the cloud, so every power cycle required a request sent to the IFTTT cloud. Leaving the drive running overnight resulted in too many requests, and my account was frozen. Next time, Ill have to use a device that supports one of the open source firmwares, like Tasmota. Regardless, the script is simple:
while true; do
    sudo ddrescue /dev/sda diskimage.img mapfile.log
    if [ -a /dev/sdc ]; then
        sudo ddrescue /dev/sda diskimage.img mapfile.log -M
    else
        curl -X POST https://maker.ifttt.com/trigger/switch_off/with/key/REDACTED
        sleep 10
        curl -X POST https://maker.ifttt.com/trigger/switch_on/with/key/REDACTED
        sleep 10
    fi
done
If the device disappears, use the switch to power cycle the drive. If ddrescue completes, and the device is still present, then use the -M switch to mark all the bad sectors as untried.
In many cases, this isn’t a process that ever really finishes, but the rate of recovery eventually drops too low to be worth continuing. Once you’ve copied as much of the raw data off the drive as possible, it’s a good idea to use fsck/chkdsk to repair the now-rescued filesystem. If it’s a system drive, after you burn it to a new disk, you’ll want to use your OS’s tools to verify the system files. For Windows, I’ve had good success with SFC and DISM. On Linux, use your system’s package manager to verify your installed packages. On a Fedora/Red Hat system, rpm -Va will show any installed binaries that have unexpected contents.
Over the years I’ve rescued a handful of drives with ddrescue, that other techniques just wouldn’t touch. It’s true that a good backup is the ideal solution, but if you find yourself in a situation where you really need to get data off a dying drive, ddrescue might just be your saving grace. Good luck!
Banner Image: “Shiny” by Nick Perla, BY-ND


I actually used the freezer trick on a drive and it worked. I documented it all on my site if anyone cares to read it:
https://miscdotgeek.com/adventures-in-hard-drives/
I have used it as well, worked like a charm twice on two different drives. Although i have had it now work on a few drives as well. Tends to work best on drives that are not spinning on their own.
I used this trick and it actually worked 3 or 4 times. Worked on drives that started correctly, and then was stuck after a few minutes or a few seconds.
The trick also failed miserably on other drives, especially the last 10 years. I wonder if it was a fix for a specific technology failure, or if it was made obsolete on more recent disks for whatever reason…
Long time ago a drive just clicked one morning. Welp, tried the freezer trick w/o success couple of times, except that on the last try I just left the drive in the freezer and decided not to bother go further. You know, f the drive, restore from backups etc. Lost just a few files I had modified previous night.
About six months later I needed more space in my freezer so took out the drive, which had quite a bit of frost and ice on it, because I didn’t bag it. The drive spent a few months on the kitchen table melting, drying and just laying around.
Then one weekend I thought the faulty drive had been around too long and I’d kill it in a way or another before throwing it away. Got my hammer ready, powered the drive and… it spinned up and didn’t click. The trick did work after all.
Maybe it was dry soldering joints coming together after extreme thermal cycling
I also had successful use of the freezer trick on a laptop drive. Although, I had to keep the drive IN THE FREEZER for the drive to work at all, with the SATA and power cable run out through the door seal and the PC laid on top of the freezer. It literally took over a week (12ish days irrc) of looping ddrescue runs for ddrescue to get a complete enough disk image that I could successfully mount under MacOS.
Now That is dedication.
used it myself as well to some success… tho I bagged the drive to insulate it from moisture and put a freezer block ontop to keep it as cold as possible.
was able to save all the data off the drive in one hit.
SpinRite has saved my butt a ton of times as well.
Fixed enough issues for me to get the data off and on to another drive!
I wish he would update it already.
Steve is now, finally, working on Spinrite 6.1 to bring a whole load of modern-era stuff in to it (faster transfers and I believe support for modernly-huge drives).
I’ve had mixed success with Spinrite, but it’s definitely worth trying. I would probably try ddrescue first, and then let SpinRite work on the disk for a while, and finally let ddrescue try reading the missing sectors again.
Totally agree – if the drive could be saved, Spinrite is the best bet to do it!
What is SpinRite ? is it some sort of dd_rescue you have to Pay for ?? (it looks like)
Yeah, essentially. It was written by Steve Gibson way back in the day. It’s clever, and does all the work in-place. I prefer to use ddrescue to create a disk image, and then maybe use spinrite to try scrubbing the last few bad sectors.
Heck, I used it back in the ’80’s to optimize the interleave on 20MB drives.
Kudos on Spinrite. Back in the early 2000’s i used the PGP encrypting software on my home and work PCs. The PGP software would create a password and key protected virtual mountable drive with a user designated drive letter and name. It was a wonderful software that was purchased back and fourth by a few large companies (McAfee, Symantec, etc.etc.). After a power outage on home PC my 120Gb Hitachi hard drive got surface errors which in terms affected my PGP virtual drive. My virtual drive would refuse to mount and i refused to believe that my data had become lost. After trying many things i decide to purchase the USB thumdrive bootable Spinrite software. I remember that it worked very hard by running multiple passes and taking advantage of many S.M.A.R.T hard drive features in order to relocate and read otherwise unreadable sectors. I was able to succesfully recover my virtual drive and i immediately retired the 120Gb hard drive. I personally recommend Spinrite.
Another option for software-controlled mains is to find a socket or power-strip using the Gembird chipset and hence able to be controlled locally over USB with sispmctl – also very convenient for any rPi-based mains switching needs.
Unfortunately they’re not very fashionable now the “wifi smarthome” style of devices have come around, so they appear to be dying out. I probably couldn’t use a cloud-and-wifi-based switching adaptor for my automatic power-cycling of my slightly unstable router – no way to turn the router back on again!
I’ve had a great deal of success using the TP-Link HS110 for automation stuff. It’s got all that fancy-pants cloud stuff, but you can still control locally without internet.
Oh, and it’s easily hackable: https://github.com/softScheck/tplink-smartplug
The HS110s run for around AU$35, and the HS100s are a bit cheaper (no energy monitoring).
Currently running one each on the input and output of my solar transfer switch so I can see how often my stuff is running on solar and plan capacity appropriately.
There’s got to be some way to throw a UPS in there and come up with an overkill-tech “most useless machine” that boots up your router, powers down the plug, activates the UPS, and so on…
I did the freezer trick on a 240mb drive worked long enough to get the 486’s proprietary setup software backed up
I later opened it up and any of the rubber parts around the head looked solid until I touched it to confirm that it was in fact a gross super sticky liquid
From dead drives to a drive that caught fire. I’ve seen many drive crashes and failures over the years.
If you don’t know what’s going on with it, first putting your ear to the drive is always a good start. Many drives are so quiet that you need to get up close and personal to hear if the drive is having issues. Is it buzzing, ticking or making any odd noise?
Putting your hand on the drive can also tell you if it’s even spinning but while picking it up will also tell you (from the gyroscopic affect) you have to be very gentle.
Stiction can be overcome by “gently” tapping the drive as you apply power. I wouldn’t do it with a metal hammer. I used the end of a plastic screwdriver. Just tap on power up.
If I remember correctly Steve Gibson has been around since the 80’s. I think it was one of his tools that I used to reinterleave MFM and RLL hard drives or to test the performance of the drives after.
I’ve found that connecting the drive directly to SATA works better than USB. Then again, as long as you can get it to work, anything goes. Just get the data off of it ASAP.
Interleaving drives… That brings back memories! Like recovering data from a floppy disk that was so worn out you could actually see through parts of it. I used “Super Zap” for that. I miss that tool. Yes, it was SpinRite used for interleaving. We always ran SpinRite on new hard drives we sold in new computers or as replacements, even if the controllers were rated for 1:1. Sometimes the computers still weren’t fast enough… and maybe more to the point M$ DOS.
And, yes, its an awesome tool for data recovery. Gibson is a genius. But like every other fix mentioned here its only good for fixing certain kinds of failures. The best road to success is always to address the the failure, ie. what’s actually broken. I never froze a drive for stiction issues, although I imagine repeated rapid heat cool cycles would work. I use the freezer to deal with circuits that get too hot and quit working.
For stiction I prefer to twist the platter spindle. But on recent drives its usually not accessible. So strategically applying vibration works. I haven’t used a hammer. But I have banged it on desktop. That doesn’t sound very strategic, but I usually only use/need one tap. The key is to get the head stack to break free so you make an educated guess on what direction it wants to swing and apply jarring force in that direction, baring in mind that over application of said force can destroy instead of fix. And, of course, tapping on it while the electronics are trying to pull it free works when the balance of force is adequate. Obviously these tricks are not likely to fix a broken drive if the issue isn’t “classical” stiction (seized bearing, burnt coils, toasted drivers, …)
I have used DD to recover data. I haven’t heard of DDRescue. So THANKS Jonathan! It will save me from having to write something next time. But honestly I haven’t built a system without RAID in so long I’ve not needed to get ingenious about recovering data. Yes, I know its not a 100% solution, nothing is and I can’t argue with the results. Toss that drive, slap in a new one, done. And for the rest of the time I have backups, remembering what was so eloquently stated in HaD comments on another article, “If you have one backup you DON’T have ANY backups!”
Oh… and by “toss that drive” I really mean: disk erasure by Ruger at the range. ;-)
Unfortunately, north of the border, they don’t really give us easy access to tools like that.
Another way is taking the drive apart for the magnet. It’s super powerful and great for holding things. Just don’t get your fingers caught between the magnet and the metal. Ouch!
If I take it apart in front of a client I give them the magnet as a souvenir of their dead drive.
Yeah, I finally took my ‘stack’ of old drives (still worked, but no place to go) and just tore them down. Removed the platters, and saved the magnets, threw the rest away. Magnets work great for sticking stuff to cubicle walls, etc. interesting they are ‘one sided’. I never did take any to the range to erase via Ruger. Thought about it though.
They’re only “one sided” if you leave it stuck to the metal bracket, which redirects the flux.
I made a wind chime from the disks in a big old 6 platter 5.25″ hard drive. Made some pretty musical sounds.
Hard drive platters make great first-surface mirrors.
What I did on drives with a sticky spindle motor was hold the drive flat and firmly between thumb and fingers, with thumb and middle fingers to either side of the spindle axis. Then with the edge of my other palm I’d whack the end of the housing fathest from the spindle, while allowing my wrist to twist.
The idea is to have the inertia of the platters try to hold the spindle still while the rest of the drive is quickly rotated around it. Very important to not knock the drive from your grip. ;)
“putting your ear to the drive is always a good start” Stethoscope might help.
That’s usually called a “Screwdriver” in our business …The pointed end rests gently on the disk, your ear is applied to the handle.
Thx for the tips. Good to know when you are caught out and really want to get a file or two off the drive. As said above though, backups are the best strategy now-a-days as cheap as the drives are (when you take them apart it is amazing you can sell them at the price they do). Don’t think these techniques would work with an SSD :) .
Be aware that ddrescue (https://www.gnu.org/software/ddrescue/) and dd_rescue, sometimes called ddrescue (http://www.garloff.de/kurt/linux/ddrescue/) are different tools which do much the same thing…
Came here to say that. And one is much better at it than the other..
Which one?
I had one case of a dead drive in a SCSI RAID array, and of course the customer had no usable backups. Through some testing, I determined that the drive controller board had failed, but the mechanics were fine. So I hopped on the Bay of e and found an identical drive for cheap, got it shipped, and swapped its controller board to the dead drive. Bingo! The RAID array was resurrected long enough for me to pull all the data off, and we were off to the races.
I had another case, which I caused myself to my own drive. I had attached an external drive to my Linux laptop and was beginning to wipe it for some reason. Only, out of muscle memory, I typed the dev entry for the laptop’s boot drive instead of the external drive, and subsequently wiped its partition table (late at night, eyes starting to cross, etc.).
Luckily I had the testdisk/photorec utilities installed, so I immediately ran photorec on the drive (the laptop is still operational, mind you! I hadn’t rebooted it or anything), and it found the partitions. I let it rebuild the partition table and learned to verify which drive or partition I was nuking before hitting GO. The laptop ran perfectly fine for a long time after that.
I’ve done the old controller swap on many a drive. Also have had luck identifying and removing some pesky “0 ohm resistors” from the power rail that were shorting things to ground in an unwanted way while waiting for the eBay delivery…
I’m not fond of Dymo’s electrical people. Why? Because their 24 volt thermal label printer power supplies use exactly the same barrel plug as everyone else uses for 12 volt!
Accidentally crossed up a LabelWriter Turbo 400 and a WD MyBook. WD’s USB to SATA adapter inside has a *very robust* 5 volt regulator for itself, and it passes that protected 5 volts on to the hard drive.
For 12 volt? No protection at all! It just passes 12 volt (or whatever is connected) directly to the 12 volt line on the drive.
With 24 volts you’re playing a roulette game with two numbers. Either the protection shunt shunts permanently to ground and the rest of the drive circuitry is fine, remove (optionally replace) the shunt to get back in action, or the shunt shunts to ground then blows open, followed by various other parts blowing up.
I fortunately got the first result.
In the case of the second result you’ve lost everything, likely even with a professional job of replacing and setting up a replacement board on the drive, because most of the MyBook line uses hardware encryption of the filesystem. Take the drive out, connect it directly to a computer, it appears to be empty. A feature nobody asked for and it can’t be turned off – except by removing the drive, repartitioning, then putting back in the MyBook case. I tested the internal adapter with another drive and it worked, no encryption.
There has never been a standard for barrel plug size/voltage/ampacity check everything every time.
It may as well be a standard for 12 volts. I have all kinds of 12 v stuff that all uses the same size plug – and one (now clearly labled) 24 v device.
I have lots of music gear and have to use adapters ranging from 5 to 24V, AC and DC. And they basically all use the same barrel plugs. So clear labelling is essential and that’s why i also have a Labelwriter 400.
I once had a MyBook drive which had problems. Because first I thought, perhaps it’s just the USB/PSU electronics, I used the drive otherwise, but I did not encounter encryption. Either you had to set it up at the first use or there were different series.
But it was the drive itself that had intermittent faults (sitting there clicking instead of spin up) and I had to do the opposite of the freezer trick: warm it up with a hair dryer (not heat gun) to get it go.
Two comments. A looonnng time ago (and far far away) there was a product called SpinRight. What it did was do a low level full track read to lift all of the data then a track erase to restablize the tracks magnetic surface and finally do a full track rewrite the original data which essentially performed a track reformat with the original data. It would do this over of all of the tracks on the drive. This restoration worked quite well on drives of that era (typically 100 Megabytes or less) and corrected the progressive track and sector deterioration caused by normal use . It also worked on floppy and cartridge disks (remember those?). After backing up a drive (for safety), we would run this app on roughly a six month schedule. We found that our data access failure rates were substantially reduced compared to before.
I now wonder if there is a modern equivalent and whether such an application would work on modern ultra high density drives (We typically use 1 to 8 Tb 7200 rpm drives) or whether it’s even needed.
Second we have had 4 WD drive controller board failures over the last couple of years (1 was toasted, fried by bad power hookup – our bad). Anyway modern drives are apparently factory tuned with the parametric for each specific head-platter stored in on board flash. We’ve been sending our failed WD HD controller boards out to DataPro Data Recovery Labs (hddparts@gmail.com) a company in White Rock BC Canada. Using the serial numbers on the drives, they swap the parametric flash from the bad board to an new identical controller board and return both for $49 USD. When we reinstalled the replacement boards on the failed drives, all four came back up and running with no data loss. (your mileage may vary).
I used to periodically use SpinRite for preventative maintenance on my work laptop. I was on a long term foreign assignment and I was worried if the drive failed I’d be given a new machine by the local company IT and “migrated” to their domain.
If I recall correctly, the disk was around 500GB.
Running SpinRite overnight, stop & take note of where it had got to in the morning and resume in the evening. A complete run would generally take about 4 or 5 nights.
Unfortunately I’ve not been able to get SpinRite to run on any of my newer machines (BIOS issues & Spinrite warnings) so I’m keen to see the next release.
On older drives Spinrite could force hot spare replacement of sectors marked bad. But as drives changed it couldn’t access the drive functions to do that for sectors that were marked bad.
I found a way to do it on those newer drives but it required losing all the data. FDISK to delete and make new partition, then FORMAT /Q so it wouldn’t scan for bad sectors.
Then run Spinrite at the highest level. Then Spinrite had full control and could make the drive hot swap bad sectors.
But as drive sizes got into 1+ gigabytes it became too tedious of a process to wait hours and hours and hours for that scan to complete. What Spinrite needed was the ability to scan at level 2 then switch to the highest recovery/repair level upon finding a bad spot.
In the pre-gig era I had a special 80286 motherboard I used for one purpose. It had the ability to do factory style low level formatting on IDE drives. IIRC the largest it was able to handle was less than 500 megabytes. I refreshed a lot of drives with that one in the early to mid 90’s.
The external USB enclosure is a terrible advice, depending of the chip, full resets are issued when disks start misbehaving. common issue that I ran across multiple times, few stuck sectors are easily recovered when attached to a SATA controler, almost impossible to fix on a USB enclosure.
I’ve had the same problem with direct SATA attached drives, except it takes a computer reboot to clear up. Your milage may vary, and it’s definitely worth trying both ways.
I used to get seriously into this shit, I bought a cracked copy of PC3000 drive recovery from china (of course) for $500, the real deal was thousands. I since sold it to some other guy for i think $800, the package was amazing. Drives progress , but this didn’t which is why I sold it, it was increasingly no good for newer drives.
The best story was when a guy came in my store with his dead drive AND a donor he got already from ebay. He thought we could just swap the boards, but you actually have to swap the nvram chip from the old board to the new. Otherwise your stuff will not be right. It’s been a while, but I believe the remapped sectors & other platter specific details were on it. Used a USB microscope to move the chip, it’s a small smd. Had the guys data back that afternoon.
I am waist deep in yak hair over one old drive I really really want data off. It has been an on and off project, just trying things gently, trying not to further screw it up in case it has to go to a pro. I have thus far been able to rule out the PCB. Had a side quest about potentially reading the serial eeprom with an AVR. Am looking into faking temperature sensors at the moment. I believe it has weak heads, that are just outside the calibration parameters. Oh yah, it’s also led to me basically rebuilding 3 different computers so far (Insert wild tails of weird age related failures and strange incompatibilities here)
The stupid thing is, there’s a whole lot of NDA stuff on it that mean I can’t let the thing out of my sight, which may have significant commercial value, but that is not the data I need back, that stuff is backed up where it needs to be, be better if I just smashed it up with a hammer on that score. There is some personal data, with some personal relevance, which may lead to realising a monetary benefit of zero to a few thousand. BUT it may be worth completely zip and/or I might need to get forensic with other data or metadata on there to determine where that data did go or where else to look. So the drive is a huge liability, with a slim chance of gain. So I can’t use a pro unless I find a fairly local one with onsite techs who aren’t going to send it to India or something. Meaning the kind of pro I need isn’t going to be Billy-Joe’s Bait, Tackle and Data Recovery, but someone expensive, with megacorp, law enforcement and government clients.
If the drive is still spinning, try Steve Gibson’s SpinRite.
Wait a few weeks. New Spinrite is under rapid development with army of beta testers. Will be fast, work with UEFI and BIOS boot, old or new systems.
In a previous job we had a xilinx inside some kit that we manufactured. We eventually upgraded the firmware, with a new Xilinx image, but sometimes the new image had a bad reaction with the Xilinx chip in a new batch, and then refused to boot.
I figured out that the failure (probably some black art constraints issue) was temperature-dependant.
So our hardware would then go into the freezer, and you had about 60 seconds after power-on to re-flash the old image, then you were back in business.
This got one of our Far-East support guys out of a hole, he thought I was joking, but after it worked, I got somewhat of a hardware reputation (I’m supposed to be a software guy).
So -the freezer trick doesn’t only work with hard disks!
Did not know about ddrescue. Thanks.
Going a little off-topic:
I only dabble occasionally in the Linux environment but I was, many years ago, sysadmin for a SunSparc & very early on I was introduced to dd when I received a software install on an exabyte or similar tape while the SunSparc (spec’d) by the software supplier had been purchased with a 10mm DAT drive.
I had to find another machine on the campus (it was largely a DEC/Vax shop) that had the right type of tape drive & then install the software across the network.
Talk about a baptism of fire!
To save money, we had not bought any Unix manuals because they were available in .ps files on the hard drive. So who needs hardcopy?
We had also saved money and the console attached to the SunSparc was a VT-200 (text) terminal that could not display the .ps files. The idea was to use our PC (DOS / Win3) with xterm emulation software as a graphics terminal. At that stage our PCs did not have a TCP/IP stack installed (remember netbui?) so getting that to work was another mission of trial and error modifications to system and autoexec.bat files before I could access the SunSparc from my PC.
Anybody ever tried swapping platters/heads (with or without the makeshift cleanroom)? That’s always fun if you get really desperate and have no money for professionals…
Here’s a similar product to the power switch tail https://www.sparkfun.com/products/14236
Last week I needed to recover a client’s personal files from a creaky old Compaq laptop running XP, with only 512 meg RAM, a busted hinge and ghod knows what kind of collection of garbage installed that made it super slow.
It was much faster to pull the drive, jack it into my desktop, make an image and mount it using Windows 10’s own utilities, take ownership of everything on the image *then* copy the desired files off to a USB stick.
Put the drive back in the junky laptop and it still works as before, for very low values of works.
If you had important data, it was entrusted to a storage solution right? It was stored on a RAID array, and that had both local backups and remote backups, correct? The drive fails, you finish the job with a hammer and replace it with a new one without skipping a beat.
My preference is the old drill press, over a hammer. Sink the drill bit through the top plate and through the platters, and that data is forever gone.
My personal favorite fix for the old seagate mfm drives was manually giving them a spin when they would not spin up by them selves.
Why didn’t anyone tell me this stuff at the time when all the 80GB “Quantors” were failing one after another?
I remember when every hard drive I bought from distributors came with a copy of On-Track (or was it Ontrack).
That was confidence inspiring.
“Here’s your new hard drive and here’s your data recovery software. You’re going to need it”
A lot like the car dealer trying to sell you insurance for when something breaks…. Is the vehicle really that bad that I need all this coverage???
I use Time Machine to keep my machine backed up. Even my linux and Windows machines are mounted on my mac and they get backed up with Time Machine. I haven’t lost any data in decades. I have lost many drives and I make no attempt to recover any data, the dead drives go straight into the recycling bin. Everything is always backed up so it’s no big deal.
Yeah so you spent weeks recovering the stuff from your drive only to discover that one sector right in the middle of your most valuable data is not recoverable and now you’ve spent all that time for nothing.
Relying on recovery software is beyond stupid. Someday you will attempt to recover your data and the recovery program you bought a long time ago will not run on your new modern computer, or else it will have some sort of weird issue and all your data will be lost. You are trusting this piece of software?!? The joke is on you. Make backups without fail, test them without fail. Otherwise you are just wasting your own life and other peoples’ lives too.
LOL. I have no idea to what extent this is operator-induced error but at work we used time machine and the first time we had to actually use it, we found out it had basically decided on its own to stop backing up any of the interesting files. so time machine would only give us 2-year-old copies of anything we needed. i found another way to get it back but the lesson that time machine is wily has stuck with me.
I worked with an old backup set like that. Someone else set it up, and I just get called in for the disaster recovery btw. In that case, the filesystem on the backup drive was fat32, and the backup system was storing everything in a single giant file. Once that file hit 4GB, no new backups.
Hearing of dying HDDs always reminds me of the IBM DeskStar series. I lost 20GB of not backed-up data (I was a student and had no money) including huge parts of my MP3 collection because the glass platter would shed the magnetic layer. No way to recover anything. That was a sad, sad, sad time and I still regret having bought that particular drive.
https://en.wikipedia.org/wiki/Deskstar#IBM_Deskstar_75GXP_failures
Didn’t those drives earn the nickname of “Deathstar” because of their failure rate? :P
“… power cycling the drive isn’t a software problem.”
A few years ago, I tried recovering a failing laptop SATA HDD. The drive would “disappear” whenever reading a bad sector; it seemed like its firmware was confused by a lack of spare sectors, as this article mentioned.
After some creative google-fu, I figured a way to use the recovery PC’s power management to automate cycling the drive’s power. This eliminated an unreasonable amount of hand-holding, but there was already a fair bit of scattered damage, and ddrescue had increasing difficulty finding good sectors, until basically nothing was readable. Ultimately the laptop was RMA’d under warranty. YMMV.
Here’s the script I used:
DEV=sda; while true; do
# some of these flags were an attempt to aggressively skip over bad sectors
# "-e +$n" ensures ddrescue exits after errors, so the script can continue
ddrescue -vvvv -d -e +8 -n -N -c 1 -K 1Mi /dev/${DEV} ${DEV}.dsk ${DEV}-ddrescue.log
# make sure device is removed
echo 1 > /sys/block/${DEV}/device/delete
# power off drive by sleeping the whole PC
rtcwake -m mem -s 3
# re-add "newly inserted" drive
echo "- - -" > /sys/class/scsi_host/host0/scan
sleep 2
# just FFR: "[12345.678901] end_request: I/O error, dev sda, sector 123456789"
dmesg -c | grep sector >>${DEV}-crash-sectors.log
done
ddrescue is a pretty neat tool! i’ve always rolled my own for that, with largely the same steps. but each drive takes a different bag of tricks, in my experience. sometimes, i just read the filesystem so that it doesn’t waste time trying to read bad sectors that aren’t in files (which means my throw-away utility could kind of understand ext2 or FAT). also, how much to skip when it finds a bad sector, and how to handle the retries to trim it down, seems to vary a lot with drives. also, i had a drive that needed a power cycle after a bad sector – i used X10-controlled receptacle for that.
recently i went back and restored most of the files from a raw image of a drive where i had accidentally overwritten just the FAT table.
restoration is always fun work, no two trips the same.
Adafruit now sells this one:
https://dlidirect.com/collections/frontpage/products/iot-power-relay
https://www.adafruit.com/product/2935
Lot of (un)happy memories revived here! – and some amount of “fun” – well, at least interesting experiences . . I have just recovered nearly 100% of data from a 4TB SATA disk using ddrescue (it hasn’t been as successful for other failures) but I would like to continue to the disk around – find out exactly what is causing he I/O and ATA errors and spontaneous disappearance of the drive (Fedora Linux). I haven’t been able to find any software tools that will diagnose what is wrong with the hardware . . I am guessig there is some proprietary Seagate stuff that I can’t get . .