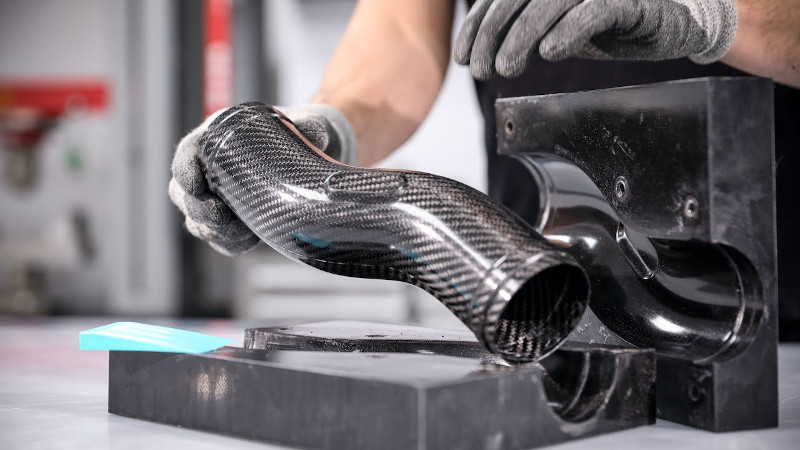
Many a hacker spent their high school years picking up a few new skills in workshop classes. Whether it be woodworking, welding, or the patient, delicate skill of technical drawing, they’ve been a mainstay of secondary education for decades. However, composites are new enough that they aren’t a major feature of the curriculum. For those wishing to fill in a few gaps, [Easy Composites] have some great videos on carbon fibre techniques.
The video in question concerns the manufacture of a complex cross-section tube part, but these techniques can also apply to more complex hollow sections, like a bike frame, for example. Starting with a mold, the first step is to cut a rough template. This is then used to lay down the first layer of pre-preg carbon fibre material, and a more accurate template is made. The rest of the steps involve the production of a secure lap joint between subsequent layers, and how to properly use vacuum bag techniques on hollow parts.
It’s a useful primer on the basics of producing hollow carbon fibre parts with prepreg material. We’ve featured composites before, with this bulletproof armor a particularly good example. Video after the break.


I’ve looked at several of their videos in the past. And to my knowledge their videos are very instructional and very accurate (or rather state of the art). (My science background: I’m a masters student in materials science and I had a few composite lectures in the last 3 years). You instantly see that those videos were not the PR guys idea but the engineers idea. And I believe this is the best advertisement you can make. I just ordered epoxy a view days ago to start my own projects (unfortunately I couldn’t support them due to high import tax and shipping costs to my place).
These is another interesting technique for complex shapes which uses a sacrificial plug printed with PLA. The trick used the fact that PLA becomes soft and pliable at a temperature below the glass transition temperature of the epoxy, allowing the plug to collapse and be pulled out of the finished carbon fiber part.
or use ABS and “dissolve” (soften) it with acetone…
For amateurs making just a few parts, cloth-and-epoxy is probably a better choice than prepreg. Messy, true, but much longer shelf life.
Shelf life of the two different types of materials for the two processes are generally pretty close assuming high performance materials. In each case it is going to be your epoxies that are limiting, though the cloth can have issues with the fiber sizing as it ages. Depending on the brand, strength requirements, and required rheology, initial shelf lives are usually in the range of 6-18 months when properly stored. Some materials can get shelf life extensions while still maintaining good structural capability, but usually other handleability of the materials change.
If you are looking to make a part that does not have high structural requirements, then yes, wet layup materials will store longer, though in humid areas, water absorption in the resin components can be an issue.
Wow! Too bad this series wasn’t around when I made my bike about 15 years ago. My bike doesn’t look very pretty, but I’m still riding it. I did wet lay-up on a foam armature and vacuum bagged it. I’ll never forget the feeling of panic when I overestimated the setting time in my 90 degree garage and had to try to remove the peel ply and fuzzy blanket that were soaked with epoxy after the epoxy had set.
Wow! That’s cool
Is it me or is this just completely the wrong way around?
For a start there must be 3d sottware which could print out the correct templates, rather than this manual method.
But on top of that, why try to lay fiber sheets INSIDE a mold?
Surely you’d 3d-print a soluble scaffold-tube which you could just wrap?
You get more exact, better and easier details on the surface facing the mold, I’m guessing you are saving a ton of work on the finnishing of that surface, especially when it has to be perfect.
The guy did say that for simple straight tubes it’s easier to wrap the sheets around a mold. This technique is for more complex shapes.
There are tools that cost very large amounts of money to create ply shapes, though for this application, this is a perfectly reasonable method. I have used Excel to create ply shapes as well. It is just a case of using the right tool for the job. This method also allows for the average builder to have access to the methods.
As to soluble mandrels, the challenge is finding something that is capable of handling 250°F at a min cure temp while still remaining soluble, as well as not expanding too much so as to cause all the resin to be squeezed out of the composite. Also silicon rubber can be used as a mandrel, though it too has a very large coefficient of thermal expansion so it too has challenges of squeezing all the resin out unless designed properly. Thin walled, silicon bags are also sometimes used in this application.
The next consideration is which side you need to have smooth. If it is an internal flow, then hard tooling the outside will almost always cause the inside flow surface to be rough. Hence you need to hard tool the inside and the outside is rough.
What technique you use to make a part is sometimes determined by how the part will be used. If you lay into a mold, as was done in this video, you’re placing a priority on the shape, dimension and surface finish of the exterior. As suggested, this part could also have been made by laying the fiber over top of a soluble armature, that would prioritize the internal shape, dimension and surface finish. Another consideration is how many parts are needed, a mold can be reused but a soluble armature is single use and a new must be made for each part.
Note to the [Stuff Made Here] guy, didn’t you say you want to make a violin? There you go, make a carbon fibre violin. (c:
I do believe there are some musical instrument makers who use exactly this process for making carbon fibre bodied violins. If you look for Lindsay Stirling on YT you can see here playing one. They have a beautiful shiny surface finish, and the tone is as good as a conventional wooden body with a pickup. I was intrigued by here comment that since they are much more rigid, you can amplify them to be much louder!
Any thoughts on using carbon fiber without vacuum bags? I know it won’t be as strong if there are bubbles or air gaps but I don’t know how significant that is. WJP004 on YouTube treats carbon like fiberglass, brushing on the epoxy and letting it air dry.
IMO the bagging is more about weight… though it also helps to reduce voids.
Voids and porosity cause issues in fatigue as well as lower overall mechanical properties depending on their size and location. For parts that have complex requirements and need to be inspected via NDT, it can mask the areas of interest.
Working in the composite repair side of things for the past decade, vacuum is always the go to, but if you are just getting started, you could build a mold like shown in the video, and use wet layup with carbon and epoxy rather than using prepreg, but it is way more of a mess. But if you use the mold like he has above you could possibly put a bike innertube in the mold and blow it up to gain enough inside pressure. A lot of homemade windmill blades and bike parts are made that way.
This guy is making all the removable body parts on some old Volvo carbon fiber. https://www.youtube.com/channel/UCsx-HTIYPn3CiBQFd4rMyXw 68 videos so far.