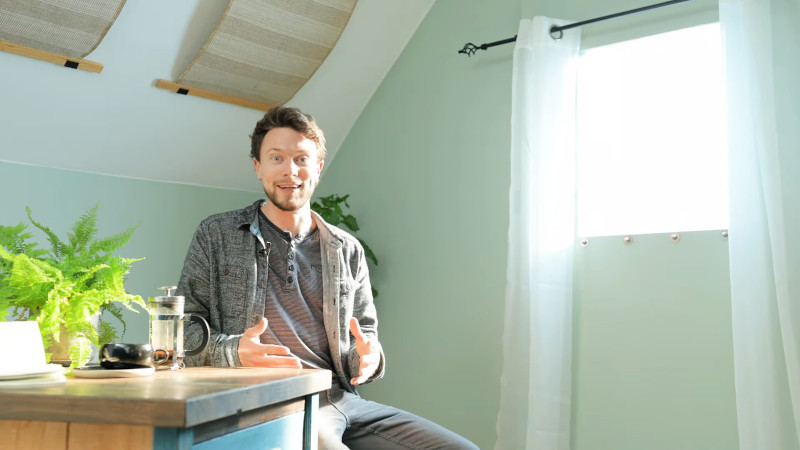
Real sunlight is a beautiful thing, but due to the vagaries of Earth’s orbit and local weather systems, it’s not available all the time. [Matt] decided this wasn’t good enough, and set about building a rig to replicate the sun’s rays as closely as possible.
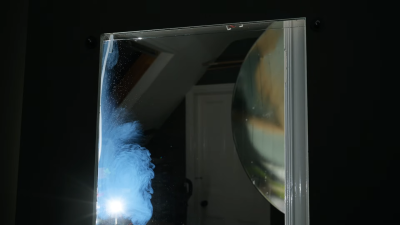
The great distance between the Sun and the Earth means that the sun’s rays are essentially parallel from our local vantage point. Replicating this, and the soothing nature of a blue sky, were [Matt]’s primary goals with the project. To achieve this, an old satellite dish was pressed into service as a parabolic reflector, coated with mirror-finish vinyl strips. A 500W white LED with a good color rendering index was fitted at the focal point, outfitted with a water cooling system to shed heat. With a point source at its focal point, the parabolic reflector bounces the light such that it the rays are parallel, giving the sense that the light source is coming from an effectivelyl infinite distance away. To then achieve the blue sky effect, the light was then passed through a glass chamber filled with soapy water, which scatters the light using the Tyndall effect. This mimics the Rayleigh scattering in Earth’s atmosphere.
The final result is amazing, with [Matt] shooting footage that appears to be filmed in genuine daylight – despite being shot at night or on rainy days. He also features a cutdown build that can be achieved in a far cheaper and compact form, using Fresnel lenses and blue film. We’ve featured [Matt]’s daylight experiments before, though we’re amazed at the new level reached. Video after the break.


Has anyone had any luck building tyndall diffusers by mixing small amounts of fumed silica into clear epoxy? The particle diameter looks like it would work out well based on the scattering equations.
I’m planning on trying it soon but I’ve been looking for prior work.
Would it be easier to spray something onto layers of glass, and just stack them?
Probably plexiglass sanded with high mesh count abrasive paper on both sides might work as well, turning it into something like the diffuser found inside an LCD monitor or TV.
Using an internally blue coloured box seems to be the cheapest and easiest way out, though.
Can’t really use paint, since he’s depending on it behaving like a point source, so that it casts shadows like the sun. The diffusion is minimal, just to hide the parts. Just the same, if you’re going to use the Tyndall effect to produce an effect similar to Rayleigh scattering, you can just as easily use a colored gel.
Well no, you can’t, because the gel would filter out particular wavelengths while the scattering does not.
Plastic and epoxy have a high refractive index, so the particles need to be coated, not inside.
Fumed silica has low transparency and low refractive index, it cannot work (technically silica works in opals, but growing opals is a whole thing)
What you need is either expensive lumira-like aerogel, cheap inkjet transparent film, a plasma sputtering setup or actual chemistry experience to use coated titanium nanoparticles.
Reply to old thread, for future readers.
The video suggests you can also get the Tyndall effect with LDPE. I have tried with a piece from a translucent bottle and it seems to work well. A cold-white led looks opalescent, more orange in the center, and bluer to the sides. The light gets difussed, though. Clear plastic bags made from LDPE also seem to work, but you have to tilt them at an angle, or use a lot of layers, for the effect to be perceptible. Plastic wrap made of LDPE also seems to work.
I came here from the future as well.
At Matt’s website, there has been an active forum thread about this running for two years now. They’ve identified a plastic film that gives a solid Tyndal effect.
A lot of the impracticality stems from it being a 500w emitter (and large parabolic dish, etc). A smaller window, dish, and 100W led fixes a lot of the issues, and you still end up with enough lux to emulate sunlight.
this looks incredibly realistic. Too bad he has to remove his sun to leave the room.
Watched the video purely to figure out where the hell he placed his light source. It would look ridiculous outside a window – to say nothing of light pollution for his neighbors.
It’s in a closet, with the door decorated to blend in with the wall.
– I could be wrong, but pretty sure it’s out in the hallway behind the door to the room.
I think if you can camouflage it as a sky light it’ll be a winner since the space in the roof is mostly not used.
I saw a basement once that I THOUGHT was a daylight basement. It had two frosted glass windows up at the top of one wall, and what looked like sunlight was streaming into the basement through them. Then I went to turn on some more lights, and the “windows” went dark. Turns out, they just had light fixtures behind the windows. Just the fact that the windows were placed where basement windows would have been (and the light was daylight-bluish) was enough to make the illusion work.
But yeah, a “skylight” like this would probably be completely convincing.
That is pretty awesome, but ouch – if it saves anyone some link-clicking interested in DIY – that 500W LED is around $500, needing a driver north of $100, and then you still need cooling… Makes quite a nice effect though!
Some people seem to have unlimited budget for their projects (or a good sponsor). I like the things he’s building, but I would love to see him create projects that are more within reach of the general public.
If this is the same video I watch the other day, it ends with him building a budget version.
He does end with a budget version: made from a foamcore box, 10W LED and a page magnifier fresnel lens.
The intriguing thing is that a mullioned window look from stacked boxes seems to act together like a single lightsource, because of the collumnated light being emited.
Thanks for mentioning this. I actually quit watching the video when I discovered the price tag… The budget solution is definitely worth a try.
Yeah that was cool, I would have expected to see a sun per box, which is not at all the desired effect. I’ very tempted too try the low-budget version myself. I think there must be alteratives to the soap-in-water scattering layer though. perhaps just rub soap on stacked plastic sheets?
He cut that part out of the video after this article was posted. In its place is a segment where he plugs one of his sponsors. He also deleted the links to the components in that part of the build. The cheaper build was the whole reason I was pointing people to this article and his video, now I look dumb because there is no second build.
I believe he needed to make a modification to the cheaper version which is why it was cut – probably going to be up on the ‘extra’ channel.
Has the video been modified? I cant find the budget build portion of the video.
You can use a metal halide lamp instead. Also powerful, efficient, high CRI and can work in higher temperatures. LEDs have active layer about 100 (or maybe less, I don’t remember exactly) atom layers, so it can be easily damaged if atoms are replaced due to thermal diffusion.
I was hoping he was using an old dish to bounce light through a north facing window.
Two problems with that: a dish wouldn’t bounce sunlight the right way; and there is no sunlight.
Three problems. The sun moves.
That’s less a problem than an opportunity to make a solar tracker. The other two actually make it impossible to do what was suggested.
So how did those Italians at CoeLux do it? They never really explained their tech…
PS: that “soap” looks more like Reckitts Bluing…
I remember watching a video of the CoeLux guy explaining how it works and even how it’s built. It’s basically a very high power light source which shines through a very large and long aquarium that is filled with water and some additives. That way you get the stationary light source that looks like the sun and the desired Rayleigh scattering. I can’t find the video anymore though, looks like they took it down.
You can read their patents though, since they are public.
Maybe it’s this video : https://www.youtube.com/watch?v=G-PDRxK1XVo
I took a look at their patents a while back (I’m not really an expert in reading such things) and from what I saw, it seems their scattering effect is achieved by mixing titanium dioxide nanoparticles in the 50-100 nm range into plastic.
Someone in the YouTube comments suggested mixing fumed silica and resin. You can get fumed silica at around the 50 nm size, but from what I’ve seen it’s nasty stuff to work with since it gets everywhere and is very difficult to mix; you also need a very good respirator and safety glasses. One video I saw that used it, did so as a thickener to turn epoxy into a paste with the consistency of peanut butter for filling holes. You would obviously want to use a lot less of it for something like this.
You can use coke cans bottoms as mirrors. Even without additional polishing it forms a quite parallel beam from candle flame (I’m going to use it to make some Christmass decoration), so it will work even better with LED, which is much smaller and brighter, and if polished well. You can cut many of these cans bottoms in square shape to stack them like in this video.
And what about adding to water not only soap, but also salt (in high concentration) to prevent from developement of any life in water? Of course electric parts must be well protected and placed out of the range where solution might spill, because saltwater is highly conductive.
He added some kind of biocide to the solution.
3D printed clamps to make double layered glass?!
When all you got is a hammer, all your problems tend to be nails..
If you don’t tell us how else to do it we’ll assume you’re just a troll.
Its a very neat solution to clamping evenly two panes over a gasket to create a thin sealed chamber – sure you can do the same thing with other methods. But he has a printer, he might not have the tools to make any of the other clamping options, I don’t know of an off the shelf part that would do the job and that makes building your own the most convenient way a winner. (The tools I know he has he could use would take a few hours of manual effort and cost more in raw materials where the printer is fire and forget)
>I don’t know of an off the shelf part that would do the job
He obviously has aluminium L profiles and nuts / bolts. Can you see the solution, or do I need to explain it?
Fluids are problematic, because they can get out, making a mess, or settle out, making them ineffective. Maybe the “solution” is cast acrylic resin with the soap or whatever mixed in, so you get a solid sheet with a scattering effect.
You’d want to use nanoparticles when mixing with a resin. The problem of course is that they’re dangerous to work with and often difficult to obtain. It would be wonderful if someone sold sheets already made that way so you could use them in whatever projects you wanted, but I believe COELux holds a patent on that.
This is brilliant if a bit impractical, but I presume it’s missing the heat you get from direct sunlight. Which must be a bit eerie.
I have been toying with the idea of some artificial sunlight to wake me up on these cold dark rainy Seattle mornings, and this is the best I’ve seen.
In England we’re used to not feeling the heat of the sun during the winter. Besides modern LEDs are relatively efficient, there would be many Watts of light streaming through those fake windows.
Something that I noticed a few years back when I was tying to simulate sunlight in ray-traced renderings, was that treating the sun as a single color does not produce realistic effects, no matter what color you choose. When you are outdoors on a clear day, there are two distinct light sources: a small but very intense and directional yellow-white source from the sun itself, and a very large but very diffused blue source from the sky. What this does is make everything that is not hit by direct sunlight distinctly bluish, and our eyes can see the difference instantly. A thing in the sun looks much different from a thing in an overcast sky, even if the clouds are thin enough that the sun throws shadows, and even if you can’t see the sky, because the shadows themselves are illuminated by the sky.
Interestingly this replicates well what you get in nature – a high K white point source shifted to lower K by diffuse blue reflectance from the gasses/particles in the atmosphere
Indeed, that was why I tried that. I had seen a verey nice architectural render, and saw that the shadows were bluish, and deduced that this was because they were only getting lit by the sky, not directly by the sun. Eureka!
This is a long-time favorite of mine: https://hackaday.io/project/7317-blue-sky-corrected-spectrum-white-led-fixture
Doesn’t give you the collimation, but it fixes up the spectrum nicely. I wonder how much of DIY Perks Matt’s effect is just filling in some of the missing spectrum?
(Not to take away from this amazing, full-bore, crazy, impressive project.)
He’s pulled a bit of a switcheroo with the videos here. In the earlier version of it, he posted a smaller, less expensive, version that was much less complicated to build and much more practical for a lot of people. (not everybody can dedicate an entire doorway/closet to something like this).
After I pointed a bunch of people to this article and his video, the part I wanted to show people isn’t there. He’s totally removed that part of the video and replaced it with a sponsored part. I don’t know if the article here was updated to reflect the fact that he halved the video and completely cut out one of the builds in it, but the switcheroo feels sketchy. I made a point to send people links to this article and video because I wanted them to see the second half, which *does not exist now* and I look like an idiot telling people with limited space and tight budgets to put in this big old satellite dish contraption.
Hey, Matt here (video creator). I made a mistake with the simple version so I needed to cut it (not something I take lightly). I’ll be uploading the updated version on DIY Perks Extra in a few days. The sponsorship was there all the time (most of my videos are funded by sponsors) the total cut time is about 3 minutes after the spot, so not halved but I get your point. Sorry about the mix up.
Thanks for the clarification, Matt! I thought I was going crazy, or just imagined that part of the video in my sleep, when I wanted to show someone else. Your timing for this video is perfect, as all of us are now lamenting arrival of short winter daylight.
https://streamable.com/y0t8jy Luckily for those of us who were in the middle of following his build when he cut it, the original version was saved and uploaded elsewhere (and this one’s been saved, too, in case it needs to reappear anywhere else). I’ve run across a bunch of other people who started their own builds of it, when that part of the video just went missing, now they can at least watch the video again.
I just stumbled on this in the future. Thanks so much for posting! I was starting to think the original vid was loat to the sands of time.
Excellent information,
Thank you
I have all kinds of questions after watching that video.
Why specifically is it early morning sunlight? Is that because of the angle, or because of the luminosity of the LED?
Would something like a 100W LED work pretty much as well, or would it be too weak? Or does a lot depend on the size of the reflector, and if so what is a “good” number of lumens per unit of area to give this effect?
What off-the-shelf parts might do in place of the 3D-printed brackets, so we could actually build the “aquarium” part?