Even when we share the design files for open source hardware, the step between digital files and a real-world mechatronics widget is still a big one. That’s why I set off on a personal vendetta to find ways to make that transfer step easier for newcomers to an open source mechantronics project.
Today, I want to spill the beans on one of these finds: part numbers, and showcase how they can help you share your project in a way that helps other reproduce it. Think of part numbers as being like version numbers for software, but on real objects.
I’ll showcase an example of putting part numbers to work on one of my projects, and then I’ll finish off by showing just how part numbers offer some powerful community-building aspects to your project.
A Tale Told with Jubilee
To give this idea some teeth, I put it to work on Jubilee, my open source toolchanging machine. Between October 2019 to November 2020, we’ve slowly grown the number of folks building Jubilees in the world from 1 to more than 50 chatting it up on the Discord server.


A snippet of the Jubilee fam
These days, Jubilee is still just a collection of files on the internet. Folks building one need to meticulously order everything on the bill-of-materials, 3D print all the parts, and then step through the assembly process. The whole process can take a couple months because of the extra wait for parts to ship from overseas. And in that time, the design can get a slight tweak along the way. Here lies a tricky situation for builders. As the project evolves, they need to decide how they want to evolve their build process with it. Do they take the update, or keep building the version they started with? And if they decide to adopt the updates, how do they keep track of how their machine compares against the latest project files?
In software, these might be easy answers. Just check the version of the code you’re running with a simple command line incantation! Or check the name of the file you’re executing, or the date you created it. All of these answers work great for digital files but immediately break down with real world objects. As soon as we transform that STL file into a real world part, we’re losing information. We’re are severing the link between a traceable file with metadata and a physical object it represents. So how do we keep this link? One way, is with a part number inscribed directly into the object itself. That’s the route I took for this project.
Taking a step back, one of my goals with sharing Jubilee is to try to give anyone who builds it a sense of agency over their build process. In short, over time, Jubilee’s design changes as people make it better. And as people build it, I want them to be able to make informed decisions about those changes. To make it happen, I figured it would be useful for folks to be able to identify the machine version they were building by inspecting the actual machine, not the files that created it. That’s the real drive behind part numbers: to give the builder a clear sense of where their machine stands in relationship to the project.
But First: Some Design Theory
If you’ve picked up a copy of Donald Norman’s The Design of Everyday Things, the idea of how part numbers can help really starts to make sense. In his book, which you should totally read, Norman brings up two distinct concepts, knowledge in the head, and knowledge in the world. As a user of designed things, knowledge in the head is information you need to memorize so that you can use said designed object. It’s whatever matters in the instruction manual. Knowledge in the world is also information you need to know so that you can use the object, but it’s somehow attached to the object itself, so you don’t need to memorize it. To hit this idea home, think about plugging some devices into the back of a video projector, like the one below. Which input is which?
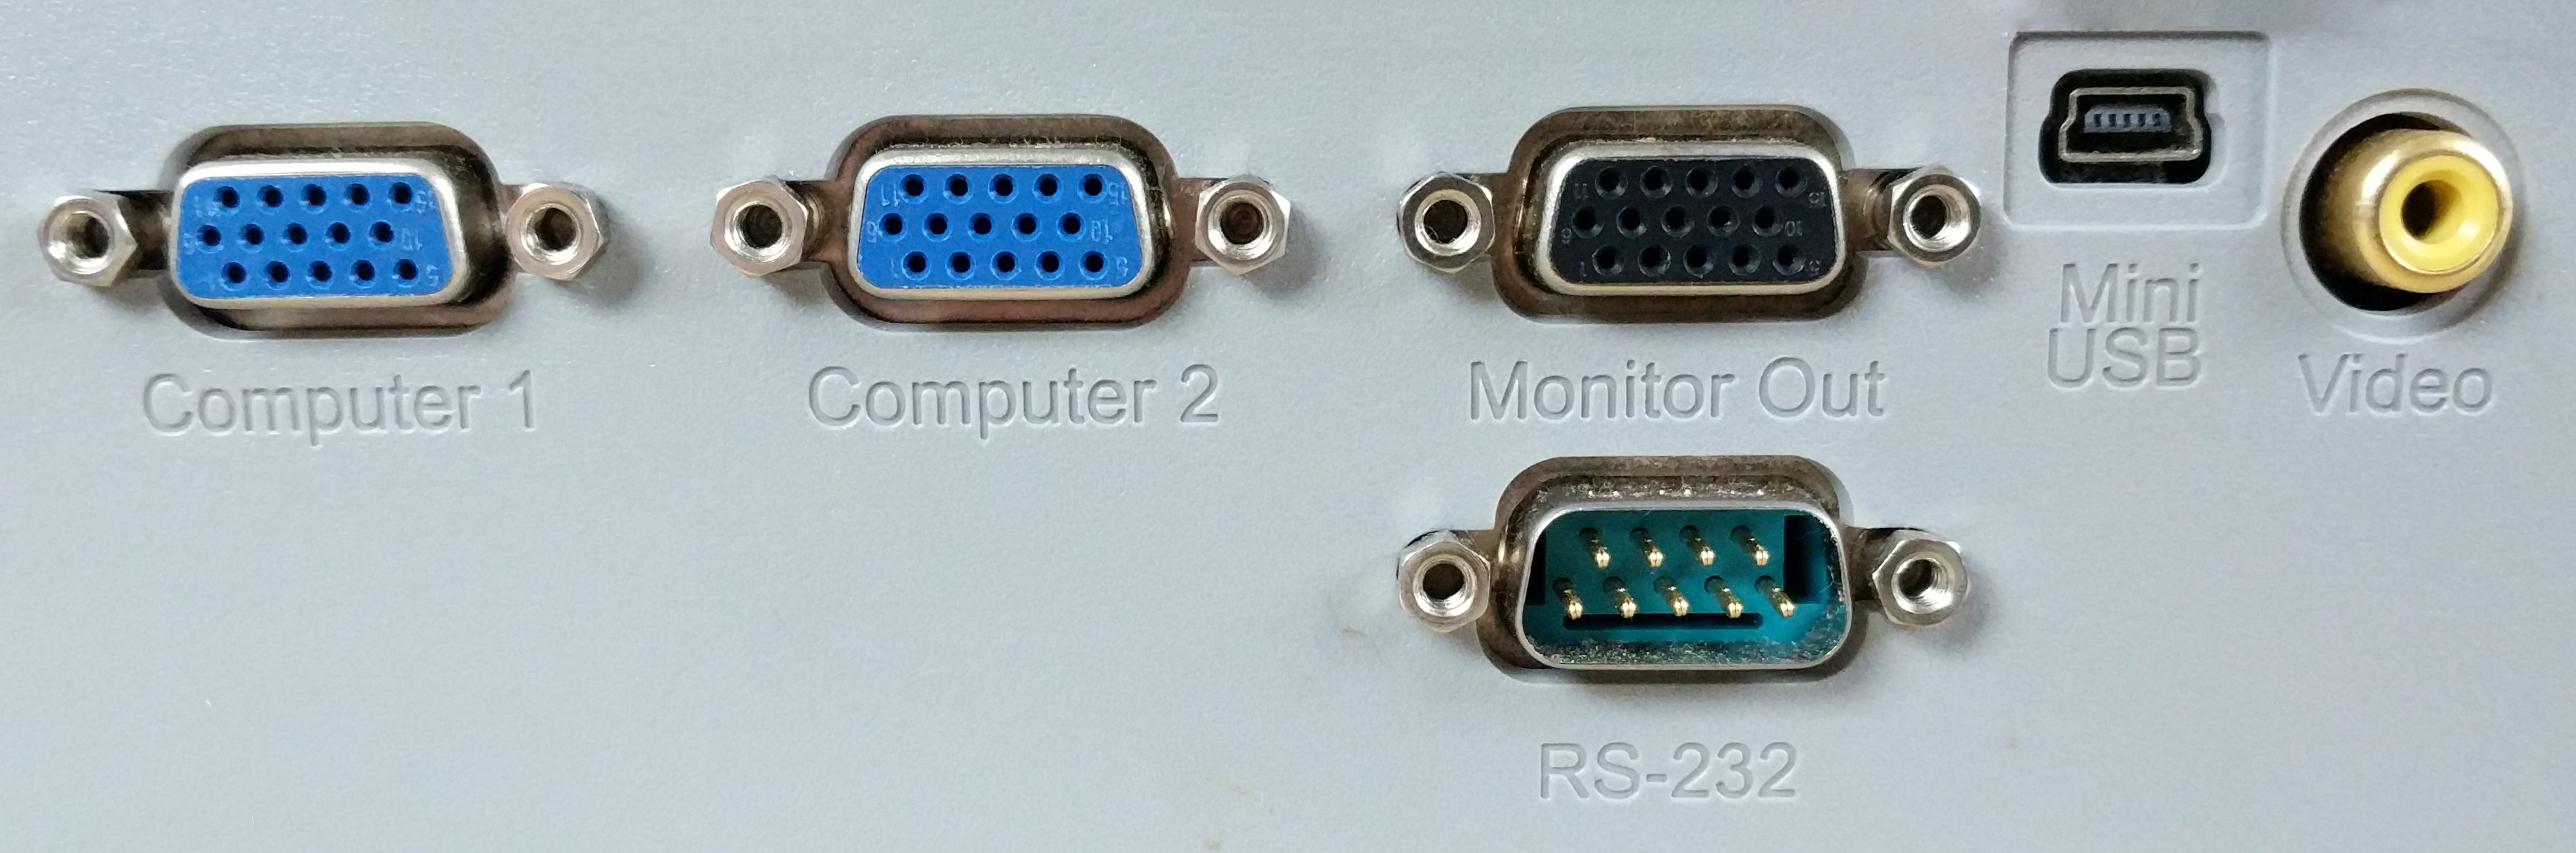
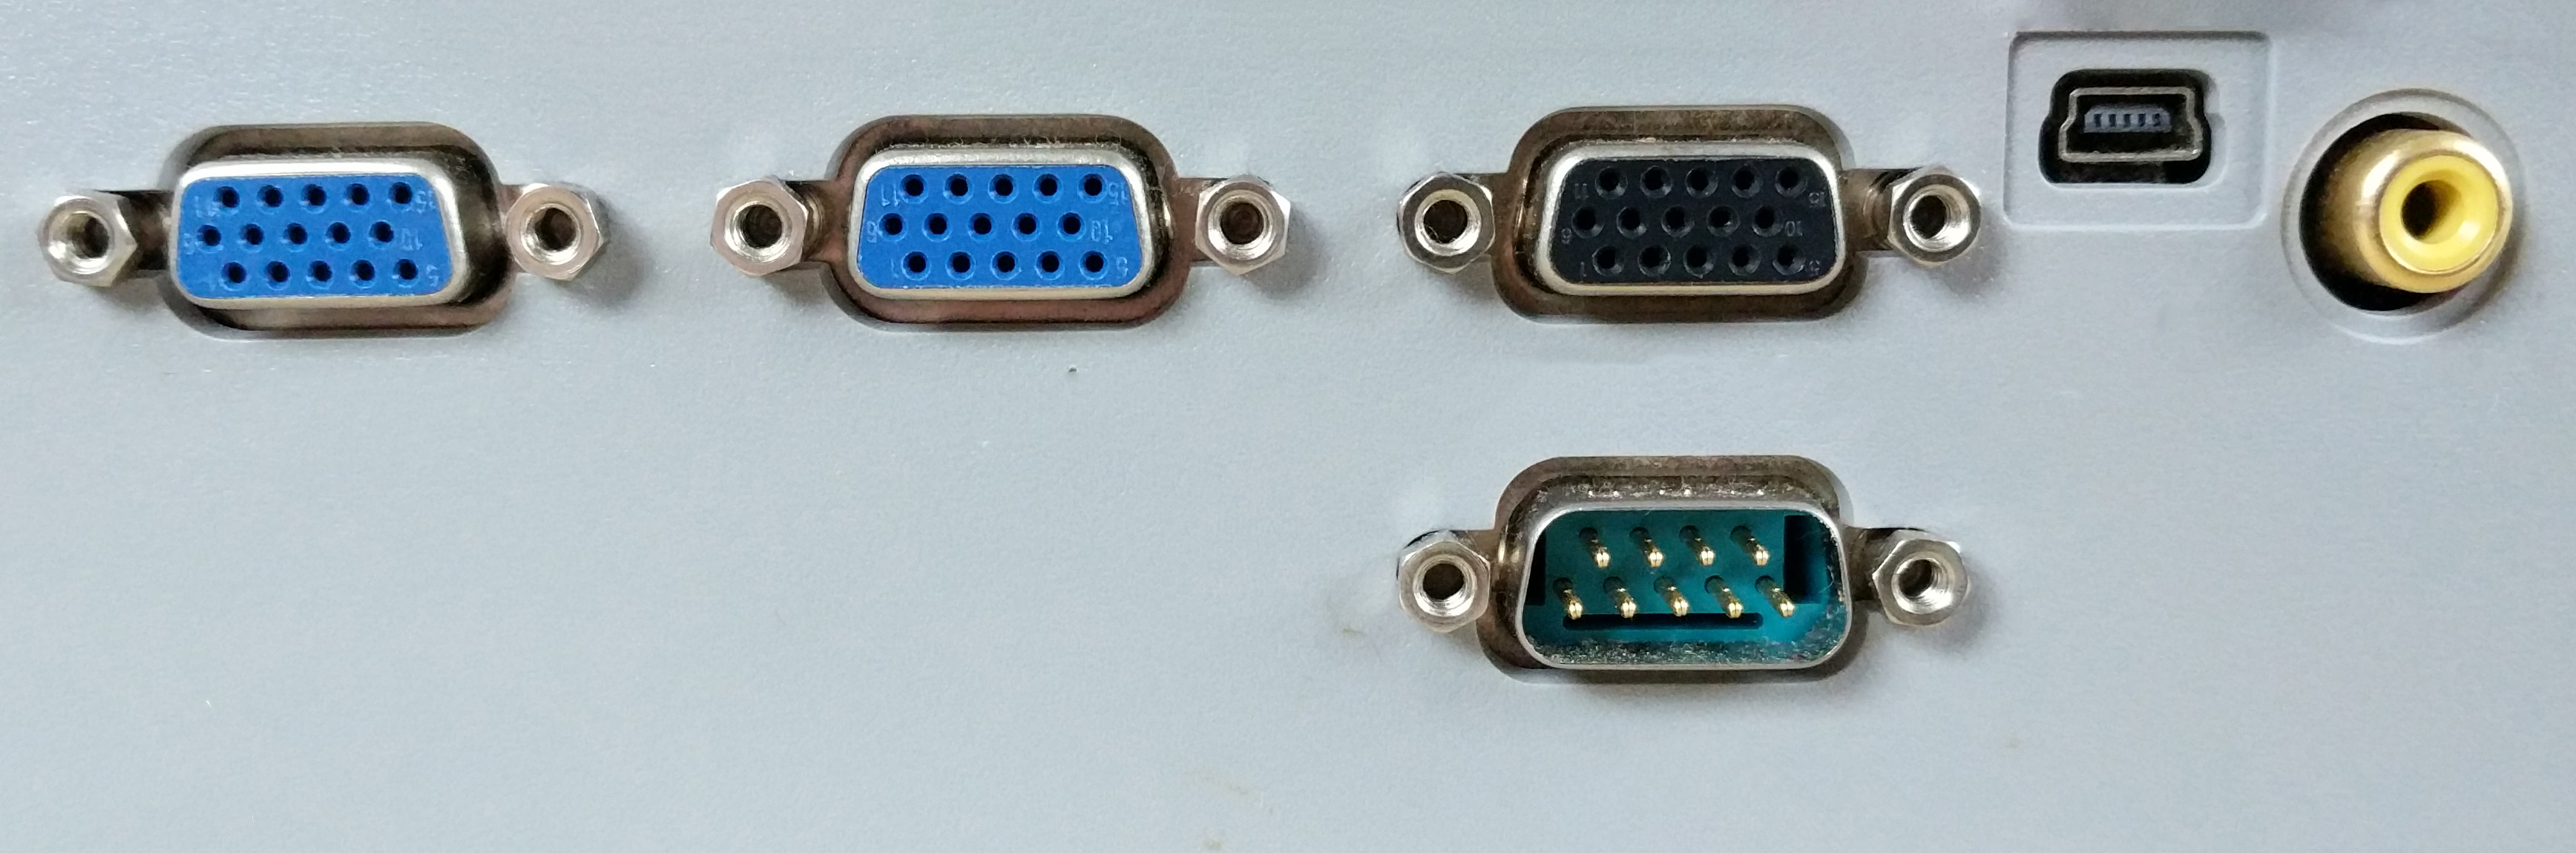
Thankfully, the one on the top is labeled; that’s knowledge in the world. But the one on the bottom is not, it’s in the manual. That’s knowledge in the head. Which one would you rather use? While the second one looks cleaner, the first one lets me throw away the instruction manual–or not need one at all! That’s the idea with an inscribed part number. It’s knowledge in the world that lets the builder know exactly what they’re holding in their hands in a way that lets them trace it back to the file that created it.
Creating a Part Numbering Scheme
Now that we know how part numbers might help, let’s talk about applying it both to Jubilee and in general. My understanding is that folks in industry fall into two camps when it comes to part numbering schemes. Either (1) your part number is just a number that increments with every new part, or (2) your part number has structured fields that each have a specific meaning. An example of the first one is just a sequence of numbers like this: 000001. And the second might look like this: 07-BED-04-MKS-MRW.
I think there are places and cases for both; it just depends on the situation. If your part number doesn’t need to be human-readable or can be looked up quickly with a computer, a simple numeric part number makes sense. Heck, you can even encode it on a barcode stickered on the part itself to make the lookup process easier. If the scope of your part numbering scheme is ever-expanding with new categories that you can’t determine up-front, enumeration might also make sense.
But if you’re part number needs some sort of human-readable meaning, the second option might be the way to go. And it was the right fit for Jubilee. First, the project scope is well defined. We know that the machine isn’t going to have an ever-increasing number of categories. Second, and more importantly, people new to the project might need to read the part numbers.
To put together a part numbering scheme, some folks in the Jubilee community kicked off a discussion on Github. The plan was to apply the scheme to every non-off-the-shelf-part. Here, that meant every 3D-printed and machined part would get a part number embedded directly onto it. The crux of this conversation was a an open question: what meaningful information is worth encoding into the part number for other people to read? We came up with a few takeaways. For all parts, the version mattered, and having some sort of short unique “signature” to easily identify it mattered too. For machined parts, “who made it” mattered.
Besides the conversation on Github, other situations on Jubilee’s Discord server were motivating the push to identify parts, namely debugging other builders’ setups. For one, mixing parts from different versions of the machine didn’t always work, so builders with mixed batches of parts would find themselves in scenarios where the assembly instructions asked them to do something impossible.
In other cases, some folks arrived with machined parts whose manufacturing quality was causing assembly or performance issues. But without knowing where those machined parts came from or how they were made, it would take extra conversation to uncover whether any of the machining processes were responsible for the issues. In a nutshell, having any form of traceability up front would be an added bonus to shortcut a few steps in debugging someone else’s Jubilee setup.
After some back and forth, I settled on a scheme that looked like this:
[subassembly] – [part id + params] – [revision] – [fab process + material] – [who fabricated it]
with a shortened version that looked like this:
[part id + params] – [revision]
The first option was the full part number. The second was the bare minimum that needed to fit on the part somewhere. Most 3D printed parts just embed the short part number which is inset on the side of the part. Here’s a shot of what these look like in action on a handful of parts.
")
")


Finally, I should mention that part numbers for Jubilee are project-specific. A different project means a different set of part numbers (although I might reuse the same scheme). But in this situation, we just need a way to help Jubilee builders know what they’re building from, and communicate with each other in a way that’s highly specific.
Parts Made with Decentralized Manufacturing
As Jubilee’s design matured, a few machinists actually started to make small batches of parts to sell them to the growing community of builders. The result was that the design became easier to self-source since you could just buy machined parts if you couldn’t make them yourself.
With the part numbering scheme set, I reached out to these machinists asking if they’d be willing to etch part numbers on their parts and list the part number on their website. They kindly agreed. Here, each vendor gets a unique part number that’s similar except for the last few fields. Those last sections identify the part’s material and manufacturer.


So while both 713Maker and Mandala Rose Works both make aluminum bed plates, the part numbers can tell a story about what they’re made from and who made them. Second off, having a part number also serves as a “qualifier” to the new Jubilee builder. It’s an implicit promise that the parts made from these places have enough community support to merit some recognition in the form of some project identification. Finally, if any of these parts cause issues, any builder in the community can use the part number to reach out to the machinist who made the part to ask for support. This is true even if they didn’t build the machine themselves and bought one already assembled from someone else.
Printed Part Number Legibility
As far as print settings go, I found that printed part numbers were easiest to read when the text was printed on the side walls of the part. This spot makes part numbers legible even if they’re only 25 layer lines thick.


Furthermore, printing on this side seems to be fairly legible across most types of 3D printers–even budget machines like the Ender 3 Pro. While I definitely tried to print the numbers on the tops and bottoms of 3D printed parts, the small letter features simply don’t come out consistently and make the part that much harder to print across a range of machines.
Designing with Part Numbers
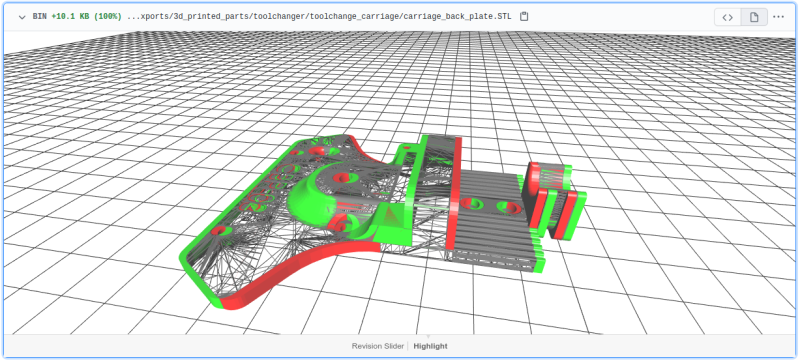
These days, every time I modify a part between GitHub Releases, I’ll update the part number. In practice, this is pretty easy to track. If I’m editing a part between a release, I just tick the number and re-export the STL in the preferred print orientation. The part number is stored as metadata in the model file, but if I get confused about what number I’m counting from, I can just lookup the STL from the last release. What that means is that STL files keep their names, but their contents change. This saves us from extra bookkeeping since part hyperlinks in places like the wiki don’t need to change every time the part number changes. This is also in-line with software practices. Every time we change a file, we don’t give it a new name. Version control software tracks the file’s history for us. And the same is true for design files that represent hardware if you track them with a tool like Git. Fun fact! GitHub will actually render a diff of two STL files from your commits if you dig for them.
Any time I change I part between a release, I’ll also make a note in the project’s Changelog. When a Jubilee builder encounters a new release, they can find a quick listing of all the non-stock parts that changed in some way. This is also the place to get a summary about what geometry changed on that part and why. That way they can decide for themselves if upgrading to the new part is worth the effort of reassembling part of their machine.
Communicating with Part Numbers
Remember that one part in the assembly instructions? It was that flibbity-jibbit-short-left-hand-edition–version-3?
Naming things is hard. Describing them is harder. With inscribed part numbers, communicating about the design becomes much easier. It’s easier between project builders and between builders and designers. There are two reasons for this. First, we don’t need to lookup any part names; they’re written directly on the parts themselves! That’s extremely useful when we want to have a conversation about these parts. Second, the name is highly specific and unique to that version of that part. By referring to the part with the part number, there’s no ambiguity to what we’re talking about.
The result is that some hiccups in communication just “go away.” If someone wants to talk about parts in the assembly process, they don’t have to struggle to describe them or look up their names; they just inspect them for their numbers. Second, if someone is building with versions of parts that are incompatible, we can catch it by cross-referencing them against the Changelog. And when your Discord community is over 1,000 people of various skill levels asking for help building different machine versions, eliminating any friction in communication is key to having an easier debugging experience.
Finally, what’s really special is that the part numbers are so specific that builders who aren’t the original project designers can have a conversation without needing clarification from the designer about the differences between the parts between them. That’s powerful. Adding part numbers removes the need from the designer to serve as mediator to clarify design details. The design works directly with the community instead of having it distilled from the original designer.
Part Numbers Build Community, Partly
I admit: coming up with a numbering scheme and then implementing it partway through the project was a ton of extra effort. So here’s a good question: if the machine already works for you, why go through so much extra effort to add something to the project that doesn’t directly enhance your machine? I think the answer comes down to sharing.
Speaking honestly, I don’t know how popular tool-changing machines will be in the future. But I know that designing them is hard. And, at the end of the day, I really want to see people build fun applications on top of them. But not everyone who comes to the table excited to play with them will have the time or skills to design one. So the question I try to ask myself now is: how can I take you with me?
I think part numbers are one way of doing that. They’re a way to give the whole crew of people building your project a common language to help answer questions from the new folks. They’re a way to help them identify whether a machine has issues that are design-related or related to modifications it received by its builder. And while I can’t keep up with every question new builders ask–the community can! And equipping them with a precise language is partly how we make them more capable of sustaining growth. And with more voices able to answer your build questions, you too can get yourself a working machine. So even if you can’t or don’t want to design up a nice toolchanging platform from scratch, you can still build on top of it.
I wish I could take credit for part numbers, but I can’t. Engineering teams in industry use them all the time to share and delegate complexity on big projects. What’s to stop us open source hardware hackers from borrowing some of their methods to build community?
Great–Where Do I Learn More?
And hey, don’t take my word for it. A few folks suggested part numbers to me back in the early days of Jubilee’s release. Eventually, this video also landed on the Discord server, and it really hit the argument home. Let Wintergatan take you through a fun discussion on his mission wrangling with the complexity of his machine.


GMTA but unfortunately not many appreciate logic and documentation.
Being 60 years old, and having worked at Sperry Univac around 1980, I wish more companies would use the “special” UNIVAC alphabet that was used to avoid annoying confusion with part numbers. I don’t think it was specific to Sperry, but it maked sense anyhow. Deciphering part numbers was fairly easy.
I can’t remember the exact alphabet, but certain letters were not allowed to be used, as they could be confused with numbers. Example of the accepted alphanumetric part number characters: ABCEFHJKLMNPRTUWXY0123456789
You would not use S because it might look like 5, and O would look like 0, I = 1, Z=2, D=0, etc.
V and U look alike too, so only U was used. D,G,Q,O look similar when the silkscreen is not clear to read.
Not really sticking to topic of this article, but I just thought it might add some value.
Anyone else remember the alphanumetric system that Sperry used?
I’m a bigger fan of having alpha only and numeric only sections, like the examples in this article. If you start to try and cross them up, you run into a ton of exclusions. 8=B, 0=D=G=O=Q, 5=S, 2=7=T=Z=2. If you keep it alpha only, you still have D=G=O=Q, E=F, I=T, U=V. Personally I don’t like the idea of losing 10 characters, so I’m a fan of keeping at least 1 of the characters from each bad group like you mentioned with allowing U, but never V.
I recently received a letter from TDS Telecom urging me to subscribe to their television service by going to their website at TDSTU.NET. Perhaps they shouldn’t have chosen a font that had a rounded bottom on VEE.
Very similar to vehicle VIN codes in the Americas. Certain letters aren’t used due to potential confusion.
For instance: the letter “O” is never used, because it looks too similar to the number “0”. Not every manufacturer uses the diagonal slash in the number “0” either, so that identifier isn’t universal.
Same with the letter “I”, too similar to the number “1”.
Not the exact system that you’re describing, but this scheme does something similar for unique truncated UUIDs with a constrained character set for human readability, and adds in an error correcting code for misreading or misstranscribing:
cual-id: Globally Unique, Correctable, and Human-Friendly Sample Identifiers for Comparative Omics Studies
John H. Chase, Evan Bolyen, Jai Ram Rideout, J. Gregory Caporaso
mSystems Dec 2015, 1 (1) e00010-15; DOI: 10.1128/mSystems.00010-15
https://msystems.asm.org/content/1/1/e00010-15.short
Not just part numbers but in web design many fonts have upper case I, lower case L, and the number 1 look almost identical. Let’s try it: I l 1
When used in words the spelling makes it obvious which character it is, when used in random generated passwords it becomes a guessing game.
Great points!
If you also leave out F N P Y it is also more resistant to things like inconsistent stamping, especially if you’re trying to stamp boxes and one corner of the pad gets dry first.
Where I work, we use a standardized part/assembly numbering system.
First group of numbers is a project code, this could be for the specific project you are working on or could be from an old project you are reusing the part from.
Second group is a classifying code that describes what category the component is, three digits so you have three layers of classifying it.
Next group has a few numbers. First is for the top assembly. We may have different generations of device on the same project (rather than just a revision) so they each get their own number. Second is for a module of the top assembly so like a box of circuit cards that bolts onto another box of circuit cards. Next number is for the circuit cards that reside inside that module. Next letter is not usually used for anything other than describing whether an item is an actual part or some sort of documentation for that part. Next item is the schematic revision. This lets you be able to update a schematic (which changes the circuit card part number) but denotes that it is still compatible with previous versions (same I/O but better performance). Next number is a BOM variant so you can have different BOMs for the same circuit card or assembly to do different things.
And then at the end of the part number, you may have a revision code. Revs really only get applied to BOMs and mechanical housing parts. Anything else usually requires a new part number.
Sometimes the numbers get a little confusing but you can usually be able to look at a random part number and know what level of assembly that part belongs to, which project owns it, and what kind of device the top assembly is but not necessarily what the part actually does.
That’s how we do it here. XXX-XXX-XXX where the first three digits are the assembly, second three are sub assemblies and last three are individual parts.
Also wish to add … Josh, it is a good article.
My approach with a numbering scheme is to just use numbers, as that makes data entry way faster. Adding alpha characters to a part number slows the whole process down. So 740-0115 is much faster to type in than P4A-0TT5. You might not think this is an important thing, but when you’ve spent days and days and weeks editing/creating BOMs (as I have), you appreciate how much faster number based part numbers are to work with when you can use one hand to type them in on the numeric keypad.
More important than the part numbering scheme is the DESCRIPTION. A *consistent* naming scheme needs to be defined as well. If you’re looking for a resistor and the descriptions start as “33 Ohm 1/4 watt”, “Wirewound resistor, 33 ohm”, and “Resistor, 1/4w wirewould 33 ohm” no one can find it reliably and you end up with multiple names and subsequent part numbers for the same thing. Naming convention definition is as important as defining how the part is to be numbered.
Years back there was a common naming structure, but for the life of me I can’t find the document(s) that defined it. I was probably a Mil spec but everyone used it for their BOMs and it made perfect sense. Easy to understand just what the part was and the critical parameters for that part. Look in an old equipment manual from Fluke, HP, Tektronix, etc. and you’ll see what I mean. If anyone knows where that standard is defined please reply.
The new way of labeling electrolytic capacitors on the silkscreen (e.g. E234) threw me for a loop last year.
Being SMD, they were just little black cubes, or whatever. It wasn’t until I saw what it was in the schematic, did it make sense.
I guess I missed that memo…
I haven’t come across that. Can you elaborate?
Well,just like sticking to PEP8 when writing python code makes your programs easier to understand for other developers, since it specifies where comments go how to annotate them, etc, everyone knows what is expected of a python program, the same applies to phisical parts, and their “PEP8” is called ASME Y.14-100-2000 and associated documents. Y.14-100 is a standard specification for Engineering Drawings and practices. It defines how to refer to your assemblies, sub assemblies, how when and where to detail views on your part, how to arrange them, dimension them, annotate them and refer to them in other drawings. How to arrange your BOMs, when to create a new PN and when to create a revision, seriously, even the line weights acceptable fonts and yes, also what digits to avoid.
Please use ASME Y.14-100 also, stick to standard MIL- or NAV- standard part numbers for fasteners and profiles and anywhere you can. By sticking to the industry standard and not creating a propietary part number that will need to be translated when sourcing parts, you do everyone a favor.
Propietary parts should only describe the specific application of your new thingamawidget as it is a novel application of materials for your machine (say the structural assembly). If it’s made of standard parts (profiles, fastener, bolts and nuts) use the MIL p/n …
If you want a “Standard” to be broadly accepted, don’t charge an arm and a leg for it. Look at the prices to download any of the ASME Y.14 series sections – it’s like $60.00 each.
Hey now, it takes quite a bit of money to send the bit pixies to the store house and retrieve those bits!
60$ does sound like a mimeograph, retrieval, and mailing fee.
It’s safe to assume that in any proper production environment, every part has a part number. As stuffbian mentioned above, I find it MUCH easier when a part number only consists of, well, numbers. In the aircraft production environments where I’ve worked, internal part numbers were this way, and usually broken down with dots or dashes. Conveniently, if you knew roughly what kind of part it was (switch, fastener, etc) many times you’d only need to know the digits after the last one or two dots/dashes if you had to walk around the shop floor to find it.
Any time I have to fill out paperwork that requires a vendor’s part number which is a big mix of letters and numbers, it’s usually a lot more annoying to transcribe it. That said, I understand that some manufacturers produce a huge number of parts that consist of an even larger number of parts and thus going strictly numerical would be unwieldly. That said, when you don’t have a huge number of parts, going alphanumeric can make the part number very short and thus easy to remember in entirety.
So it’s certainly good from a development standpoint to have some structure to your numbering scheme. Ultimately though, you need to figure out which side will be dealing with part numbers the most: production, or development, and then devise a system that’s easiest on them.
For a historical example on how the organisation of complex parts has been done in the past, take a look at how the US Army organised parts for its military vehicles during WWII.
Across the diverse range of vehicles it had in its arsenal, parts needed to be catalogued in a consistent manner even though they were from different manufacturers, and able to be called up in an instant.
So the US Ordnance Department standardised all parts into common groups, and these were printed in a document for a given vehicle called the ‘Standard Nomenclature List’ (SNL) with the emphasis on _standard_.
The SNL always started with ‘Group 01 – Engine’. Then ‘Group 02 – Clutch’. ‘Group 03 – Fuel’, ‘Group 04 Exhaust’, Group 05 – Cooling’, ‘Group 06 – Electrical’ through to the higher group numbers to cover lesser items such as Bumpers, Guards, Tools and the like.
For tracked vehicles, Groups such as ‘Group 13 – Wheels’ were deleted and a Group added for tracks, idlers, bogies etc.
Under each Group, the first subgroup is the complete assembly. For example, ‘0100 – Engine Assembly’. Then the breakdown of that assembly, eg. ‘0101 – Crankcase and Cylinder Block’, and so it goes.
The individual atomic part numbers are done by Manufacturer then their number.
But what about, say, a spark plug? Would you find it under ‘Group 01 – Engine’? No, it’s an electrical item. So, easily found at ‘0604B – Spark Plugs’ ie. Group 06 – Electrical, search for subgroup 0604.
A great example of an SNL is this one for well-known WWII jeep:
http://jeepdraw.com/images/jeepdraw/ADOBE_ACROBAT_FILES/SNL-G-503.pdf
I’ve used this particular SNL many times for my jeep. What I can say is – they are the most wonderful way of documenting every last nut, bolt and washer, who supplied it, the metal finish, and when it was changed or deleted.
If you acquire a jeep (or other US WWII vehicle) disassembled to its last nut and bolt in a big pile, its SNL will let you reassemble it with confidence.
If only modern vehicles had such SNL’s…. sigh.
German ones do have SNL’s . . . At least BMW and VW(AKA vw, audi, seat, skoda, lamborghini, bentley, porsche), and stuff designed in Germany, like chevy engines.
Thanks for the history on how they chose those numbers! Working on german designed stuff is soothing if you have any touch of OCD, until you have to go to the parts house and look stuff up by the Dorman ‘HELP!’ grab bag of o-rings
I’ve found placing text onto parts in FreeCAD a horrible process. The tutorial to achieve it works, but such a torturous path to achieve something quite simple!
Using knowledge I had of how FreeCAD works I now use a far simpler way of doing it. I’ve been wanting to write a guide on it, but have so far not found the time :(
I don’t think it was mentioned in the article, but an important concept to nail down is what a part number actually means. I’m not talking about what it encodes in the sense of human readability, but what it actually represents in the virtual world of your documentation. Until you nail this down, you can’t clearly differentiate a new similar part from a revision to an existing part.
I’ve headed up a project to this end at my workplace (a multidisciplinary designer/manufacturing company). We also found that when you try to talk about this sort of thing, you end up using the words “part”, “component”, “thing”, “item”, etc. in a vain attempt to make things clear. When you find yourself talking about “thingies” or “widgets”, it’s a good sign that you need better terminology! Our solution was to use a new synonym that is very much not in common usage, and then to ascribe all of our specific meanings that result from our numbering system to *that word*. It’s kind of like in legalese where the terms get defined early in a document, and then later on the identified stand-in words are used instead.
We settled on “artifact”, since an artifact is a “thing”, but it’s not the sort of word you’re likely to hear in a manufacturing/design setting (archeologists might want to choose a different word!). We then laid out very clearly what constitutes an artifact, and what constitutes a revision to an artifact. For us, artifacts are interface specifications, so any revision to an artifact must respect ALL of the interfaces of earlier revisions, and should introduce new ones, since all revisions of an artifact must be drop in replacements for each other. That is, the goal of a revisions is to improve, not change. You don’t have to do it this way, but these are the rules that we decided on.
Our artifact numbers are 5-digit numbers assigned deli-system style (starting from 00000), and revisions are 2-digit numbers beginning from 01. We experimented with different classes of revisions (major & minor), but in the end it was too difficult to come up with a set of rules for what constituted a major vs minor revision across all of our different kinds of artifacts, so we settled on a single revision number: change the part or its documentation -> increment the revision number.
In the end, this greatly simplified all of our documentation, since work instructions/BOMs only need to reference artifacts by number, and can completely omit their revisions. This means that we can revision artifacts and not have to change the documentation of the other artifacts that consume them. Artifact 12345 is artifact 12345, regardless of revision, so a BOM that includes this part can just state “12345”. Meanwhile, the design team can revision the artifact, creating 12345-01, 12345-02, …, but these changes don’t create a horrendous ripple effect throughout the documentation structure.
If you change the interface specification for an artifact (including adding features), a new artifact should be created with a new number. This also allows a graceful changeover from one artifact to another: just because a new artifact (i.e. new number) is used in one assembly, that doesn’t mean that the older artifact can’t keep being used in other assemblies.
If all this sounds like a set of best-principles for object-oriented programming to you, you’re not wrong! What we’ve done is applied the same way of thinking to our part numbering system. We work with PCBs, harnesses, mechanical parts, and software, and it all is covered by a single numbering system with one set of rules.
The last thing I will suggest is that you choose an easily recognized prefix for your part numbers so that they stand out from 3rd party parts. That way you (and the rest of your team/company) can recognize at a glance those parts that are internal, that should be looked up in the internal database. On top of this, design the format of your numbers with machine readability in mind. For us, its “prefix-number-revision”. Although we currently specify the number as a 5-digit number with leading zeros and the revision as a 2-digit number with leading zeros, because the whole thing is delimited with dashes, it can grow to extra digits when the time comes.
Thanks mate. Can you talk about BOM management in open source projects?
How do you know which combination of parts makes a working machine?
Figured I’d be the person to drop these links in case you missed them: https://www.dla.mil/AboutDLA/News/NewsArticleView/Article/1675036/dla-uses-national-stock-numbers-to-manage-supplies-efficiently-throughout-their/
and
https://www.lincolnoldparts.com/pdf/Ford_Part_Number_Breakdown.pdf
GM – I and a couple of my coworkers haven’t really seen any pattern to GM part numbers but doing a quick search this is supposedly related https://www.buyplm.com/plm-good-practice/part-numbering-system-software.aspx.
MOPAR uses http://www.ringcar.com/5_e0fafba10a038a0a_1.htm
I think it’s aa personal mission, not a vendetta.
What software did you use to design the extruded aluminum frame for it?
On the topic of labelling things.. in 1993 I travelled overseas, and during a stopover in Japan wanted to connect the camcorder I had with me, to the hotel television. They’d screwed the front panel shut, hiding away its composite aux connectors – but it was a simple Phillips head screw through the front panel, and I had tools with me (hey, I was a prepared teenager). The second problem I had was that the panel was labelled in Japanese.
I do not read any of the Japanese character sets.
In the end, on my third guess, I figured out which button toggled the AV input based around how they’d grouped the buttons in the labelling, correctly assuming that the “input select” button wouldn’t be in a +/-, ^/v pair.
I of course put the TV back exactly as I found it after showing my fellow travellers (my classmates) the day’s footage. Unfortunately I had to turn the saturation down as the camcorder was PAL, and Japan used NTSC – but it was enough for folks to see.
On the topic of naming conventions – using something like a simple number is useless with a search engine – you’ll end up with pages and pages of reverse telephone number lookup sites. For some, that may be a feature, but an alphanumeric string with a specific formatting – that’s easier to search on.
I was in a job where handwritten notes had to be readable by others. We were taught a ‘standard’ form of notes… Surnames in capitals, cardinal/ordinal direction in capitals, road names in full (no abbreviations eg Rd or St), crossed zeros, tail on the top of 1, crossed 7, vertical stroke through S, times in 24 hour, all groups of numbers preceeded by a three letter descriptors eg TEL, VRM, SER.
30 years later I’m still using it for shopping lists, much to my wife’s amusement.
My approach with a numbering scheme is to just use numbers, as that makes data entry way faster. Adding alpha characters to a part number slows the whole process down. So 740-0115 is much faster to type in than P4A-0TT5. You might not think this is an important thing, but when you’ve spent days and days and weeks editing/creating BOMs (as I have), you appreciate how much faster number based part numbers are to work with when you can use one hand to type them in on the numeric keypad.
Evil genius mode: Why stick to Latin alphabet? throw some Greek in there too!