[memestra] is a teacher whose life has become a series of videoconferences over the last year or so. With all the classes and meetings, they spend the whole day switching between either Zoom, Teams, or Meet. If anyone needs a single piece of hardware to control them all, it’s [memestra]. Well, and every other teacher out there.
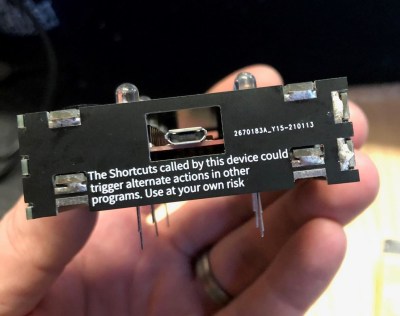
 The hardware — an Arduino Pro Micro and some buttons — should come as no surprise, except for maybe [memstra]’s use of a resistor network for the LEDs. Still, there’s a lot to like about this little box, starting with the enclosure. That’s not milled or laser-cut metal — each side is a PCB, and they’re all soldered together into a box.
We especially like the top panel, which fits down over the PCB that all the components are soldered to. Each of the non-volume buttons has multiple functions that are accessed by pressing, long pressing, or double pressing. But even the volume buttons do double duty: press them together to mute and un-mute. If [memestra] ever forgets which button does what and how, there’s a handy reference table silkscreened on the bottom panel.
In true teacher fashion, [memestra] has written comprehensive instructions for anyone looking to build a similar device. The heavily-commented code should make it a cinch to drop in keyboard shortcuts for Discord or anything else you might be using, though it’s worth noting that this box is optimized for the desktop apps and not the browser-based versions.
Just looking for a fun way to end video calls? Pull chains are pretty fun.


“[memestra] is a teacher whose life has become a series of videoconferences over the last year or so. With all the classes and meetings, they spend the whole day switching between either Zoom, Teams, or Meet. If anyone needs a single piece of hardware to control them all, it’s [memestra]. Well, and every other teacher out there.”
I’m waiting for someone to do it Minority Report style.
that’s intresting !
Nice touch to the UI that the camera button needs a long press to change state, but the mic only needs a short press. Very neat project!
FYI, if you pay JLC a little bit more they will remove the internal number from the PCB. It would look a bit better without it. But still, nice work.
(I wonder which % of the hacker and hobyist PCBs are made by this manufacturer… I see them everywhere, their PCB but also their advertising…)
There’s even an option to just move that internal number to a certain spot on the board, so if they do make some more boards, they can hide it on an internal layer next time! Especially if they don’t care about paying that little extra to remove it entirely.
I made enclosures using pcb. Check them out at dweebosystems.com