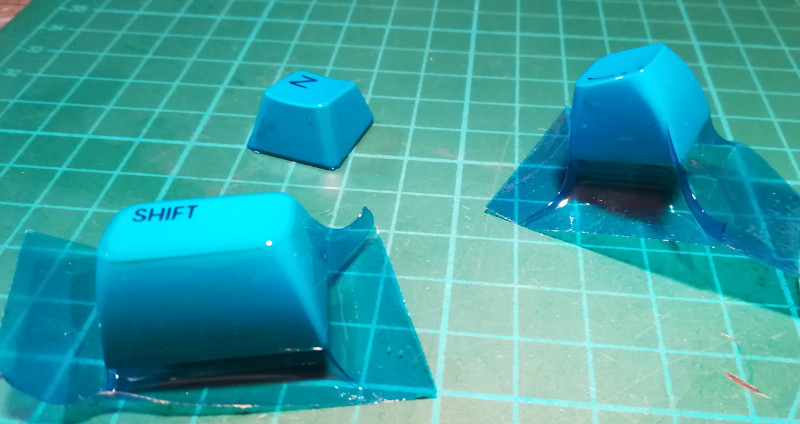
Retrocomputing is as much about physical preservation as it is about electronics and computer science. Plastic is an awful material when it comes to decade-long timescales, and the forces of sun, air and water are unrelenting on these materials. [Drygol] has long experimented with techniques to preserve and refresh keycaps, and decided to try some fun vacuum forming techniques for something new. It sadly didn’t go to plan, however.
The basic idea was to use a vacuum-forming machine to coat keycaps in a thin layer of translucent plastic, for both aesthetic benefit and to preserve them from falling apart. Initial small-scale tests were promising, creating a key with a tight, form-fitting blue plastic wrap through which the original labels were still visible.
However, scaling up the process proved fraught. Uneven heating of the plastic film and a lack of rigidity in the carriage used to stretch it over the keycaps led to poor results. The final product showed many wrinkles and was distinctly unappealing.
[Drygol] isn’t giving up however, and plans to build a new vacuum table with greater performance. We can imagine this technique being an accessible way to colorize keycaps for a vintage cyberdeck or chiptune rig, without permanently modifying the keys. If you’ve got the inside knowledge on how to make this work, sound off in the comments.
We’ve seen [Drygol]’s work in this space before, too, like this extreme modded Amiga. If you’re executing your own retro repairs, be sure to drop us a line!


“Plastic is an awful material when it comes to decade-long timescales, and the forces of sun, air and water are unrelenting on these materials. ”
Mouse wears out every four years, and every new one made from plastic. One review even complained about the flex. Metal mice would be interesting if expensive.
“Mouse wears out every four years…”
Good heavens, what are you doing with it?
My Logitech Cordless Optical Mouse is still my daily driver after 20 solid years of hours-per-day use. I bought it as soon as something viable and cordless replaced the ball-type meese.
A new pair of AAs every year or so, and an internal clean every 3-4 years, and it’s still better than anything else I’ve tried in all that time.
I think I had a mouse that stopped reliably responding to clicks before, but I’m pretty sure that’s because I had a very high grip for that particular mouse design and was pushing the buttons about an inch back from the switches. Other than that replacement feet have covered a lot of wear cases. I’m pretty sure I’ve got a working Intellimouse Explorer in my box of cast-offs.
Oddly they all are Logitech, including a wireless. The failure mode for the majority has been the switches. Latest is the right switch. One of the others was the wheel. And another the left. Wireless had really bad battery life. This time I’m trying a G. Skoll Haiti with better switches. As for usage, aside from the usual, the rest is gaming.
I repaired many a right button switch in ball mice. Carefully shave off the 4 melted pins on top then pry off the metal cover. Remove the plunger and the cracked metal dome. Find another mouse that’s dead for other reasons and eviscerate its *left* button switch. Put the snap dome into the other switch then with a magnifying glass and a needle carefully apply teeny little drops of super glue. Put the plunger back in then carefully press the metal cover back onto the remains of the 4 plastic studs. Resist the urge to use the mouse for a couple of hours to ensure the glue has dried.
I also shortened many a mouse cord by an inch due to wires breaking right where the cord went into the mouse. Many internal “strain relief” arrangements got modified and holes enlarged so the cord would still be held against being yanked but constrained its motion less sharply. Odd thing was the broken wire affliction was almost exclusive to the higher priced mice. The cheapies all had flexible strain reliefs molded onto the cord.
The input device I really want to see brought back is the Microsoft Trackball Optical 1.0, in both thumb and finger versions. But with one improvement! Replace the steel bearing points with silicon carbide *like every other trackball has*. A few years ago there were people making bank buying worn MSTBO1’s and refurbishing them by somehow replacing the steel bearing points with silicon carbide balls. Then they’d sell them for $60 to $70.
I bought a bunch of defective returned thumb style MSTBO1’s which were simple to fix. They had two red LEDs, one provided the “Look at me! I’m OPTICAL!” illumination while the other provided the light for motion sensing. The transistor for the sensor LED was positioned real close to a rib inside the upper housing. Careless assembly could bang that transistor and break loose one of its leads. Apparently there was a simple function test on the assembly line that involved plugging it into a USB port and checking it lit up. Well, with only the decorative LED working, it would “light up” but dimmer than the motion LED. So they’d get a QA pass but be broken. Easy fix to hit the break with an iron and a dab of solder, then carefully bend the transistor over a bit before reassembly.
That’s one of the well-known issues with testing stuff that isn’t the function you’re aiming to deliver.
20 years ago they made mice which failed less I guess….Just the rubber on my G502 is going to wear out in 4 years, but, of course, it depends on my use. Add onto that the dreaded double click syndrome that these sometimes encounter (pointing at lower switch reliability)
What model of mouse are you using?
Just like it says on the tin: “Logitech Cordless Optical Mouse” Circa 2001.
If there’s a model number on the sticker, it’s long ago worn off.
Ancient 27 MHz technology. Completely unencrypted. I can hear it on a radio receiver. Somebody could total Van Eck me from a block away. Cheapo modern switchmode supplies too near the receiver totally DOS me too.
My mouse is old enough to move on its own and form a family.
My old Logitech G5 played a few very hard years of gaming, moved across the ocean with me, and is now being used by my wife as a daily driver. It’s ~15 years old.
Granted, it was an awesome mouse for its time.
My G5 has had a new cable, new switches new skids. It is however, still an excellent mouse.
I have two ThinkPad mice from when they turned black and got a lighted scroll/click wheel. Still working perfectly.
One ThinkPad Bluetooth mouse of which I had to scrape the paint – turning sticky – but otherwise working as new.
One original PS/2 mouse (32 year-old – the one with vertical sides and rubber-coated steel ball) that came with my PS/2 Model 50Z, also perfect (except for the ergonomics, which suck).
One Logitech IR+scroll/click wheel, also perfect.
Can’t find anything in the stores that even closely matches ergonomics, reliability, and certainly not durability.
The shape and depth of most keycaps will make any mass vacuum forming neatly very hard (heck not the ideal shape to get reliable single key at a time forms).. I think you would need a rig that held all the keycaps in the right place, perhaps with a few extra holes drilled in each keycap to help distribute the vacuum. But the real helper (and the really tricky part) is a smoothing tool that would quickly force the covering plastic flat and smooth over the important areas keeping it from webbing.
I think you would be better off creating a ‘fake keyboard’ as a mold that holds all the keycaps with a ‘lid’ providing the small void over the keys to fill with 2 part casting epoxies – put the fill hole and sprue to let the resin in at the bottom/underside of each keycap so its easy to just sand the excess fill flush to the original key beneath and leave a surface finish as good as your original mould (assuming you degas the resin properly, use a pressure pot, fine detail resins etc – its a whole art form I’m only a novice at – Still looks like a better choice if you have access to the cnc/3d printer to make the master ‘easily’). It need not be a permanent change to the original keys – with mold release on the originals the resin won’t actually be able to stick to them, but should be on more than well enough to not just fall off..
Given the wrinkles evident at the cap corners, it seems the draw provided by the stand-offs isn’t nearly deep enough.
I surmise too many keycaps are being done at the same time, leading to the vacuum pressure distributed over too much area, presumably to save effort and material costs.
For all of the letter keys I would skip the flat vacuum table altogether and try a bespoke single-key mould. Say a piece of round steel tubing with a smooth flange (ie. faced smooth on a lathe) where a small circle of plastic is clamped and a single key plunged through into the tube as well as applying vacuum. This may be enough to form the sides, leaving the top concave surface indent to be handled by the vacuum.
The space bar and other long keys moulding could be relegated to the vacuum table.
“Vacuum pressure” *twitch* There is no such thing as “vacuum pressure”. You have vacuum OR pressure, measured relative to the ambient pressure of the instrument being used to measure.
Ie, you’re in a spacecraft or a submarine with a gauge that has a port open to the exterior of the vehicle. For a spacecraft it reads vacuum. For a submarine it reads pressure. Go outside and have the gauge out there too, with its port open to the inside. In both cases the gauge will read pressure, but for the submarine one could say it’s reading vacuum relative to the pressure outside the sub.
In none of those cases is the gauge reading “vacuum pressure”. It’s how much of a vacuum there is, relative to the pressure on the other side of some barrier. But 100% vacuum is always zero pressure – though still not “vacuum pressure”. This is why 100% vacuum on Earth is measured as inches or millimeters of mercury. 29.92″ inches of mercury is the maximum height that nominal Earth sea level air pressure can hold up a column of mercury inside a tube with its top end sealed and its open bottom end down in a container of mercury. Go over 29.92″ high and the mercury pulls down, forming a vacuum at the top. As air pressure falls, the column of mercury also pulls down, making a larger space of vacuum above it.
Another example, tire (or tyre) pressure. The gauge says 30 PSI. It’s wrong. The pressure is actually 30 PSI *plus the ambient pressure outside the tire at the time and place it’s measured*. For practical purposes one may ignore that ‘extra’ because it’s balanced by the outside pressure. But if you’ve put 30 PSI into the tires at the top of a 5,000 foot high mountain pass then drive down to sea level, the tire pressures will show as being lower, despite the actual pressure inside the tires not having changed.
That was a pretty long comment to say that “gage pressure is different from absolute pressure”.
Guess what? Everyone else knew what Mr Name Required was talking about.
Perhaps placing the keys with the vacuum holes at the corners instead of at the sides may help.
Why aren’t metal mice and keycaps a thing? They should be.
I’d buy a metal wireless mouse in a heartbeat.
They would be cold. You’d need glove to use them, except on hot days.
Assuming you are living in a climate controlled/ heated house they wouldn’t be that bad. Initially chill to the touch quickly warming up. How fast depending on just how much thermal mass they have and if much surface area is available to the air to radiate your heat – which could be marketed as a feature – never get sweaty hands again this mouse keeps your hands cool etc…
Still not really practical…
They’d be furiously expensive. The plastic parts in a mouse probably cost less than a dollar to make in quantity. Metal would require machining, or casting and THEN machining, making them pricy. It could be done but it would be at a very fancy price point.
Make one and document it and let me know – might get a post on the ol’ Hacks a Days!
It might be better to use a different technique to create a female form and then vacuum form into the cavity. That way shrinkage would make it fit tighter too.
I recommend truck bed-liner spray. Your keys won’t be falling apart anytime soon.
Create a skirt like extrusion to continue the profile of the key cap [ resting the key cap in and above it ] and the wrinkles will appear below / outside of the key cap & can be trimmed away.
contre les plis en coin caisson de bullage
Making a key cap cover ? Why not use something us kids (old schoolers) played with decades ago….a VacuForm.