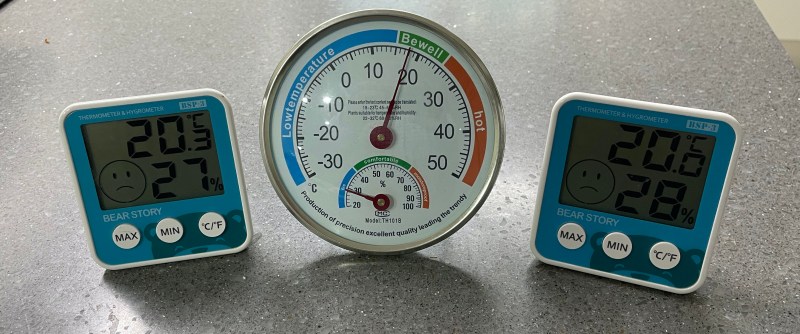
I have been meaning to play around with MQTT for some time now, and finally decided to take the plunge one evening last week. I had three cheap home temperature and humidity sensors, and was bothered that they often didn’t agree. Surprisingly, while the analog one had a calibration adjustment in the back, I have no idea how to calibrate the two digital ones. I took this as a sign that it was time to learn MQTT and be able to install my own, accurate sensors. Of course, I began by ordering the cheapest sensors I could find, but I can always upgrade later on.
While we have written quite a bit about MQTT in Hackaday, I had to go all the way back to 2016 to find this introductory four-part series by Elliot Williams. Five years is a long time in the tech world, but I decided to give it a try anyway.
Building a Broker
The first article worked perfectly, although instead of a Raspberry Pi, I used an old desktop that my wife was about to throw away. After wiping out Windows, doubling the RAM, and installing Debian, I had a new lab machine up and running. I installed the mosquitto packages from the standard repositories, and used them without issues to follow along with this article (I briefly tested on an Ubuntu and Mac machine, too). Installation is as easy as:
- Debian and Ubuntu
sudo apt install mosquittosudo apt install mosquitto-clients
- MacOS
brew install mosquitto
Networked Nodes
The trouble began with the second article. Elliot used an ESP-8266 module and NodeMCU. I had been wanting to give NodeMCU a try, so I plunged ahead. While I didn’t have any 8266 modules on-hand, I did have an ESP32 DevKitC module. In the past I brought up these and similar modules running GRBL, Micropython, and bare metal — “How difficult could this be?”, I thought to myself.
Well, in fact it proved to be quite difficult. I proceeded to build NodeMCU custom images online, was able to make the esptool.py talk to and program my board. But try as I might, and I tried for hours, I could not get my board to boot up without errors. The board programmed and hashed correctly, but always gave errors on boot. I read many similar reports from users online, so at least I am not alone in my problem in my frustration.
I reached out to a couple of professional programmers, and the advice I got was to move on. They suggested that NodeMCU is outdated and weren’t surprised I was having difficulties. I am confident that I could have eventually made NodeMCU to work — evidence points to a hardware bootup issue (I/O pin or setting), the online image was being loaded at the incorrect address, or it was just plain wrong. But after so many wasted hours, I wanted to experiment with MQTT, not become a NodeMCU expert.
Having used Micropython before, and seeing there was an MQTT module I could just import, I decided to take this approach. The toolchain setup is a bit involved, but the instructions in the Micropython Github repository were easy enough to follow.
Information about the MQTT server in Micropython can be found here, and I found this two-part tutorial by [boneskull] quite helpful as well:
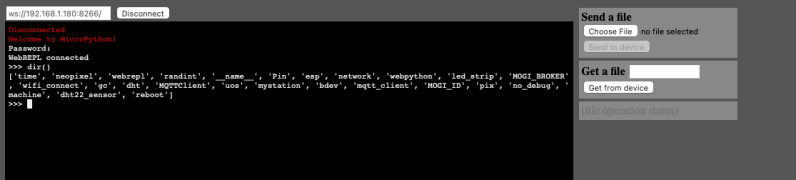
Once everything was all installed, I could pop into a REPL and start programming. I typically use rshell when using Micropython on embedded systems:
pip install rshell
rshell --editor nvim --port /dev/cu.usbserial-1410 --baud 115200
If you prefer to connect wirelessly, there is also the WebREPL method which I tested and seemed to work fine. And of course you can just connect with a terminal emulator but file saving and editing becomes an issue.
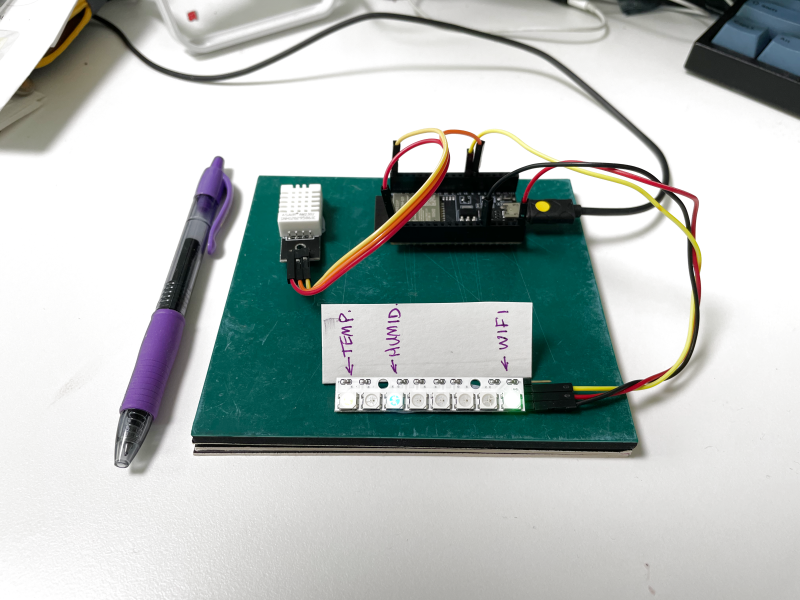
I made my demo sensor node along the same lines as the one in the original article. See this Github repository which contains the resulting Micropython flash drive. Copy this to your board, editing the MQTT and WiFi details:
MOGI_ID = 'esp32a-mogi'
MOGI_BROKER = 'underdog.lan'
WIFI_SSID = 'Covid-19-Laboratory'
WIFI_PASSWORD = 'yourpasswordhere'
Enter the REPL using rshell or whatever method you prefer, and start the node by running mystation(). Once it’s tested out, you can make a main.py file so it will auto-start on boot if desired. (Note: MOGI is the Korean word for mosquito.)
Control and Clients
I didn’t go too deep into the third article in the series. I did find a couple of iOS apps which played well with my server out of the box.
Power and Privacy
I think the meat of the final article is still valid. I haven’t put my test sensor node on batteries yet, so I can’t confirm these numbers. That will be a project for another day.
All in all, the basic material in Elliot’s original series is still relevant today. Not surprisingly, the software details have changed a little over the years. Rather than digging myself into a deeper hole with NodeMCU, I switched up and got a similar demo up and running with Micropython. Now that I’m hooked on MQTT, I’ll be delving deeper into battery powered nodes and pretty graphical displays of data before long. My ultimate plan is to hack my home’s automation network.


Were you able to set QoS in micropython?
When i made my MQTT server i discover you can use an ESP as server, and i was able to replace my super expensive beaglebone black with an ESP12 and save some money.
I learned MQTT a bit before Elliot’s articles and were useful to me too.
QoS of 0 and 1 are supported by uMQTT on MicroPython and MiniMQTT on CircuitPython (based off uMQTT, has a bit more functionality).
I’m all-in on MQTT, and continue to find uses for it. My thermostat can broadcast the room temperature, and also accepts commands to change temperature etc. My computer that hangs up on telemarketers uses MQTT to report incoming calls, so I can monitor what was rejected. Of course my lights are MQTT controlled, but also a whole house fan, linear actuators to open/close windows. The electric garage door opener is enabled during the day and disabled at night via MQTT. Once you have MQTT infrastructure, you’ll find new applications for it. The Raspberry Pi that runs the mosquitto server also runs perl scripts that, for example, calculate and broadcast dew point, and automatically open the windows and turn on the whole house fan if the outside temperature and dew point is favorable.
I’ve wanted to play with TRBBL but I’ve read that if I do that I might go blind.
One short link to wiki might have saved my vision: https://en.wikipedia.org/wiki/MQTT
I still fail to see the point, even though using UDP only and secured WPA2 only Wifi with my ESP32/8266 I don’t suffer from package loss or the need for hierarchy of topics.
This seems to be blown out of proportion or I am a dinosaur waiting to go extinct. I’ve got all the data, neatly visualized in RRDtool.
Tuck me in already.
MQTT is awesome for multi-client communication. And the protocol is dead simple, adaptable, and designed for wretched bandwidth.
Give is a look. You won’t regret it.
Okay I’ll try, even if it is just for the learning curve.
Test it out on your desktop, using the command-line clients. There’s very little learning curve.
mosquitto_sub -h localhost -v -t "#"will monitor all local MQTT traffic while you’re testing. Super handy.The big difference for me is the store-and-forward functionality, which effectively decouples all the devices from each other at the “broker” (server). This means you can hack on this widget that makes data, and then later hack on that device that consumes it, without having to think hard at all. One-to-one, many-to-one, and one-to-many are all basically the same. And as William F. Dudley Jr. mentioned, writing scripts to process that data in the middle is also very easy.
You could absolutely do the same with custom code and UDP. If you dig into MQTT, there’s not all that much there — it’s a very lightweight transfer protocol. The “M” is “minimal” after all. But it _is_ one more layer on top of raw UDP (and in this case TCP).
I think some people who are resistant to MQTT think that it’s going to be a heavy/bloaty protocol like REST over HTML or something. It’s not.
But it’s basically implemented everywhere already, so you don’t have to fret the protocol if you don’t want to. People really like Node-RED and some of the databasing infrastructure that’s grown up around MQTT as well. If you need that kinda stuff, it’s simple to integrate it together.
Thanks for explaining it to me Elliot,
I think my real problem is letting go. MQTT is probably amazing, but I am in my KISS-bubble. I feel like trusting complexity makes it another magic black box to me. I get that MQTT makes it easier for me and it is not necessarily complex, but the inner workings of MQTT might be.
I’m less worried about the bloat than using something and introduce security holes because I misconfigure something. My home net is comfy and safe, if I’d do IoT on the net I’d probably use JSON and ChaCha20-Poly1305 since AEAD ensures that data really came unaltered from my sensor.
But yes, I guess I have to try MQTT to see what it can do for me personally.
{“nonce”: “QEFCQ0RFRkdISUpLTE1OT1BRUlNUVVZX”, “header”: “UFFSU8DBwsPExcbH”, “ciphertext”: “vW0XnT6D1DuVdleUk8DpOVcqFwAlK/rMvtKQLCE5bLtzHH8bC0qmRAvzqC9O2n45rmTGcIxUwhbLlrcuEhO0Ui+Mm6QNtdlFsRtpuYLBu54/P6wrw2lIj3ayODVl0//5IflmTJdjfal2iBL2FcaLE7Uu”, “tag”: “wIdZJMHHmHlH3q/YeArPSQ==”}
The message was:
“Ladies and Gentlemen of the class of ’99: If I could offer you only one tip for the future, sunscreen would be it.”
QSH. Over and out.
Comedian John Safran did a great parody of this, search for “not the sunscreen song.”
I’m also wondering why MQTT is needed above standard udp messaging. Adding complexity doesn’t seem to be the right way to go 😭😭😭
There are MQTT variants running over UDP, such as MQTT-SN (MQTT/UDP): https://mqtt-udp.readthedocs.io/en/latest/
I think it would of been easier to use ESPHome and Home Assistant. Or Node Red.
I’m with Chris on this one — if I were re-doing my MQTT series, I would do it with MicroPython. Back then (5 years ago!) NodeMCU was the easiest way to get up and running with the ESP8266, but it’s not my favorite. Because of the way the event queuing system works, you can’t send more than a few MQTT messages per second, for instance. That’s an unnecessary bottleneck.
NodeMCU has also seen some code-breaking API changes in the mean time, which means that my old code might not even work anymore on recent builds. When my gadgets stop working over here, I’ll migrate then to MicroPython instead of porting to a more recent NodeMCU flavor. Fortunately/unfortunately, they’re all still working just fine. :)
And as Chris noted, MQTT/mosquitto package support has improved tremendously since then. What was a two-liner (add repository, download software) to set up the server has now become a one-liner (download software). Heck, the BeagleBones come pre-installed with mosquitto and NodeRED these days. I could have written the series in three articles instead of four.
But the real point of that series wasn’t NodeMCU anyway — that was just an implementation detail, IMO. The point was how nice it is to build up a home data network/framework on a pub-sub thingy like MQTT. And I’ll stand by that!