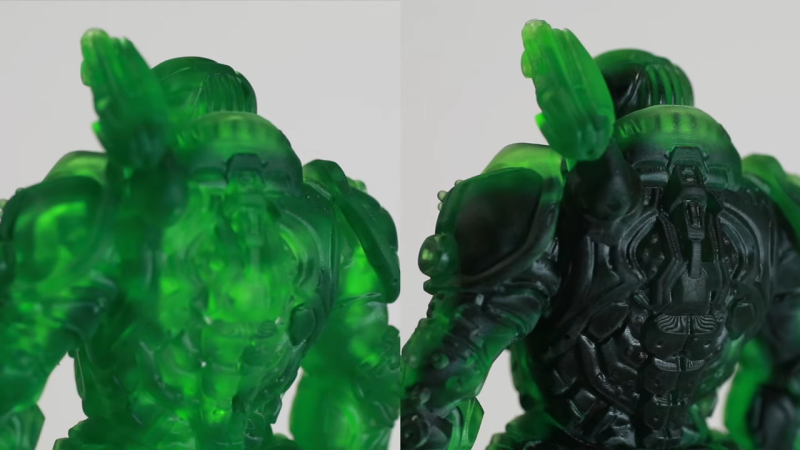
As cool as resin-based 3D printers are, they’re not without their shortcomings. One sore point, especially for those looking to document their prints, is that the translucent resins often favored for stereolithography can make the finest details difficult to see. Injecting paint into the model is how [Andrew Sink] decided to attack this problem, and the results are pretty striking.
For sure, this isn’t a problem that everyone making resin prints is going to face. Some resins are nicely opaque, and the fine details of a print show up just fine. But transparent resins lend a nice look to some projects, and might benefit from [Andrew]’s technique. It’s pretty much as simple as it sounds: choose a hollow model — or modify an existing one — print it up in the usual way, and clean thoroughly inside and out with isopropanol before curing under UV. Using a curing station that can get UV light up into the voids is probably a smart idea.
To finish off, the cured model is injected with acrylic paint. Nothing special here, just craft store acrylic in a syringe. [Andrew] seemed to prefer a thicker paint; we don’t want to second guess, but intuitively a thinner paint would seem to have some advantages. In any case, be sure to provide adequate vent holes for the displaced air. The video below has a few before and after shots, and the technique really works well to show off surface detail. Plus it just plain looks cool.
This seems like a good technique to keep in mind, and might even work well for hollow FDM prints done with transparent filaments. Still on the fence about FDM vs. SLA? We can help with that.


Make the interior void skeleton-shaped and you would get a really cool visible man effect.
Acrylic paint has a habit of sedimenting when it sits still, when it’s thinned with water, and it will take forever to dry inside the plastic shell, so all the paint will end up in the legs of the figurine.
Indeed, though using a thinner paint you can ‘slush casting’ the paint around the inside and use much less of it – you don’t need to fill the whole thing, just coat the inside surfaces.
Either way its a quite a neat look
You need to have some means to cure the paint or it won’t stay in place. Acrylic paint is not very convenient for that. Maybe you could thin it with IPA.
Its own surface tension will hold that thin skin of it on all the surfaces reasonably well, and being only a thin layer it won’t take forever to dry. Setting up like a real slush casting setup can mean just hooking it up to something slow rotating so the paint inside keeps rolling down to the bottom getting smaller and smaller in volume as the layers build up on the sides, until you tip out the rest (or it dries). Though most slush casting I’ve seen keeps it simpler vigorous manual rotating a few turns then set it down on a different angle, repeat a few times till set…
The IPA is an interesting idea, no idea how well it would work, but can’t see a reason it shouldn’t as long as you can get it to mix properly in the first place.
Not in my experience.
Acrylic paint is an emulsion of pigments and polymers in water. When you thin it out, it tends to separate. The solvent (water) may wet the surface, but the pigments and the binder will settle down by gravity.
> slush casting setup
It takes literally forever for the water to evaporate out from inside a closed plastic shell. You will be tumbling it for years to make it happen.
I think it would be pretty much fine Dude, just use the paint at its normal thickness – as supplied which in my experience means it is a pretty stable emulsion (so to have about the right thickness probably buy ‘airbrush’ versions – which probably reveals most of my experience with acrylics is miniature modelling paints), or thinned preferably with a proper medium not plain water as needed.
To coat the entire inside with a thin layer of colour is all it needs – as it doesn’t have to be a durable hard wearing coat or even fully saturated opaque colour – its internal and the requirement is just to tint that inner surface, so you will only need a tiny volume of paint, the paint only needs to be thin enough to flow at all (which describes even very thick paint – so the limit is probably getting it in the model in the first place), probably rather tiny fractions of a millilitre required, it won’t take long to dry that really thin skim coat – so either dump out the excess, just let it pool, or keep spinning till its done…
Certainly worth experiments, but I really can’t see it being that bad, and if you are really in a hurry you can add a little heat, most of the UV cured resins will take far higher temperatures than is sensible to speed the paint drying or use on FDM prints just fine – the limit is likely to be the paint, the few experiments I’ve done personally suggest 40 C is about the right temperature for paint drying acceleration, maybe up to 60ish, but generally the paints dry so fast anyway I’ve not worried about it, too hot really doesn’t work though, so far better to stay on the cooler side and employ a little patience.
Its not like the model printed in fractions of a second, what does it matter if you then set it up on your spinner for a few hours, a day – whatever gets the result you want too.
The paint is _injected_ after the toy is printed.
Leaving the injection hole open can speed drying time.
>Leaving the injection hole open can speed drying time.
You kinda have to if you want it to dry at all – but then you can’t “slip cast” the paint because it would drip out.
You absolutely can slush cast with the feed hole still open, just spin it around that hole as an axis mostly, and occasionally cover hole and tip if you actually need to – which in many cases you don’t, as you are only really interested in the sides and top face of your barrel – the bottom of the foot on your mini here really doesn’t matter for example – its going to be glued down to something.
Maybe air compressor and a small tube could ventilate the inside to allow drying.
Or just fill with opaque two-part resin.
Or fill with SLA resin then cure it further under UV…
A vacuum chamber would pull the air out and replace it with paint.
Doesn’t have to be a very good vacuum, just enough to get some of the paint inside the limbs, and then you can shake it.
are there any writeups on filling the interior space of FDM prints with epoxy, to make a more rigid object?
seems pretty straightforward, except for maybe heat from the exothermic reaction softening the printed filament
Would a vacuum chamber help getting the air out ? Might be better than drilling additional holes.
That is what I was thinking too. replace the paint with black epoxy/potting compound and you’ve got a winner.
If you place it in a vaccum chamber with a couple of dessicant packs that should cause the water to evaporate just be careful how quickly you draw the Vaccum or you may cause it to boil off instead of gently dry disturbing the surface
I must be stupid. All these years, I’ve been priming models before painting their entire surface. This feels like a series of more exotic solutions to problems that don’t exist. If you insist on it being clear (why again?) do a zenithal coat with a darker clear shade to pop the detail.
I’ve had lots of interesting ideas on what to do with the transparent models I possess paint wise, and this is another interesting effect you couldn’t get (from all viewing angles anyway) any other way. Sometimes you want that transparent/translucent element, perhaps because you are putting in lights, but equally just because it looks cool.
Instead of acrylic paint, why not use another darker resin. You can UV cure it after injection in a matter of seconds, and if you use a water washable resin, the lower viscosity will coat all of those hard to reach nooks inside the model with ease. Seems like this would be quicker and easier…