Resin print before and after paint injection.

Resin 3D Prints Get A New Look With Paint Injection

As cool as resin-based 3D printers are, they’re not without their shortcomings. One sore point, especially for those looking to document their prints, is that the translucent resins often favored for stereolithography can make the finest details difficult to see. Injecting paint into the model is how [Andrew Sink] decided to attack this problem, and the results are pretty striking.

For sure, this isn’t a problem that everyone making resin prints is going to face. Some resins are nicely opaque, and the fine details of a print show up just fine. But transparent resins lend a nice look to some projects, and might benefit from [Andrew]’s technique. It’s pretty much as simple as it sounds: choose a hollow model — or modify an existing one — print it up in the usual way, and clean thoroughly inside and out with isopropanol before curing under UV. Using a curing station that can get UV light up into the voids is probably a smart idea.

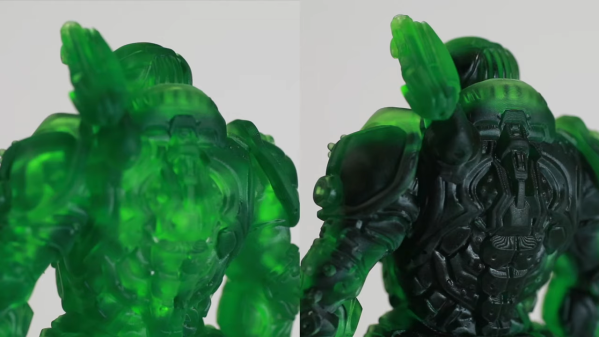
To finish off, the cured model is injected with acrylic paint. Nothing special here, just craft store acrylic in a syringe. [Andrew] seemed to prefer a thicker paint; we don’t want to second guess, but intuitively a thinner paint would seem to have some advantages. In any case, be sure to provide adequate vent holes for the displaced air. The video below has a few before and after shots, and the technique really works well to show off surface detail. Plus it just plain looks cool.

This seems like a good technique to keep in mind, and might even work well for hollow FDM prints done with transparent filaments. Still on the fence about FDM vs. SLA? We can help with that.

Continue reading “Resin 3D Prints Get A New Look With Paint Injection”

Visible Light CT Scanner Does Double Duty

If you’ve ever experienced the heartbreak of finding a seed in your supposedly seedless navel orange, you’ll be glad to hear that with a little work, you can protect yourself with an optical computed tomography scanner to peer inside that slice before popping it into your mouth.

We have to admit to reading this one with a skeptical eye at first. It’s not that we doubt that a DIY CT scanner is possible; after all, we’ve seen examples at least a couple of times before. The prominent DSLR mounted to the scanning chamber betrays the use of visible light rather than X-rays in this scanner — but really, X-ray is just another wavelength of light. If you choose optically translucent test subjects, the principles are all the same. [Jbumstead]’s optical CT scanner is therefore limited to peeking inside things like slices of tomatoes or oranges to look at the internal structure, which it does with impressive resolution.

This scanner also has a decided advantage over X-ray CT scanners in that it can image the outside of an object in the visible spectrum, which makes it a handy 3D-scanner in addition to its use in diagnosing Gummi Bear diseases. In either transmissive or reflective mode, the DSLR is fitted with a telecentric lens and has its shutter synchronized to the stepper-driven specimen stage. Scan images are sent to Matlab for reconstruction of CT scans or to Photoscan for 3D scans.

The results are impressive, although it’s arguably more useful as a scanner. Looking to turn a 3D-scan into a 3D-print? Photogrammetry is where it’s at.

Continue reading “Visible Light CT Scanner Does Double Duty”