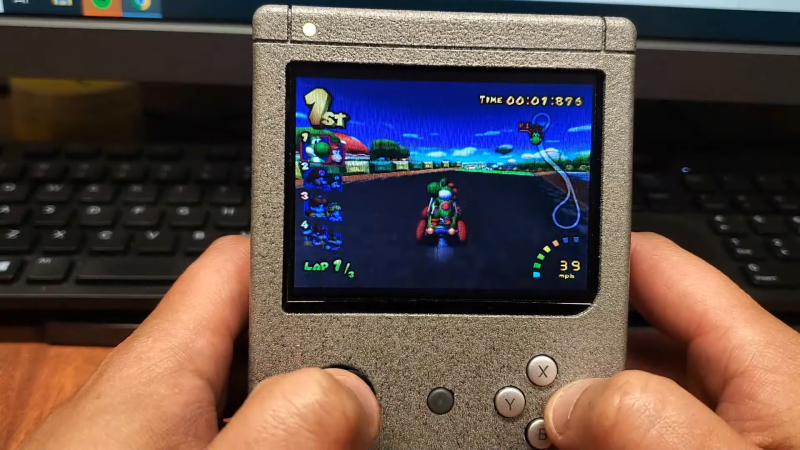
The G-Boy kit revolutionized the subculture around building portable home consoles, allowing an entire Wii to be crammed into a form factor the size of a original Game Boy. [Chris Downing] is no stranger to the field, and sourced a G-Boy kit of his own to build it to the best of his abilities. (Video embedded after the break.)
However, he wanted to step up above the FDM-printed parts of the original kit. Thus, he contacted the kit developer Gman, who provided him with the 3D model files so he could attempt a higher-quality SLA print himself. [Downing] had some experience with SLA printing in the past with the Form 2, but found some unique challenges on this build with the Form 3.
The benefits of SLA printing are the finer detail and surface finish it delivers. This is particularly nice on things like enclosures and buttons which are handled regularly by the user. However, the standard resin that ships with the Form 3 had issues with warping, particularly on thin flat walls which make up the majority of the G-Boy case.
Other issues included the fact that the standard cured SLA resin is much harder to thread screws into than softer FDM plastic, something which frustrated assembly of the design. It’s also brittle, too, which leads to easy breakages.
As a fan of a properly finished product, [Downing] decided to sand and paint the enclosure regardless. Tragedy struck when the spray cans started to spit chunks due to being over a year old. However, it serendipitously turned into a win, producing an attractive granite stone-like finish which actually looks pretty good.
The G-Boy kit took Wii portable builds mainstream, and drew many new builders into the subculture. [Downing] may be a stalwart of the scene, but still learned new skills along the way of the build.
We can’t wait to see what happens next in the scene, though we’d suspect someone’s already out there chopping up a rare PlayStation 5 as we speak.
[Thanks to Bushy555 for the tip!]


Honestly, I think that finish looks great. The way it looks was actually unintended? A real win, serendipitous indeed.
Obligatary jab at the tomfoolery of a clown ranting about using a form 3 and it’s expensive resins, when a sub £200 entry level SLA printer, and relatively budget end resin can handle this task fine..
Honestly, what the fluff man :/
Haaa, I’d be interested to see the results on the lower end printers and see if the results are the same.
I think it’s more inherent with the way resin prints cure and the fact there is full-infill on every part. I have a feeling with there being no room for expansion/contraction as it’s cured, the deformity it causes is compounded by thin walls and wide spans. Which explains why I have zero issues with the smaller, detailed parts like buttons.
The issue is still there, but very minimal.
If you have full infill on every part, then you’re slicing wrong. And as far as thin parts go, that is exactly why you choose resin over FDM.
Also keep in mind that designing parts for resin printing is a little different than designing for FDM. Things like screw holes are a perfect example. Which is why how you slice it is so important – to tailor it for the medium you’re printing in.
Thanks for the input, but don’t forget that I did not design this case, I took the files and had to use as-is.
But I’ve been printing in SLA for over 5 years now, so I understand the ins/outs of the process, though in all that time, I’ve been using the Formlabs Preform software for the Form 2 and 3.
Maybe others are different now, I don’t know, but in Preform, I’ve never seen an option that lets you choose the amount of infill in the same fashion as you’d do in an FDM slicer like Prusa or Cura.
And in fact, when I went to Formlabs HQ for a Form 2 training a few years ago, they even had it in their protocols that all parts printed in Resin are 100% infill because staggered infill like traditional FDM would create liquid filled pockets, which would also produce cups in the process that screw everything up.
Makes quite a bit of sense really.
Which then turns back around to my original problem. Density and curing tolerances.
So while I agree that slicing matters, I’m more interested in the “correct” application for SLA slicing and how that is achieved with this particular set-up? l
You’re welcome. As I said, there is a difference between designing for SLA and designing for FDM. I realize you didn’t design the parts, but the parts they designed were intended for FDM, so you were already at a disadvantage.
Your problem is Preform. Both Chitubox and Lychee offer infill settings, including turning it off. 100% infill is just a waste of resin. Now I know there are differences between a laser based resin printer from the more common MSLA, but I think Formlabs recommendation is more for industrial standards than something like what you’re trying to accomplish.
As far as pockets go, that’s why you place holes in strategic places. Both slicers I mentioned will allow you to do it. Not only do the holes allow drainage, but they act as pressure relief to avoid damaging the FEP film.
You are only going by what you were taught, so I understand why your process is how it is, however it seems Formlabs is leaving significant gaps in their training. Either that or their training is more specialized towards both their specific products as well as their intended uses. There is so much more you can do. Have a look at Lychee . I think you can even use Cura. Both seem to offer more than what you’re saying Formbot wants you to use.
“If you have full infill on every part, then you’re slicing wrong.”
Gonna need some evidence for a claim like that.
Why would you ever use full infill? You’re just wasting resin. Wall thickness is far more important for tensile strength in both FDM and resin printing. There are plenty of sources you can read about it. Now I will give the caveat that the type of model you are printing matters. If you want a functional part that requires it be solid for strength, sure. But what people are typically printing, it is just a waste of resin. If you’re printing a D&D mini, for example, 0% infill and thicker walls. Hollow it in the slicer. If you’re printing a picture hanger, you can certainly get away with less infill than 100%
Actually I take that back, I’d say 0% or 100%. Nothing in between. You’d likely be left with uncured resin using infill if not at 100% or 0% with drain holes.