For general everyday use, there’s nothing wrong with the standard selection of plastics that most 3D printer filaments are available in. PLA, ABS, PETG — they’ve all got their place, and they’re all pretty easy to work with. But if you need to work with more exotic materials, you might need to go to extremes and modify an off-the-shelf printer for high-temperature work.
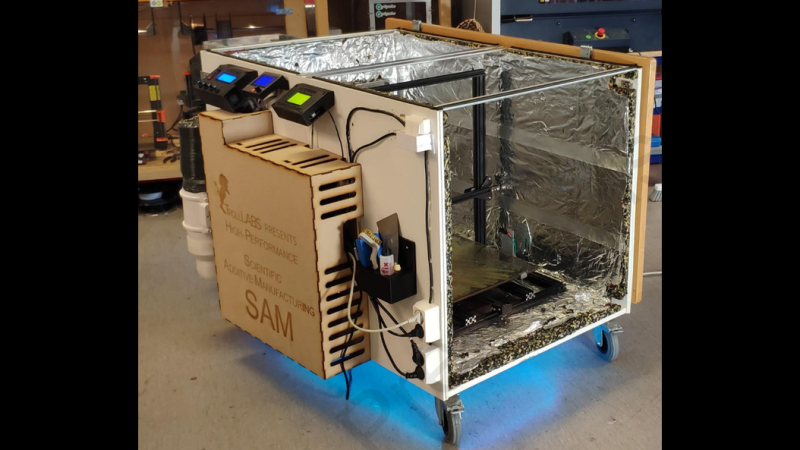
For the team led by [Andreas Hagerup Birkelid] at the Norwegian University of Science and Technology, the standard menu of printer chow wasn’t up to the jobs they had in mind. They wanted to print using polyether ether ketone, or PEEK, a high-performance thermoplastic with useful mechanical and thermal properties, in addition to chemical resistance. Trouble is, the melting point of PEEK is a whopping 343°C (649°F), making it necessary to turn up the heat — a lot. A standard Creality CR-10 printer was upgraded to withstand not only the 500°C max temperature of the new hot end and 200° printed bed, but also to survive operating in what amounts to an oven — a balmy 135° in a chamber made from IKEA cabinets. That entailed replacing plastic parts with metal ones, upgrading belts, pulleys, and wires, and moving all the electronics outside the enclosure. Even the steppers got special treatment, with water cooling to keep their magnets from reaching the Curie point.
The mods seemed to do the trick, because a Benchy printed in a carbon-fiber PEEK filament came out pretty good. It seems like a long way to go and kind of pricey — $1,700 for the printer and all the mods — but if you have a need to print exotic materials, it’s way cheaper than a commercial high-temp printer.
[via 3D Printing Industry]


Impressive build. How do they manually level the bed? Not sure I want to reach in there with a feeler gauge.
I wonder if using a core xy would have been easier to convert. The steppers could be moved outside the chamber.
You have four options:
1. Don’t level the bed
2. Reach in there with welding gloves and do it
3. Level the bed at “normal” temperatures
4. Sensing stepper drivers
You want to level the bed (the pendants say “tram”) at full temperature. The gap will change with temperature, in my case going from 100C to 110C changed the gap 0.08 mm. And temps that high may well cause bowing). Better to just use a (temp hardened) distance sensor, and map the actual contour of the bed.
In my case, my goals are less ambitious, just reliable non warping printing of ABS or nylon. That means (abs) an enclosure of 60-80 C, a bed of 110C, and 220-240 degrees at the head.
In my case it meant an enclosure made from foil faced foam ($15 for a 4’x8’ sheet), a $12 roll of aluminum tape, and a hunk of acrylic I had kicking around for a window to see in. I also moved the electronics out of the enclosure (had to lengthen a few cables, print an case) $50 for a water cooled head, about the same for scrounged pc water cooling parts. A 24 volt resistive heater with fan was $20, the “ink bird” controller was $35 I think, had the power supply, a tweaked laptop brick.
Yea it’s ugly. But it does work. And it’s quieter than the stock, unboxed unit, I was able to get rid of a few of the noisier fans, and the stepper noise is partly contained by the enclosure.
It’s pedants, not pendants. Pendants are “a piece of jewellery that hangs from a chain worn round the neck.” ;)
Bloody automisscorrect. Didn’t notice it had switched it. Of all the words to mess up.
Reading you post reminded me, Prusa’s new XL machine uses a load cell to calibrate the Z. Also, if the print bed was conductive, a touch probe might work too.
As Jeff pointed out, you definitely want to level it at temperature. Even standard “room temperature” machines print more reliably when calibrated at temp.
Any cartesian that raises the bed for Z can put the steppers outside the build envelope, I think. A CR-5 could be modded, for example. A CR-10 is not the right choice for another reason as well: a bed slinger like the CR-10 requires more volume for a given print surface size, making the heating of the enclosure less efficient.
I have a ender 5 plus that can do the same but I’m under there price by 200 bucks. And no ikea parts. I do have a mill at my disposal so that helps. It’s running a duet2, titain aqua hot end, gates high temp belts, and kenovo silicone bed heater.
Also need to make sure it’s a bowden and not a direct drive model.
This is actually really fun to think about. I have no need for such a printer, but I kind of want to make one now.
Impressive, but why would you modify a cheesy printer for this when you could design/build something that would work better? How much of the original printer was left, a few pieces of t-slot?
Most of the printer is still there, electronics outside the box, printer inside.
I was leaning bloft but this is tempting
Sorry to burst bubbles. But… this won’t print PEEK properly. And by properly, I mean, in a way that the industry actually would care about it.
Delamination isn’t the big issue. It’s the final result, PEEK needs to crystalize to get the right industrial properties. That requires a very carefully controlled environment, and temperature gradients. If you don’t do that, you might as well use cheaper materials, as you won’t get any benifit from using PEEK.
(We had an experimental machine at Ultimaker that could print PEEK, it was a beast)
I have a couple machines I spent over 100k on and my ender 5 that I built for fun. I can print parts on either in peek and you wouldn’t be able to tell the difference. You still need to anneal them after they are printed in a annealing oven.
Do you also sell a high temprature printer, with a room temprature of 200+ degrees.
We want to print PEEK and other high performance materials.
Otherwise we start to build a printer.