There’s a fine line between simple feature creep and going over the top when it comes to project design. It’s hard to say exactly where that line is, but we’re pretty sure that this filament dry box has at least stepped over it, and might even have erased it entirely.
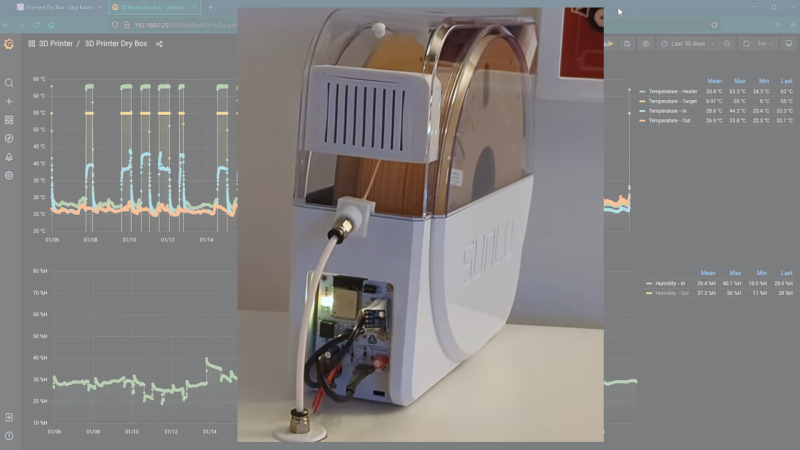
Sure, we all know the value of storing 3D printer filament under controlled conditions, to prevent the hygroscopic plastics from picking up atmospheric moisture. But [Sasa Karanovic] must really, REALLY hate the printing artifacts that result. Starting with a commercially available dry box that already had a built-in heating element, [Sasa] took it to the next level by replacing the controller and display with an ESP32. He added a fan to improve air circulation inside the enclosure and prevent stratification, as well as temperature and humidity sensors. Not satisfied with simply switching the heating element on and off at specific setpoints, he also implemented a PID loop to maintain a constant temperature. And of course, there’s a web UI and an API available for third-party control and monitoring.
The video below details [Sasa]’s design thoughts and goes into some detail on construction and performance. And while we may kid that this design is over-the-top, what really comes through is that this is a showcase for design ideas not only for one application, but for hardware projects in general. There are certainly simpler heated dry box designs, and zero-cost solutions as well, but sometimes going overboard has its own value too.


Sometimes, it look like 3D printing scene is more about fiddling with hardware stuff around the computer than actually make useful parts.
If you look at the effort many 3D printer enthusiasts go to pimp up their setup, it is definitely more a hobby than a tool to manufacture fragile prototype parts.
Absolutely and there’s nothing wrong with that.
I can confirm that too. :)
It can be a great many things, including a way to make parts of stupendous stiffness and strength for their geometry and lightness – but to really push those boundaries usually means ‘exotic’ filaments and those often require real effort to get the most out of – so once folks really want to make useful enduring sturdy mechanical parts for all occasions they will fall down the rabbit hole of wanting the humidity controlled drybox, heated build chamber, stiffer and faster printer etc – as you do reach the limits of PLA easily mechanically, ABS is pretty easy to print and better for some things but really would benefit from more than the budget printer, the real tough stuff you probably need gemstone tipped nozzle to survive the abrasion of the printing process, a volcano hotend to print at high temperatures with any speed (even your low end printer can manage to get hot enough to print most things – but can’t put enough heat in fast enough to do so in a reasonable time), the drybox so there are no little steam explosions etc…
Its the same thing in machinist world – you can spend all your time using your machines to make tooling for your machines so you can then make something else – like perhaps yet more tooling for your machine. Or you can just with some extra hassle and setup bulldoze your way through the project part with what you have or can buy..
That depends on whether you’re in in as a hobbyist (tinkerer) , or a business that buys high end for prototyping/production.
The beauty of it is that it’s both at the same time, you just don’t oftensee articles named “Johnny printed an organizer for his desk”. Fiddlers help raise the standards of the community, which makes everyone’s prints better.
There’s also a bit of selection bias at play here, since the people who just use their printers to make things rather than modding them to the moon don’t show up on hackaday with 3d printer mods
Sounds like you should get a refund on your printer/sell it and get yourself a Prusa. I didn’t know anything about 3D printing when I got my Prusa mini and have had no problems with it. If you find a way to keep the filament dry, it prints just perfectly without having to fiddle around with hardware all day.
I too bought the Prusa mini. I had some major issues with it out of the box, at least after putting it together. The self test wouldn’t finish without fail. After 2 hours on the phone with their help desk i finally searched online and found that there was an issue with the firmware version. I reverted to an older version and it worked. The help tech wasn’t aware of that issue. He did help me level the arm pretty good, which would have caused issue later. My next challenge was that a long print of a skull would fail after around 30 minutes in. It pretty much defeated me and I put it away for 6 months now.
I’m going to buy a dry-box and see if it changes anything. If it does, then, crap!
Yeah a simple skull print should be easy for the mini… one it should cope fine even with one of those fancy voroni skills with all the holes in it.
A dry box can make some things worse though… since it adds more resistance to the feed loop… so dry your filament for about 4 hours then put it on the regular roller stand then print.
Make sure you are NOT printing with ABS or a variant of it….the mini can do PLA and PETG variants just fine though.
Professionals work on tools that build stuff too. Sharing those tools and tips is valuable as well.
With a 3D printer you can print the parts for a better 3D printer. And with a better 3D printer you can print the parts for a better 3D printer!
And then print better parts for a better 3D printer
I think the tendency to fiddle around with/improve your tools is true in general if you’re a hobbyist whether it be 3D printing, woodworking, machining, electronics, or software.
I think the bottom line with hobbies in general is; if it brings you joy, it’s worth it. At least that’s how I look at it.
Agreed–that’s why it’s a hobby: to bring you joy.
I am printing PLA on a 200 USD printer, I make items for my home and life. Printed properly these thing are far from fragile and serve well my family and friends, I definitely like to tinker and up grade the little bugger but he still makes lots of nice products.
8 or 9 years ago, I built a large format delta printer. It was a meter tall, 400mm bed with a/c heating coil, magnetically detachable, geared filament drive with all custom machined parts on my diy CNC. After I got it working and printed a few test pieces, I sold it on Craigslist because the fun was over.. :)
My old joke is that the only reason I have a 3d printer is so that I can print parts for my 3d printer.
Some of us are both. At work, I use a printer to prototype parts and designs. It’s a huge cost savings to get your final designed much narrowed down and in your own hands I a day with a printer, than it is to outsource that and wait for shipping. You can do a ton of rough “fit and finish” before you get to your final design.
I also have a printer at home. Most of the the things I have designed and made so far are trinkets or upgrades for my printer. It is a good indoor hobby for the hot summer days and cold winter days. Also, it’s a “passive” hobby in a lot of ways because of the print times
I use my printers for both personal and business. I have PEEK parts that have been designed using data and specs from surgeons, printed, then implanted in a patient. The printer I use for this was built using a mid level store bought printer. A typical print job for a medical part I print is around $5,000.00
My 8 year old Plywood i3 knockoff sits with it’s PLA spool in open air, manually levelled bed, no screen or UI or SD card just plugged directly to my workstation controlled by Pronterface… it’s always at the ready to chug away when I need it to produce something.
Just like cars, some people like to fettle and tinker and get the fanciest looking, or fastest going, or heaviest hauling…. while others just need transport.
Was it a MakerFarm one?
My biggest gripe with all these humidity sensors is just how low their inherent accuracy is.
Working in a shop that requires calibrated humidity measurement, I’ve been exposed to just how easily the humidity measurement cells can be corrupted, and how inaccurate most are in the first place.
This leads me to wonder why worry much about any quantitative measurement (instead of the obvious qualitative measurement: “it’s too wet, it’s spitting/steaming!” level of moisture) since what we are measuring is effectively a ballpark measurement that may be off ±10% right from the start.
That’s true. Measuring air humidity is inherently not a super easy task to do. Then on top of that you add the size and cost limitations that come with DIY builds, the precision and/or accuracy might be way off from the get go. But seeing a number instead of nothing at all gives you that additional “data point”. :)
Thanks Dan and Hackaday!
It’s great to see this feedback. All of which is really appreciated.
Discussing hobbies and tools always spark a very interesting discussion. :)
Open-source and open-hardware projects are a lot of fun, at least for me. You share with the community and then it’s up to the each individual person to decide what to do with that. Some will think it’s great and want to replicate or even improve it. Some will look at it as a learning opportunity or a spark to get interested into a certain topic or field and so on.
I made something I (sort of) needed and I really liked the end result. I also spent a lot of time trying to make sure that all the steps and instructions are in place so that someone who wants to look under the hood or build their own, they can use it as a reference. Good or bad reference but at least it can be a reference. :)
This is almost exactly what I was thinking of. Instead I just got a camera equipment dehumidifier cheap, put a ZigBee hygrometer in and used a heated chamber (with another hygrometer). I’m surprised how good the dehumidifier is, runs on about 8w. I’d recommend it.
Reminds me of the old gearheads back in the day who spent more time working on their cars than driving them!
They probably learnt that from their fathers who had to spend more time fixing cars (and motorcycles) than driving them because they constantly broke down.
I did a poor’s man version of a similar idea, using a esp8266, a relay and a oven lightbulb for heating… Interface is via oled and www (using a win7 css style)
https://www.thingiverse.com/thing:5197205
https://github.com/jmgk77/HTMON
That’s true. Measuring air humidity is inherently not a super easy task to do. Then on top of that you add the size and cost limitations that come with DIY builds, the precision and/or accuracy might be way off from the get go. But seeing a number instead of nothing at all gives you that additional “data point”. :)
192.168 l 8.1.
Throw some silica based kitty liter with humidity indicator in a sealed box. That’s more than enough to have <30% humidity for months.
Just 2hrs in an owen (after cooking) to renew the silica gel and voila, cheap low maintenance drybox.
It looks like you installed a small container for desiccant (the white box with vertical slots) inside the dry box. Did you have to cut the original dry box. Is that desiccant container purchased or did you 3D print it and if 3D printed what filament did you use?
I cannot find any information on how you installed the fan in the dry box. It looks like you 3D printed a fan holder that was friction fitted. Did you 3D the fan holder?
Are STL files available?
Good point, I’ll also add the 3D files to GitHub repository.
Both the fan and desiccant container are printed in PLA and then have a TPU “shroud” that fits around. Then the entire thing is friction fitted into the enclosure. So no modifications to the enclosure are needed in order to fit the fan or desiccant box.
The beauty of living today is that you don’t need lots of money to have what you can’t otherwise afford.
Some things about this –
I used to service commercial A4 (approx letter size) printers that printed 5000 to 20000 sheets a day. So with a printer like this you don’t want paper jams, misleads or double feeds.
I often advised customers to buy a cabinet especially for paper stock and have an electrician install a 5watt to 20watt incandescent light in it (watts depending on the size of the cabinet). The cabinet should be close to the printer in an air conditioned environment. Then keep paper stock in the cabinet for a week before use with one end of the ream open.
This article is about the same thing more or less so there are some important things that haven’t been mentioned.
First of all you’re not drying the air in the filament box, in fact your making the air more moist. The extra moisture is coming from the filament. As you elevate the temperature of the filament and the air you increase both the filament and the airs capacity to suspend (store) water. It’s just that the airs capacity increases at a higher rate than the filament.
The total water (moister) in the box remains unchanged.
If you pre-heat air and then make it flow (slowly) through the box then you will have a much better result because your actually removing the moisture from the filament and the air.
If the filament was then exposed to humid air outside the box it would absorb water at a higher rate. The Bowden tube in this example is preventing this.
If this whole setup is i a very humid environment then it wont work well as the already moist air can’t hold a lot more moisture even when heated.
The silica cells idea mentioned here is a very good idea as it actually removes moisture from the box when the silica is taken and re-heated outside the box.
People have mentioned varying results with the same model printer and different environmental factors (ambient air moisture/humidity) is probably the reason. i.e. is it in an air conditioned environment. What’s the moisture condensing point and temperature. Is it near the coast with higher humidity etc etc