
For big-ticket purchases, I tend to do a lot of research before I open my wallet. I like to at least have the illusion that when I send my money off to a far-away stranger, I’m likely to get back something of equal value in a reasonable timeframe that does what I want it to do. So I tend more toward the “analysis paralysis” end of the spectrum, where I pore over so many specs and reviews that I end up buying nothing.
While that sounds like a bad thing, and sometimes is, I find that it tends to help me avoid rashly spending money on things that aren’t going to work for me. This is especially true in the area of tools, where while I’m trapped in my analysis loop, I often find a workaround or substitute that’s good enough to get the job done.
For some things, though, there is no substitute, and when you start working with SMD components that you’d have a hard time telling from a grain of salt, you’re probably going to need a microscope. I recently determined that this was where I was in my electronics journey, and now that I’ve worked my way through the analysis and procurement phase of the process, I thought I’d share my first impressions of my microscope, and what it’s like to get used to working with one.
Setting Expectations
Luckily, I was pretty sure about a couple of things I wanted in a microscope. I knew that I wanted an optical microscope, as opposed to a digital camera and monitor setup. While there are plenty of people who do excellent work with these setups, I felt like an optical scope would be the best match for me. I really didn’t like the idea of dealing with the lag a USB microscope always seems to exhibit, and even if it’s a direct HDMI camera to monitor setup, I felt that staring at a monitor on the wall while working on a circuit on the bench would be disorienting. It seemed like a better idea to have my eyes pointed at least in the general direction of where my hands were working.
On the other hand, there’s a lot to be said for being able to put things up on a big screen, especially for someone in my position, who is likely to want to write about what he’s doing and include some pictures and videos. So I was reasonably sure that I’d want a scope that’s capable of having a camera attached. I figured this was more of a “nice to have” than a feature I’d need out of the gate, but I at least wanted the option to add a camera in the future.
I was also reasonably sure that I’d need something compact enough that it wouldn’t claim a lot of my limited bench space. Being able to push the scope out of the way to make way for non-SMD work seemed like a good idea. There were also budgetary limits — I really didn’t want to spend more than $500.
With my specs in hand, I set about doing my research. Unfortunately, I didn’t have much to go on other than online reviews, and far too often those are worth less than the paper they’re written on. Luckily, the Hackaday community is pretty helpful with these kinds of purchases, and a lot of the leg work had already been done by others. I found a lot of reviews of scopes, but one stood out: Scotty Allen’s “A Boy and His Microscope” video.
I think what really resonated with me about Scotty’s video is his confession that, at least with soldering, “My expectations of myself far exceeded my abilities.” That’s a truth bomb that hit me pretty hard, and seeing that he had managed to work around his physical limitations by buying a microscope was encouraging. He had also set up a deal with the Shenzhen market vendor where he bought his scope, which eliminates a lot of the guesswork involved in trying to purchase bits and pieces from various vendors. So, since Scotty’s package deal seemed to fit my needs, I placed an Ali Express order in late December.
And just to be clear, this was entirely at my personal expense. I was just following Scotty’s advice but spending my own money, so there’s no sponsorship of any kind here. My impressions and opinions are entirely my own.
First Impressions
Ordering from China always seems like a bit of a crapshoot these days, but to my delight, the scope arrived in only about two weeks. The package was in fine shape, but I was surprised by the compact size of the box — it just seemed too small for a bulky scope. But that ended up being due to very clever packaging, with the entire scope stripped down and the parts wrapped separately before being tucked into the foam packing. I didn’t see any damage from shipping.
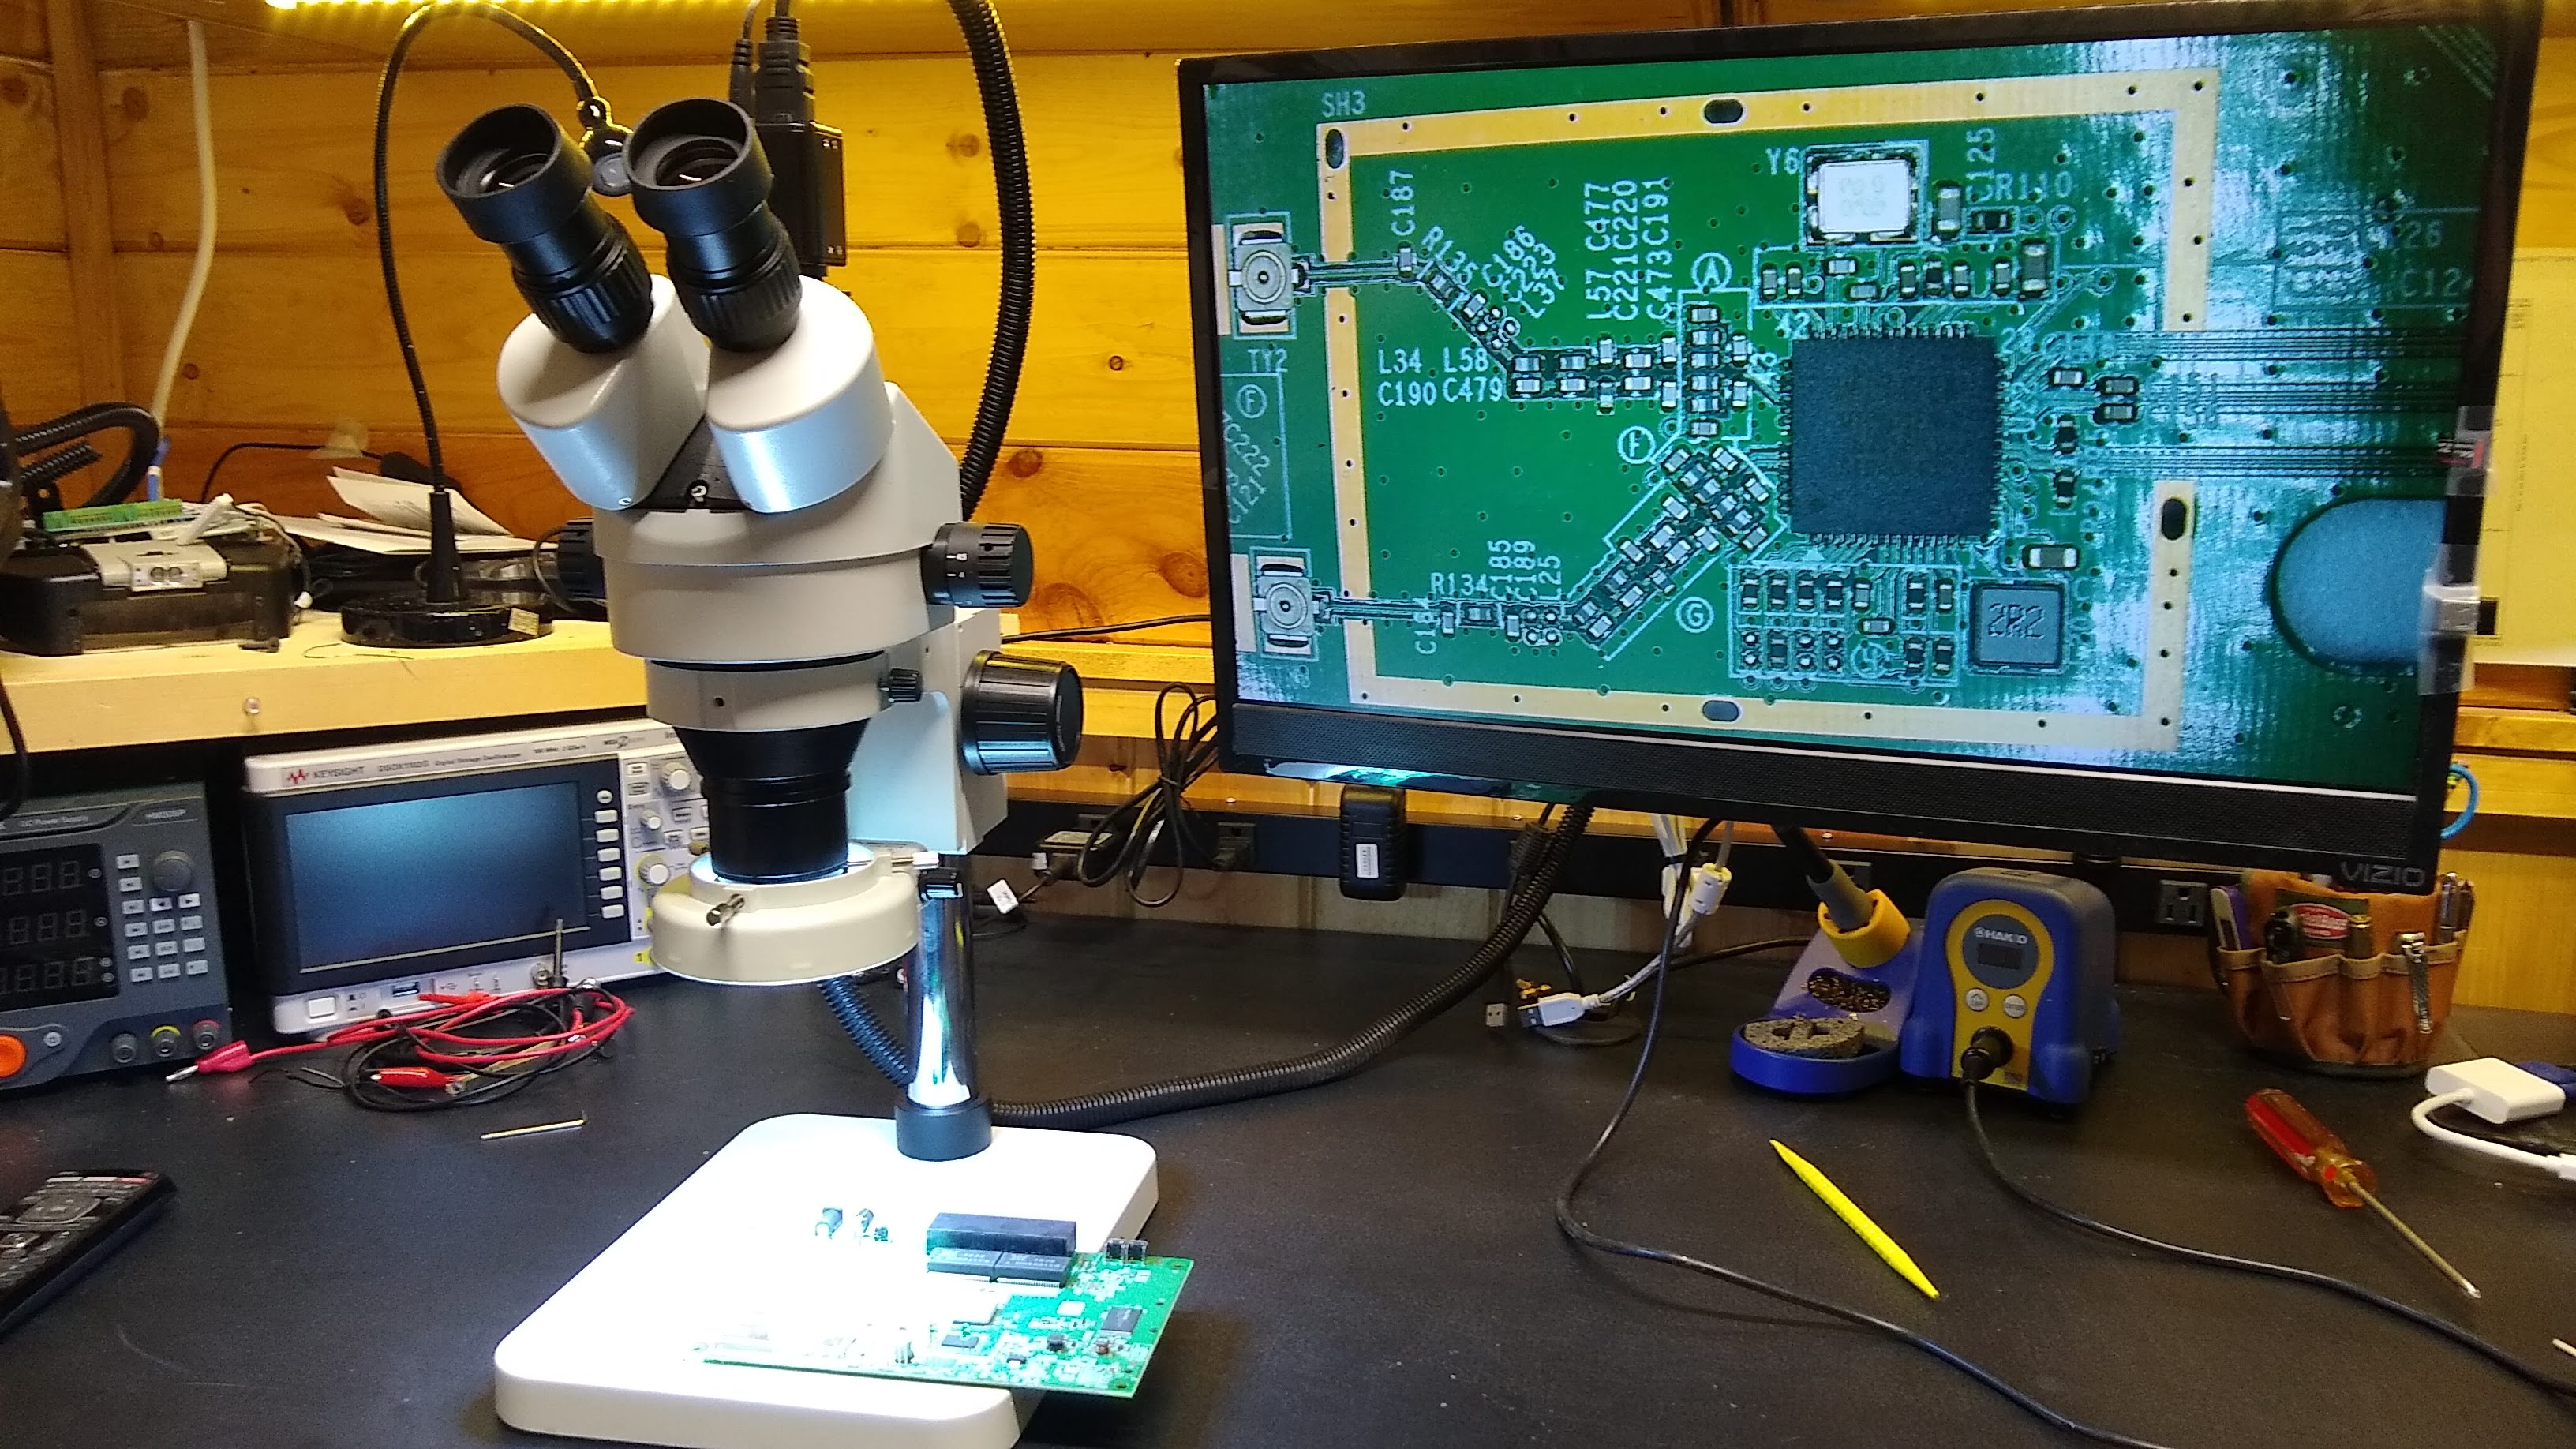
The scope package I bought includes the binocular stereo zoom microscope body, a pair of eyepieces with cups, and a stand. Accessories include a ring light, a 0.5 x Barlow lens, a protective filter, and the all-important HDMI camera with adapter ring. Although there was no manual, assembly was a breeze — everything pretty much only fits where it’s supposed to go. You’ll need some tools, like a very small Phillips screwdriver, but it’s all pretty straightforward and self-explanatory. The only trouble I had was tidying up the cables from the camera and the ring light, which were flopping all around the place. I decided to make a single “umbilical” to the monitor on my bench by bundling the cables and wrapping them with some plastic wire loom.
My first impressions on quality were quite favorable. All the metal parts are nicely finished, and the castings have no flash marks or defects. Aluminum parts have a good-quality anodized finish, and the threads on all the optical components were clean and lightly greased. There wasn’t any stray grease on surfaces that shouldn’t have it, a common problem with cheap optics in my experience. Also absent was that familiar chemical odor that often seems to come with some shipments from China. The only part that had any real odor was the plastic dust cover, and that dissipated quickly once it aired out a bit.
I have to say that for an entry-level microscope, this one has some really good optics. I have yet to find anything that seems misaligned or out of whack, and the visual field is flat and bright. I chose to attach the Barlow lens, which screws onto the body just below the dual objective lenses. The 0.5 x lens shrinks the visual field slightly, letting you raise the microscope up on its stand quite a bit. This makes more room for tools and hands between the stage and the objective — I measure about 14 cm.
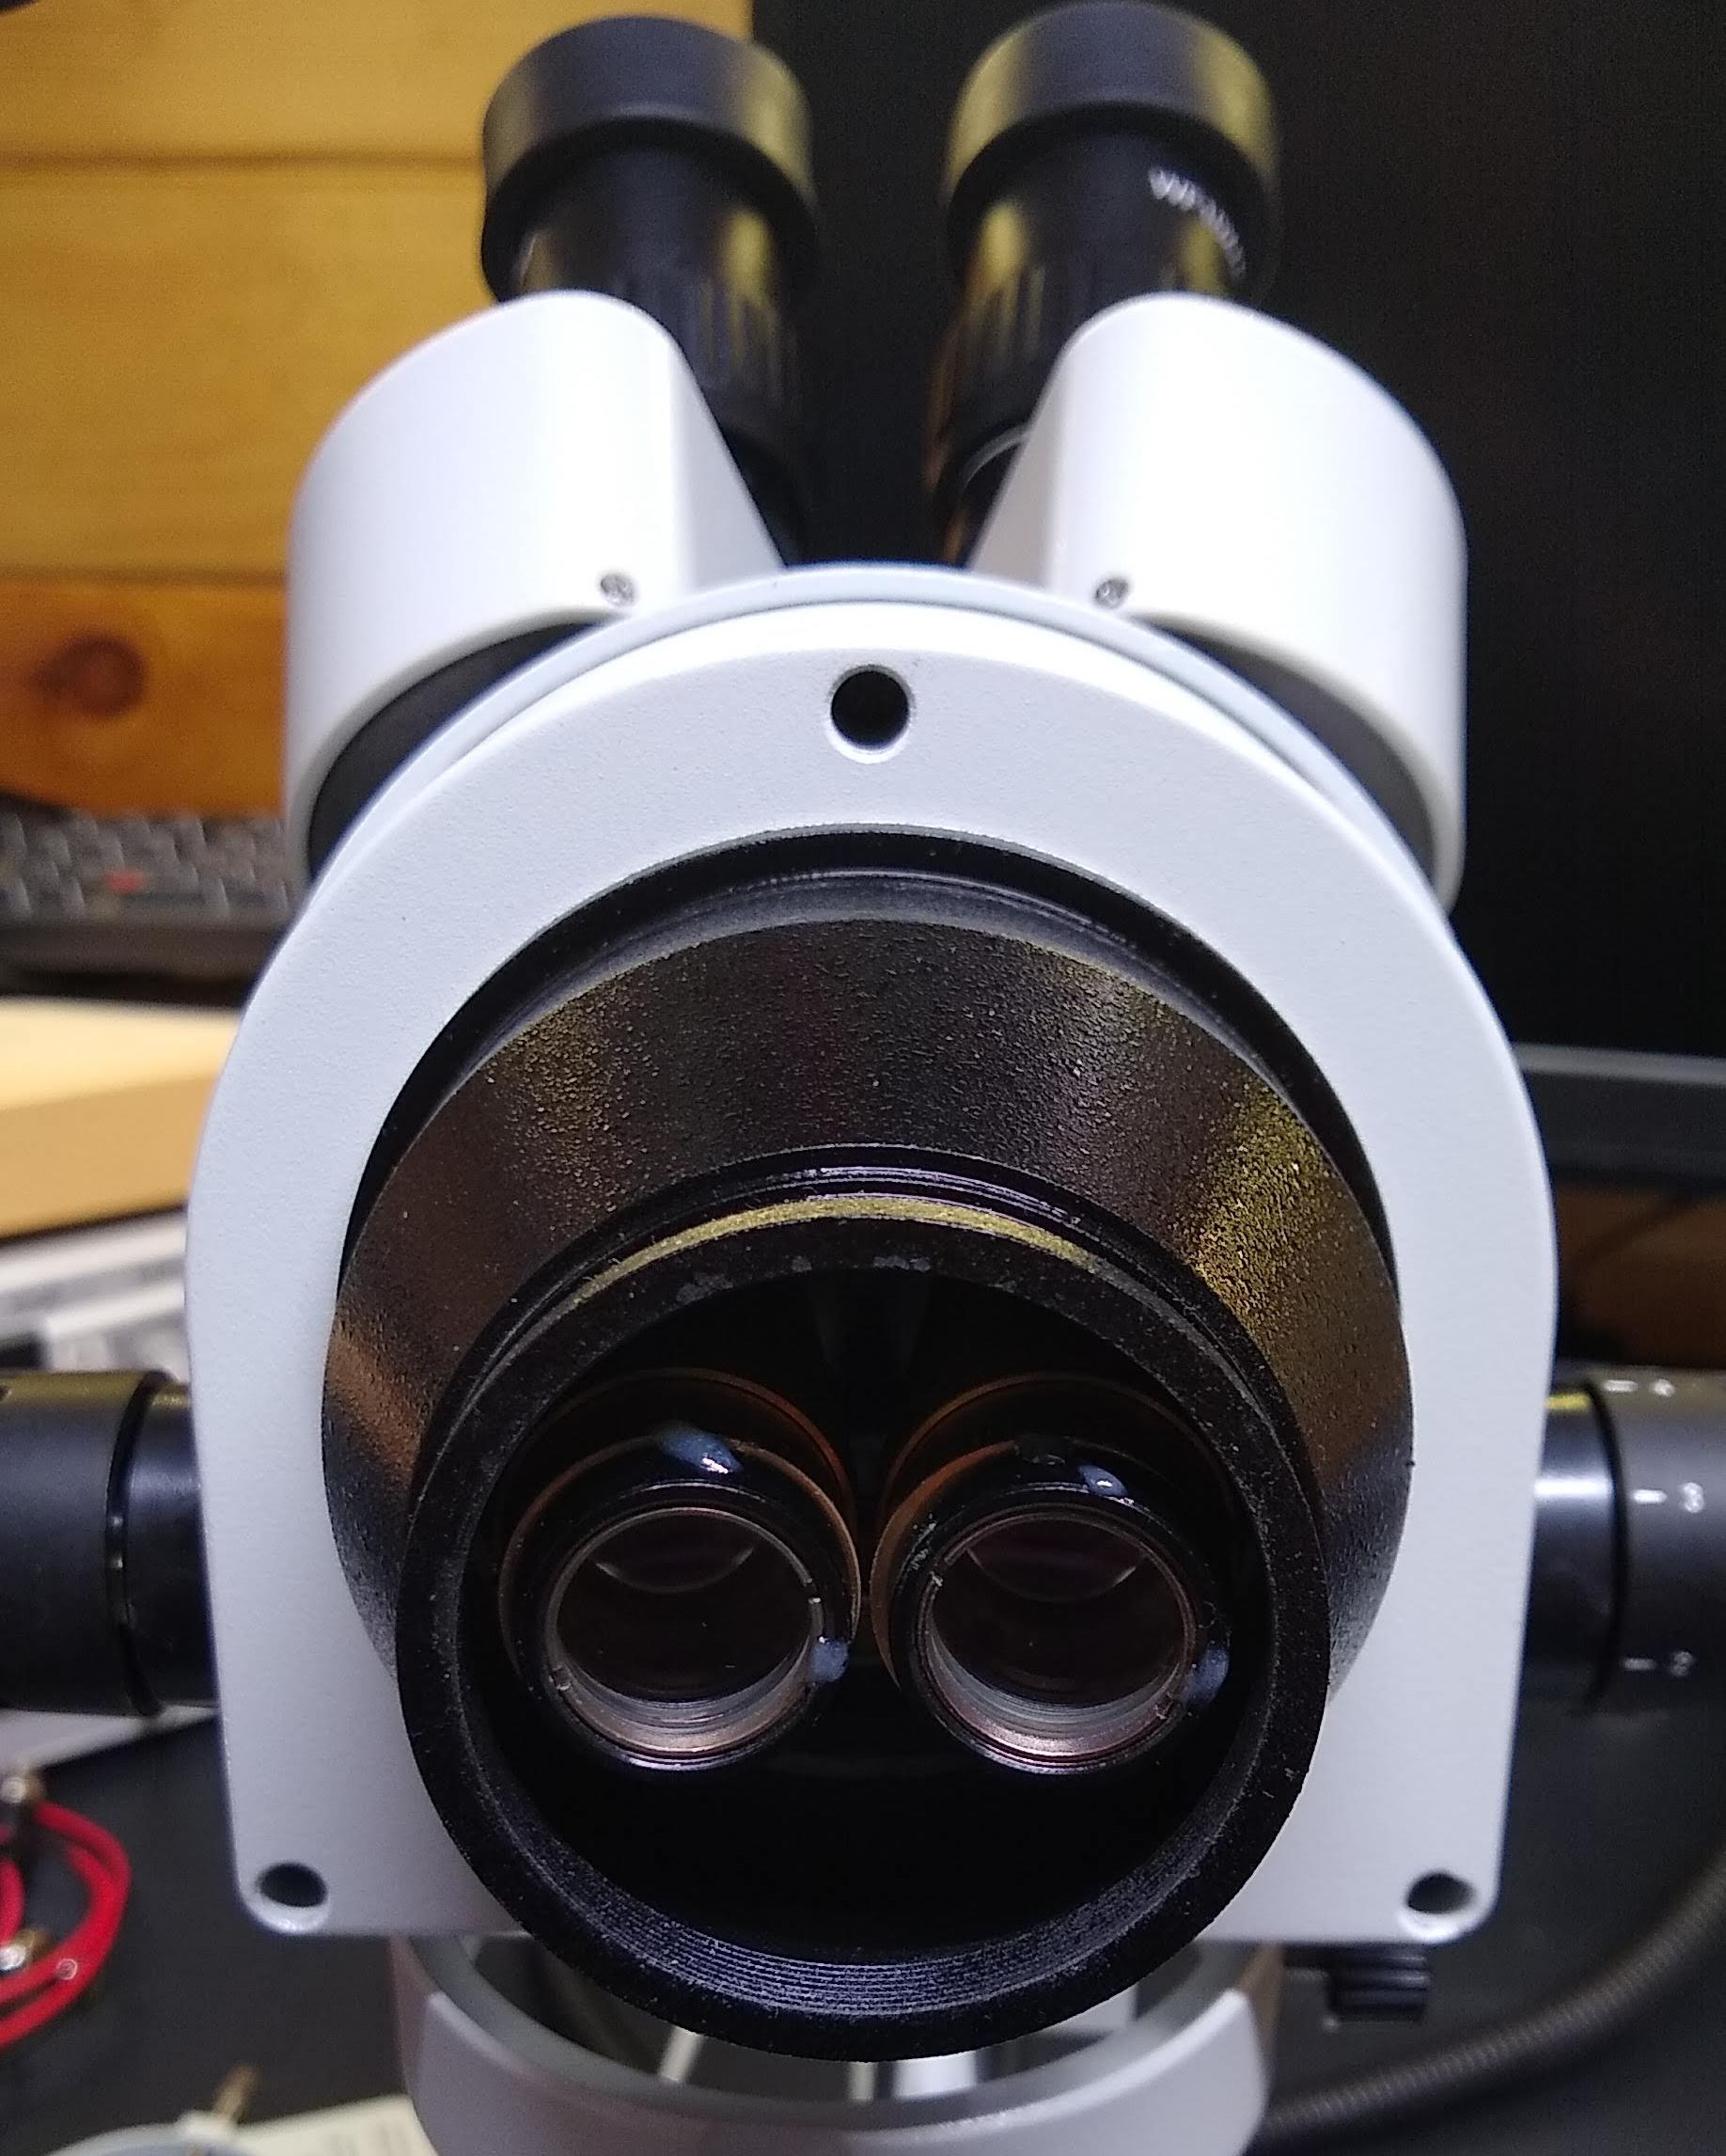
On the other end, the binocular eyepieces are fully adjustable. The eyepieces swivel to adjust for interocular distance, and each eyepiece can be adjusted to different focal lengths. This makes it easy to set up the scope just the way you like it, which is often a problem I have with optics — it’s hard for me to get the “eye relief”, or the distance between the eye and the lens, just right to get a full field of view. On this scope, it’s pretty easy to adjust for proper eye relief, even when I choose to wear my reading glasses.
I do have one complaint about the eyepieces, though. The grub screws that retain the eyepieces in their tubes don’t actually touch the lens; rather, they only screw in far enough to engage in a groove in the lens body. This keeps the eyepiece from slipping out, but leaves it loose in the tube. It’s only really noticeable when the rubber eyecups touch my glasses, which makes the eyepieces wiggle around in their tubes. The resulting slight change in alignment of the optics makes it hard for my brain to meld the two images into a stereo view, which is really the whole point of a stereo microscope. A longer grub screw would probably solve the problem.
Practice Time
The whole reason I decided to get a microscope goes back to my failed attempt to repair an Xbox. In that article, I acknowledged how suboptimal my setup was, and what I intended to do before attempting the repair again. Aside from improving the lighting in my shop and getting a decent microscope, I figured what I really needed was some practice. So, having sorted the hardware issues, it was time to update my personal firmware with a little hands-on practice.
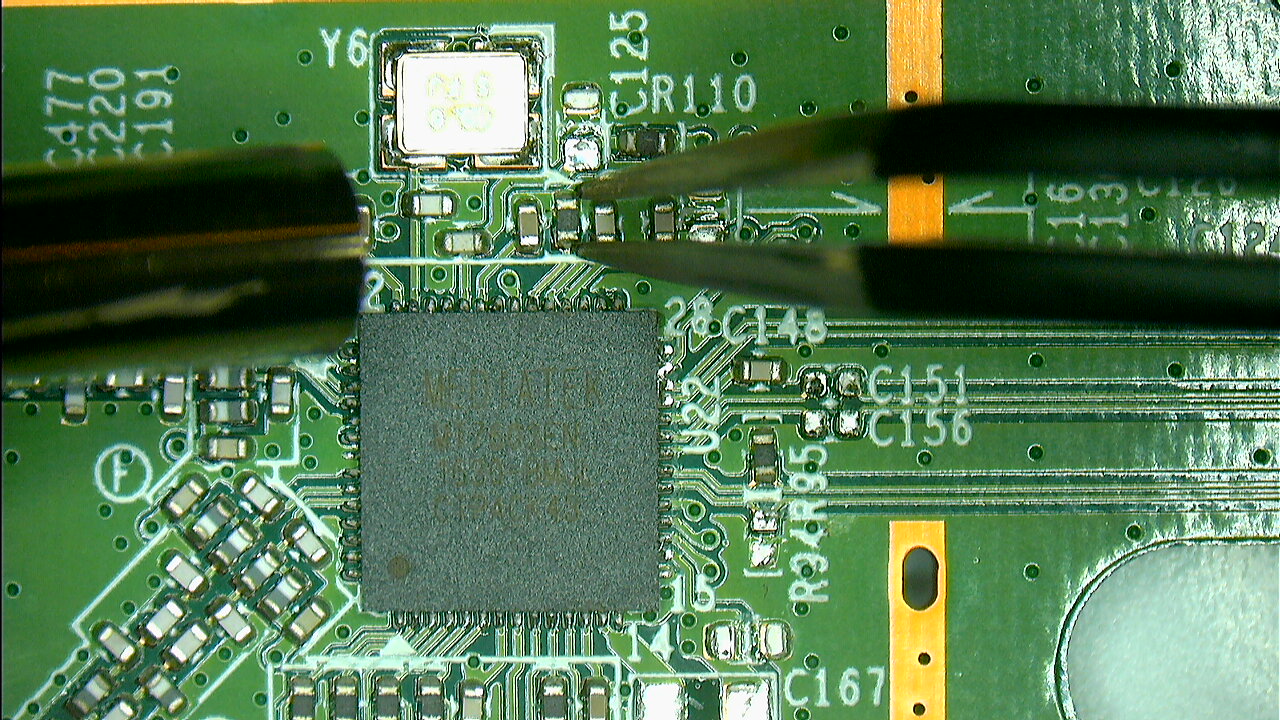
The junk bin offered up an old wireless router as a test subject, and I got busy trying to desolder random components. The first thing I noticed is that it takes a while to get used to the fact that the field you’re working in is so small. Looking through the scope with a zoom level of about 2x, the visual field is about 2.5 cm in diameter. Getting a soldering iron or tweezers into that field isn’t exactly easy, especially when you don’t have any peripheral vision to guide your hands. I find it worse to position tools with my left hand, which is my weak side. It’s getting better quickly, but it’s disconcerting.
The other thing I had a problem with was holding the PCB while I worked on it. The stage of the microscope isn’t huge, so my test subject PCB flopped around quite a bit. Plus, I found that applying the force needed to remove components would wiggle the board around, often throwing it out of focus. Some kind of helping hands to hold the board steady would be nice. Or, perhaps just a silicone mat on the stage to provide some friction — and some heat resistance — would be enough.
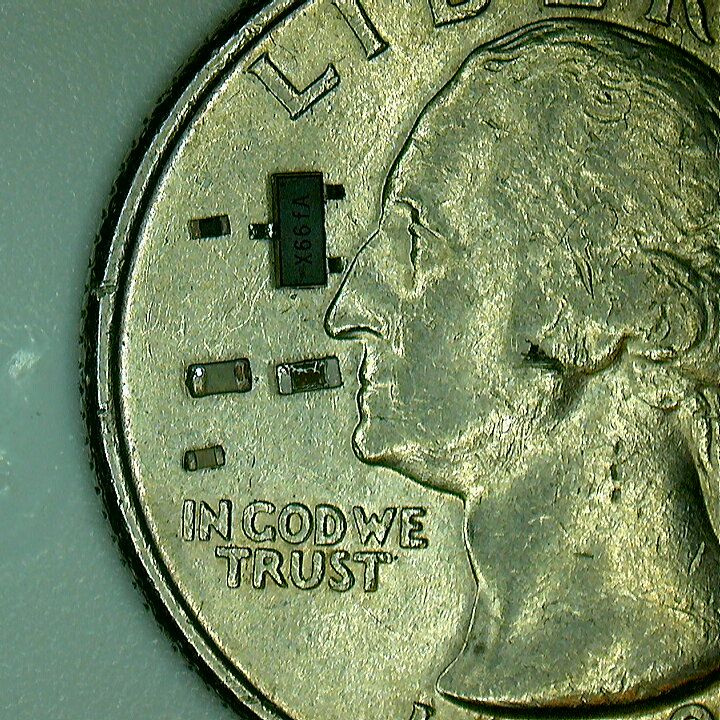
Ergonomic issues aside, I have to say I was pretty amazed after desoldering my first few components when I looked down at my little collection and realized how small they really are. Through the scope, I had no problem seeing them and handling them with the tweezers — although I did manage to yeet a few resistors off into the wild blue yonder when I had the air turned up too high on my rework station. But without the scope, there’s no way I would have been able to deal with these components.
Overall, I’m really pleased with this purchase. Apart from a few minor quibbles, like the fact that the plastic insert in the stage isn’t especially heat-resistant, it’s a really good value for the money. I need to make a few adjustments to my work holding, and I can always use more practice, but I think I’m getting closer to actually fixing that Xbox.


I think i have that exact same microscope because of that video. However i don’t think i paid (and would pay) 140€ shipping to Europe!!! (microscope is currently 330€ without shipping). Also beware of import taxes.
I am quite happy with it, except maybe the fact that what you see with your eyes trough the scope is not the same that the HDMI-camera sees. I think this should be fixable by changing the adapter/lens between the scope and the camera, but i don’t use the camera often. Also i remove my glasses to use the microscope (it is possible to use this thing with glasses?? How do you do?). One of the eye-pieces can be individually adjusted so i have a clear picture on both eyes. However it’s annoying, remove glasses, look trough microscope, put glasses back on to look on the PC screen and so on… I do have a HDMI-USB-adapter but it lags and of course you loose the advantages of the stereoscopic view.
Overall it’s a really nice piece of equipment and well worth the money.
To use glass you should be able to fold back the rubber surrounds that are on the eyepieces. (Or take the rubber off completely.)
I tried. Yes i can see something with glasses on, but it’s not great. I think i will still remove my glasses and look directly into the eyepieces.
I use a binocular dissecting microscope that cost me about 70 GBP. Quality is surprisingly good.
Large working distance, objective to part, is critical in my experience. I have a Mantis at work that’s really nice in that it repositions quickly and accurately on a swingarm arrangement, but the working distance particularly for the 20x objective is terrible: hard to get a heat pencil in there. My setup at home is like the one in the article but cheaper, but has like 35cm working distance.
And yeah, finding a way to clamp or weight boards down is really helpful. When you’re moving your hands out of the visual field it’s easy to bump a larger board and move it. (This is especially the case with wiring harnesses.)
But once you go to a microscope it’s almost impossible to go back. You rapidly get to the point where the main challenge is simply handling small parts. 0402 stuff sticks to tweezers just from static charge and it’s hard to place stuff. But you can see it clearly.
I 3d printed a little flat plate that clips onto one of the eye pieces with a hole in it so I can stick my cellphone against the plate and get pictures, but this setup with an integral camera is much nicer.
Yeah I was going to buy a laser cutter but eventually realized that I needed a rotary tool instead.
Even when not doing SMD stuff, I always end up in the one lab with the binocular microscope! It is such a pleasure to use, and has revealed problems in my freshly milled antennas more than once. I really need to get one of these once my garage workshop gets properly started.
I own an absurd number of binocular microscopes. Some are clearly better than others. The best use a single large objective lens rather than a pair (this is called CMO or “common main objective”). Nothing replaces looking through a good optical scope, and as the camera people say, “there is no substitute for good glass”.
You can make do with some kind of camera and screen I suppose, but it just ain’t the same as “using your eyes” with a good optical scope.
Congratulations on your purchase. I have yet to have a bad experience buying from China, you just have to wait, though I do have a ceiling beyond which I won’t gamble in that market. My first scope was from China, the rest have come from surplus sales from high tech firms or the university and those have been the best.
Are you talking about an actual Stereo microscope or just a standard Binocular microscope?
a Binocular microscope is better than a Monocular microscope(Despite being dimmer, the way the brain works makes the image better), but it is not in any way a replacement for a Stereo microscope as they actually allow you to use your depth perception, which is VERY useful in dissection(which, I think, they were designed for), but also in soldering.
I find that a Stickvise PCB Vise works well to hold boards so that they don’t move around. I do mostly small boards.
Since you can’t really see the soldering iron when it’s out of the (tiny) stereo microscope field of view I find myself melting the jaws now and then. BUT – there are 3D print files on-line to make new jaws. Which I’ve done. Nice.
From somebody who’s been known to spend hours a day on a microscope, *please* don’t let your posture reflect the illustration at the top of the page. It will not end well for you. Finding a lower stool/chair and sitting up straight will ultimately be far less fatiguing and you’ll do better work.
Indeed, excellent advice. I took the other approach and raised my scope so I can comfortably use my favorite chair, but the goal was to sit up straight and then find the eyepieces right in front of my eyes. I also spend hours many days at my microscope. It makes a big difference.
Simply put, always bring the microscope to your eyes, not your eyes to the microscope. This kinda goes for most work and tools. Always try to adapt the work height and tools to where you can work with them comfortably in a normal posture.
Also, pay attention to working distance. A 4″ working distance puts your hands mighty close to your eyes, so you may be trading back fatigue for arm and shoulder issues. A 14″ working distance is far more comfortable, but more expensive.
having used professional binocular microscopes, versus a nice camera-and-screen setup, the camera and screen wins for me.
I started to get eye problems around the time I started on binocular microscope usage for extended periods playing with SMD components. Maybe a coincidence, as I’m becoming an old git, but maybe the eye relief coupled with different eyeball convergence starts to trick the brain.
Combining a good camera with VR.
Very interesting. Have people demonstrated wearing a VR headset that shows a video feed from a microscope camera?
Showing a camera feed in VR is not a challenge, lots of ways to do it and the microscope camera is ultimately just a camera so as long as you can get the data out of the camera and into the VR headset fast and smoothly to avoid lag and motion sickness inducing stuttering its not that hard.
The real question is has anybody used a proper stereo microscope with two cameras (or a large sensor with the right optics to split the images for the L/R eyes down the sensor with some optics) to give real depth perception to the VR image rather than just having a large flat 2d video screen in your FOV, which as far as I know hasn’t been done – but again its not actually that hard to do in theory, though this time I’d expect getting the execution good enough to use to actually require some effort.
looking for recommendations for a microscope that will make my hands stop shaking
Good tool holders and tool rests (or hand rests) might help. My hands are much steadier when braced against something that doesn’t move vs. when holding them up in the air.
Try to at least double your caffeine intake.
Some people with focal dystonia have found that very heavily weighted gloves (or bandaging soup cans to the backs of their hands) helps a lot because it changes the resonant frequency of the tremor down to the point you can fight it.
A shot of whiskey also helps. Seriously. It blows your reflexes and whatever’s going on with focal dystonia it’s reflex-oriented so that’ll help reduce it. (My wife is a part of a neurology practice that deals with this, among other things.)
I can absolutely assure you that looking up at a monitor on the wall to solder is a lot more comofrtable than bending over an optical microscope. I’ve used one of each type at work, the digital is a much nicer experience. Just wish I could find a good and cheap supplier of one for myself, would want HDMI (or VGA or DVI or displayport) direct output from the scope, not USB, and when combining this with the need for a fairly wide view feld and long focal length compared to other scope uses (like looking at biological cells or dust grains) this gets quite hard to find. Any tips on a cheap (<£150), good HDMI one. And not one of those ones with the little tower shape and inbuilt screen ones either.
I have one bought from the Eakins Microscope Store on Aliexpress.
13MP 1/3″ CMOS HDMI and VGA output 60 Hz.
I have used it for the past five years, almost daily for work related stuff, and I can’t really flaw it.
There is no lag, a working distance of 12-15cm, and with a 23″ computer monitor right in front of me, it is just as good as commercial ones I have used.
The good news is that it is really quite cheap, around €70 shipping included. I have not checked, but I would expect that there is a 1080p model out by now.
I made my own stand and light ring, and use a sheet of blank FR4 30x30cm square as a work surface. I find it a perfect surface, as it is heat resistant and it is large enough to hold both my wrists and the board I work on, but best of all, it can slide easily on the desk surface, allowing me to shift to a different area of the board without getting the tweezers or soldering iron out of my hand.
I have always found that board holders such as 3rd hand or similar are impractical and mostly slow to use.
Working mostly with small boards, I have now mastered the technique of using my spare fingers to keep the boards where I need them; this also aids to a steady hand.
Don’t own any (yet – its high on the list of things I want to get), but by my experience of the ones I’ve used was pure optical every day, stereo if available – for me the camera output would only be better as a way to scan the work afterwards for obvious defects in a more relaxed position, you can’t beat having stereo vision (assuming your eyes actually work right for it) or that 100% constant frame of reference – your eyes are locked in a space above the work that means you have some sense of where your hands and tools are even when they are out of sight – at least with some practice – like touchtyping I can do it on a backwards to me keyboard, or when its offset at horrible angles but its not half as easy as having all the motions in your muscle memory be valid and a very good idea of where to find the keys just from where your wrists are sitting…
I have two microscopes,a WILD and an Olympus,the Olympus is
a “specimin” scope and binocular,and on a whim I stuck a little
digital camera on the eye piece and it auto focuses and takes
great pics,messed around taking random little lenses and putting them in front of my phones camera and that works as well
Before I broke down and upgraded, I used a usb webcam cannibalized from a netbook. I cranked the lens almost all the way out and used a webcam test program to stream the video. The webcam was held over the workpiece with some helping hands. The workspace underneath was about 5mm, but damn did it magnify – helped me put down .65mm and .4mm pitch components.
Then I bought the pimoroni microscope kit with a pi hq camera and I run that on an original pi attached to a 19” monitor. raspistill -k has no discernible latency in my experience and I’m much happier working with that setup.
Having done serious work in invertebrate taxonomy, I know the importance of a good scope. I also intend to put my skill at mounting 200 micron long insects for scientific study to good use placing microscopic components on circuit boards, myself.
Setup like surgeons use when operating on nerves.
I agree re needing a small vice to hold the pcb under the microscope, so I made my own and have been using it ever since.
https://mecrisp-stellaris-folkdoc.sourceforge.io/_images/pvb-vice-c1.jpg
Turning the arm one quarter turn clockwise lowers the ‘foot’ onto the pcb and locks it so it can’t move. Only a 3mm deep ‘bite’ of the edge of the pcb is required. Made on a lathe and milling machine to accept 0.9 to 1.65mm thick board.
Cheers,
Terry
For a high quality helping hand I recently bought an Omnifixo holder, https://omnifixo.com/products/of-m4-2-pre-order-delivery-november-2021?variant=39398474055737. I have for some years had one of these aluminum base with flexible coolant pipe arms (like the one pictured here https://hackaday.com/2017/05/12/cheap-helping-hands-just-add-time/). While great in theory, in practice it is very painful to work with because the arms are too stiff and very hard to position precisely.
When I first saw Omnifixo I knew that that must be a much better product. At the time they were sold out and apparently I had signed up for updates which I had completely forgotten about until I got a “Hey, we’re in stock now” email December last year. So I ordered one, and while I have not tried it out yet I am looking forward to using it.
Here is a 1 minute show case, https://youtu.be/6OWIcLDGfq0, there are a couple more linked on the home page, https://omnifixo.com/.
Now this is hackaday, so for those more inclined to making their own there have been several posts for how to do that in the past, https://hackaday.com/tag/helping-hands/.
I have no affiliation with the company other than being a customer (and I fully support unconditional prison time for anyone doing hidden marketing).
It’s actually pretty easy to 3D print an adapter to mount any cell phone on a microscope (or telescope) to shoot video or still images through the eyepiece. The camera lens simply replaces your eye without any additional optics. All you have to do is figure out the spacing required between the phone lens and the eyepiece lens, then work out a clamp the holds the body of the phone on the tube the eyepiece slides into. You can get very high resolution video and still images that way – much better than the low resolution cameras that typically ship with a budget microscope.
It’s not a good technique for wide angle cameras like go-pros because the view through the eyepiece will only be a small circle at the center of the frame. You want a relatively narrow angle field of view in the camera to keep the image circle as large as possible.
Tip for ‘finding’ the soldering iron or tweezers when coming from out of field: swing it through the FOV above the work surface. Your brain will detect the orientation and you can then instantly position it where you want.
Source: I use a microscope almost daily for SMD prototyping.
If it’s the soldering iron just think about where your second hand is before swinging too much…
Yes, I am pretty sure he means a CMO stereo microscope in which the left and right optical paths look through the left and right halves of a single, large objective, the same way you look through an 0.5~2.0X barlow lens when you attach one to any stereo microscope.
CMO microscopes give a considerably brighter, often higher resolution image; some also find them easier on the eyes. All the ones I know have “infinity corrected” internal optics which allow you to insert all sorts of accessories (e.g., phototubes and coaxial lighting units) to customize and extend the microscope.