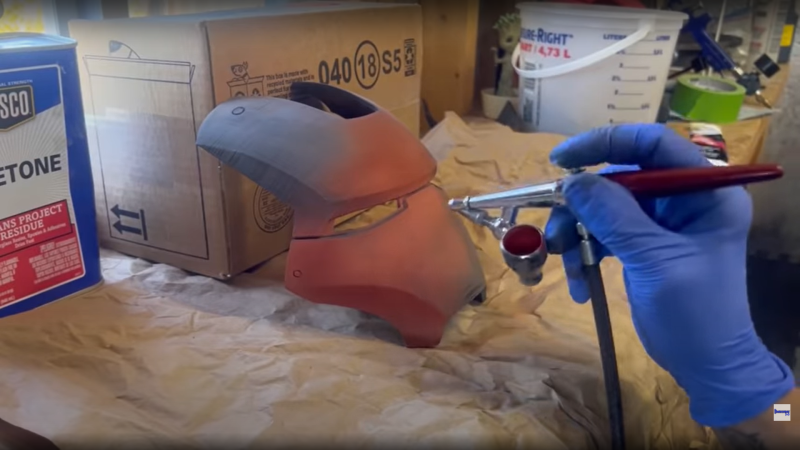
Finishing off 3D prints is a labour-intensive process, and getting a good looking, smooth surface suitable for painting takes a lot of time and plenty of practice. Deeper printing layer lines or minor surface defects can be smoother over with a variety of materials, from putties to resins, but the deeper the defect, the thicker the filler and that takes it toll on the surface details – smoothing those out and making fine details less distinct. [Darkwing dad] has another solution that looks pretty easy to achieve, by mixing acetone with glazing putty it can be airbrushed over the print surface in one go. After a little experimentation with the ratio of putty to acetone, a wide open nozzle and a low pressure, it was found that a nice even spray could be achieved. Importantly it dries in just a few minutes, enabling multiple coats to be applied in a short space of time.
Once sufficient thickness has been applied, the coating can easily sanded to get a smooth result with the worst of the gaps filled, and the layer lines nicely hidden. The final part of the filling process is more typical, with a few coats of filler primer applied straight from a rattle can, followed by a light sand and you’re good for painting.
We’ve covered smoothing 3D prints practically as long as we’ve been covering 3D printing itself, and there are multiple ways to do this, depending on the filament material, your budget and you tolerance for noxious fumes. Here’s a guide for smoothing using UV curable resins, using a special smoothable filament with IPA, and finally if this is just too fancy, smelly or expensive, just whip out the old butane torch and smooth those prints with good old fashioned fire.
Thanks [Zane] for the tip!


It’s maybe worth mentioning that this “Glazing putty” is probably not the same as the putty you use for glazing.
There is a sort of very thick paint, called “knifing putty” or “glazing putty” used for filling flaws in paintwork. I use this quite a bit (with a filling knife) for smoothing prints and castings.
Holts Cataoy is one brand.
Then there is “glazing putty” which is a mixture of linseed oil and whiting (ie, chalk dust) which is used to hold glass panes in wooden window frames.
To further confuse, paint was traditionally made from linseed oil and whiting. So they might historically have been exactly the same thing. You can still do this if you want a truly traditional finish, see: https://youtu.be/690fp9Q-H48
I still think titebond III and a low temp heat gun(Just enough to slightly soften) is is the most convenient finish.
That, or titebond and tissue paper, you can slightly crumple it for a tree bark like effect.
Soooo… DIY high-build primer? Might be cheaper in bulk than Tamiya Fine I guess (if you already have an airbrush setup).
High build primer in a spray can is available at any auto parts store.
This is the putty: https://www.autozone.com/sandpaper-and-body-repair-tools/body-repair-and-accessories/p/bondo-glazing-and-spot-putty-1lb/167009_0_0
I use it to fill the grain in balsa or plywood for rocket fins, nose cones, etc., and for the spiral grooves in cardboard/phenolic tubing. Thinned as needed for the application. If it’s to be sanded anyway, application with a foam brush may be faster in the long run.
Bondo’s good stuff.
When I friend of mine was 16 he convinced his neighbors he could do car body work.
He cut his costs bill significantly by putting old tennis shoes into the dent before filling the space with bondo. Made for a lighter weight fix too, so double plus good.
High-buildup primer such as Sikkens would might also work.
neat idea the main question i have is because most products do not like to stick to plastics really what is the adhesion after a month or i guess does it start flaking?
You can just buy spray putty, of course. I used it today to smooth a foundry pattern.
https://www.amazon.co.uk/gp/product/B015WIEGN6
Just curious:
@05:12 he starts with the big flat pieces on the outside. I’ve noticed with spray painting (and also see it here) that deeper features such as the narrow grooves tend to be left open. Would it not be better to first “paint” the groove, (which will partially get outside it) and then continue on the “flat” sections from the edge of where the spray stopped.
Does it work to put a putty knife over the surface before it’s dry?
It would get more of the putty into the grooves to be filled, and also keep closer to the original surface where no putty is needed. Maybe only do this for the first one or two layers. Maybe the putty misbehaves if you do this before it dries?
Your protective mask is not a good idea for acetone.
You need to wear chemical mask. Also not sure spraying acetone is ok with your eyes
He mentioned it was a demo & recently did a part 2 with proper ppe requirements & truths of using acetone.
I wonder if the acetone is important? Does acetone dissolve the material and help with the smoothing?
The normal solvent for spray-putty smells more like normal “thinners”. (alcohol, ketones)
Possibly the magic here is a solvent that liquifies the top later and a “paint” that has enough surface tension to pull it flat.
Acetone may slightly dissolve the outer layer of an ABS print, but it won’t do anything except keep the putty liquid long enough for it to settle on the surface and evaporate against a PLA or PETG print. I would love to see someone test your idea out and see if it ends up making the surface of an ABS print stronger by (basically) mixing putty into the outer layer.
One PLA and PETG the acetone does nothing, the only purpose of the acetone is as a solvent for the spot putty. The point is to get thin layers of build up with the thinned out spot putty so that you can fill in layer lines and not lose detail.
Whereas if you were to use the standard method of using a putty knife to add thick layers of spot putty you would end up losing detail due to the thickness of the putty.
The author should begin proofreading his work
This seems like a more roundabout way of finishing than just filler primer or a feather primer (I think that’s what the airbrush equivalent is. Feel free to correct me). Also acetone scares me so NOOO thanks lmao
Why would the acetone scare you? Bondo Glazing and Spot putty already has acetone in it as the solvent, just in a much smaller amount.
Also, this works really well to get build up on more detailed surfaces where just using regular methods of applying the spot putty would cover the details.
I have used this method to great effect on larger prints, like helmets, with a .8mm nozzle touch up gun and thinned spot putty. Some of the biggest benefit is that you can build up layers much faster because the acetone in the thinned out putty flashes extremely quickly and you can apply multiple coats quickly.
I’m a little late to this party, but if you’re thinking of trying this, check out Evercoat SlickSand. It’s thicker than a filler primer and thinner than body filler, and there’s a long period between the initial set and full hardness where it’s easy to sand it down to the point where it is just thick enough. It’s also a pleasure to work with – unlike glazing putty. And it doesn’t bleed through into your paint later.