A Simple Binary Coded Decimal Watch

Analog and LCD watches are both useful designs, but ultimately are mainstream timepieces. Using a binary watch is an easy way to set one’s self apart as a tech enthusiast, while impressing your hacker friends to boot.

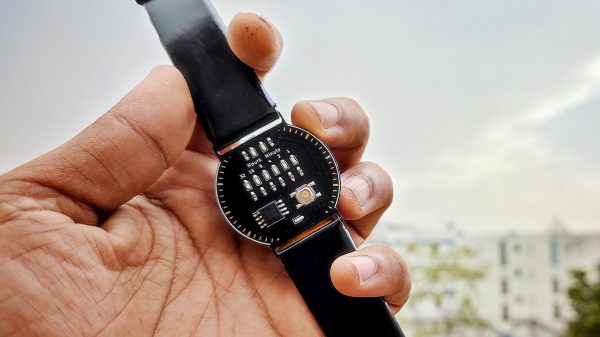
One such build comes to us from [vishalsoniindia], and it uses a single bare PCB which is designed to mate directly to a traditional watch strap. The single tactile button on board is used to activate the watch, showing the current time in hours and minutes in binary-coded decimal on the watch’s LEDs. Long-pressing the button puts the watch in setting mode to correct the time as needed.

The watch relies on an ATtiny85 microcontroller, a lightweight and compact design which is more than powerful enough to run a simple watch. It’s paired with a 74HC595 shift register to run all the LEDs from a minimum number of pins, and there’s also a TP4056 charging circuit on board to keep the lithium-polymer battery topped off.

A project like this is a great way to learn all manner of basic electronics skills, from PCB design, to SMD soldering and even working with basic logic parts like shift registers. As a bonus, you get a cool watch out of it to boot.

We’ve seen some similar designs over the years, as varied as the hackers that build them. Video after the break.

Continue reading “A Simple Binary Coded Decimal Watch”

A putter with an Arduino attached to its shaft

This Golf Club Uses Machine Learning To Perfect Your Swing

Golf can be a frustrating game to learn: it takes countless hours of practice to get anywhere near the perfect swing. While some might be lucky enough to have a pro handy every time they’re on the driving range or putting green, most of us will have to get by with watching the ball’s motion and using that to figure out what we’re doing wrong.

Luckily, technology is here to help: [Nick Bild]’s Golf Ace is a putter that uses machine learning to analyze your swing. An accelerometer mounted on the shaft senses the exact motion of the club and uses a machine learning algorithm to see how closely it matches a professional’s swing. An LED mounted on the club’s head turns green if your stroke was good, and red if it wasn’t. All of this is driven by an Arduino Nano 33 IoT and powered by a lithium-ion battery.

The Golf Ace doesn’t tell you what part of your swing to improve, so you’d still need some external instruction to help you get closer to the ideal form; [Nick]’s suggestion is to bundle an instructor’s swing data with a book or video that explains the important points. That certainly looks like a reasonable approach to us, and we can also imagine a similar setup to be used on woods and irons, although that would require a more robust mounting system.

In any case, the Golf Ace could very well be a useful addition to the many gadgets that try to improve your game. But in case you still end up frustrated, you might want to try this automated robotic golf club.

Continue reading “This Golf Club Uses Machine Learning To Perfect Your Swing”

Number Like It’s 1234 AD With This Cistercian Keypad

Don’t feel bad if you don’t know what Cistercian numbers are. Unless you’re a monk of the Order of Cistercia, there’s really no reason for you to learn the cipher that stretches back to the 13th-century. But then again, there’s no reason not to use the number system to make this medieval-cool computer number pad.

If you haven’t been introduced to the Cistercian number system, it’s actually pretty clever. There are several forms of it, but the vertical form used here by [Tauno Erik] is based on a vertical stave with nine glyphs that can be attached to or adjacent to it. Each glyph stands for one of the nine numerals — one through nine only; there’s no need for a zero glyph. There are four quadrants around the stave — upper right, upper left, lower right, and lower left — and where the glyph lies determines the multiplier for the glyph. So, if you wanted to write the number “1234”, you’d overlay the following glyphs into a single symbol as shown.

[Tauno]’s Cistercian keypad, admittedly more of an art and history piece than a useful peripheral, somehow manages to look like it might have been on the desk of [Theodoric of York, Medieval Accountant]. Its case is laser-cut birch plywood, containing a custom PCB for the 20 keyboard switches and the Xiao RP2040 MCU that runs the show. Keycaps are custom made from what looks like oak combined with a 3D-printed part, similar to his previous wooden keycap macro pad. Each of the nine Cistercian glyphs is hand-carved into the keycaps, plus an imaginary glyph for zero, which wasn’t part of the system, as well as operators and symbols that might have baffled the medieval monks.

The native Cistercian system is limited to numbers between 1 and 9,999, so we’ll guess that the keypad just outputs the Arabic numeral corresponding to the Cistercian key pressed and doesn’t actually compose full Cistercian numbers. But the code to do that would be pretty easy, and the results pretty cool, if a bit confusing for users. Even if it’s just for looks, it’s still a cool project, and we doff the hood of our monkish robe to [Tauno] for this one.

Framework Board Gets This Round Display PC Rolling

The Framework laptop is already a very exciting prospect for folks like us — a high-end computer that we can actually customize, upgrade, and repair with the manufacturer’s blessing? Sounds like music to our ears. But we’re also very excited about seeing how the community can press the modular components of the Framework into service outside of the laptop itself.

A case in point, this absolutely gorgeous retro-inspired computer built by [Penk Chen]. The Mainboard Terminal combines a Framework motherboard, five inch 1080 x 1080 round LCD display, and OLKB Preonic mechanical keyboard into a slick 3D printed enclosure that’s held together with magnets for easy access. Compared to the Raspberry Pi that we usually find tucked into custom computer builds like this, the Framework board offers incredible performance, not to mention the ability to run x86 operating systems and software.

[Penk] has Ubuntu 22.04 LTS loaded up right now, and he reports that everything works as expected, though there are a few xrandr commands you’ll need to run in order for the system to work properly with the circular display. The standard Ubuntu UI doesn’t look particularly well suited to such an unusual viewport, but we imagine that’s an issue you’ll have to learn to live with when experimenting with such an oddball screen.

It was just a few weeks ago that we brought you word that Framework was releasing the mechanical drawings for their Mainboard module, and we predicted then that it would be a huge boon to those building bespoke computers. Truth be told we expected a cyberdeck build of some sort to be the first one to hit our inbox, but you certainly won’t catch us complaining about seeing more faux-vintage personal terminals.

Thinnest Keyboard Uses Cherry DIY Doubleshot Method

As with any other community, it takes all kinds to make the keyboard world go ’round. Some like them thicc — more backing for the clacking and all — but some like them sleek and prefer the slimmest possible keyboard. For now and the foreseeable future, the go-to method for making whisper-thin keebs is to use Kailh Choc switches, because that’s about all that’s out there.

But chocs aren’t for everyone, and there are plenty of die-hard Cherry fans out there that want it both ways. Being one among them, [Khmel] set about designing the lowest-profile possible keyboard (and caps) that uses standard Cherry-sized keyswitches. Shut up and take your money? Well, okay, but the case and keycap files are all available on Thingiverse, so.

The whole video is great, and at less than 2½ minutes long, it’s definitely worth your time. There are a few little gems of wisdom sprinkled throughout, like printing keycaps standing up on their backsides (like where they would have a little flash dot if they were factory-molded). This gives them a nice texture thanks to the layer lines. But the real reason we’re here today is this DIY method for making doubleshot keycaps with little fuss that [Khmel] just tosses out there toward the end.

Trust us, there’s a piece of glass there.

Traditionally, doubleshot keycaps are made with two layers of plastic — one for the legend, and one for the rest. This produces a quite durable keycap and (used to be the norm), but the expensive process gave way to laser-etched and pad-printed keycap legends in the ’90s. [Khmel] was able to fake the look by printing legends at 0.25 layer height and then fusing each one to its respective keycap by laying a thin piece of glass (think microscope slide) on top and applying a soldering iron for a few seconds. Classy!

Tweezing tiny legends not really your kind of tedium? Here’s a method for DIY waterslide decals instead.

Continue reading “Thinnest Keyboard Uses Cherry DIY Doubleshot Method”

Data Alignment Across Architectures: The Good, The Bad And The Ugly

Even though a computer’s memory map looks pretty smooth and very much byte-addressable at first glance, the same memory on a hardware level is a lot more bumpy. An essential term a developer may come across in this context is data alignment, which refers to how the hardware accesses the system’s random access memory (RAM). This and others are properties of the RAM and memory bus implementation of the system, with a variety of implications for software developers.

For a 32-bit memory bus, the optimal access type for some data would be a four bytes, aligned exactly on a four-byte border within memory. What happens when unaligned access is attempted – such as reading said four-byte value aligned halfway into a word – is implementation defined. Some hardware platforms have hardware support for unaligned access, others throw an exception that the operating system (OS) can catch and fallback to an unaligned routine in software. Other platforms will generally throw a bus error (SIGBUS in POSIX) if you attempt unaligned access.

Yet even if unaligned memory access is allowed, what is the true performance impact? Continue reading “Data Alignment Across Architectures: The Good, The Bad And The Ugly”

Theory, Practice, And Ducted Fans

About a year ago, [Wyman’s Workshop] needed a fan. But not just a regular-old fan, no sir. A ducted fan. You know, those fancy fan designs where the stationary shroud is so close to the moving fan blades that there’s essentially no gap, and a huge gain in aerodynamic efficiency? At least in theory?

Well, in practice, you can watch how it turned out in this video. (Also embedded below.) If you’re more of a “how-to-build-it” type, you’ll want to check out his build video — there’s lots of gluing 3D prints and woodworking. But we’re just in it for the ducted fan data!

And that’s why we’re writing it up! [Wyman] made a nice thrust-testing rig that the fan can pull on to figure out how much force it put out. And the theory aimed at 652 g of thrust, which was roughly confirmed. And then you get to power: with a 500 watt motor, he ended up producing 47 watts. Spoiler: he’s overloading the motor, even though he used a fairly beefy bench grinder motor.

So he re-did the fan design, from scratch, to better match the motor. And it performed better than the theory said it would. A pleasant surprise, but it meant re-doing the theory, including the full volume of the fan blade, which finally brought theory and practice together. Which then lead him design a whole slew of fan blades and test them out against each other.

He ends the video with a teaser that he’ll show us the results from various inlet profiles and fan cones and such. But the video is a year old, so we’re not holding our breath. Still, if you’re at all interested in fan design, and aren’t afraid of high-school physics, it’s worth your time.

Don’t care about the advantages of ducted fans, but simply want to make your quad look totally awesome?  Have we got the hack for you!

Continue reading “Theory, Practice, And Ducted Fans”