As with any other community, it takes all kinds to make the keyboard world go ’round. Some like them thicc — more backing for the clacking and all — but some like them sleek and prefer the slimmest possible keyboard. For now and the foreseeable future, the go-to method for making whisper-thin keebs is to use Kailh Choc switches, because that’s about all that’s out there.
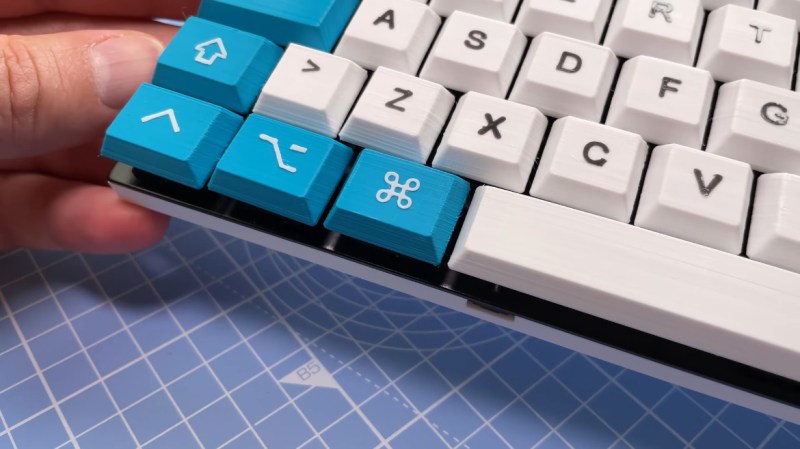
But chocs aren’t for everyone, and there are plenty of die-hard Cherry fans out there that want it both ways. Being one among them, [Khmel] set about designing the lowest-profile possible keyboard (and caps) that uses standard Cherry-sized keyswitches. Shut up and take your money? Well, okay, but the case and keycap files are all available on Thingiverse, so.
The whole video is great, and at less than 2½ minutes long, it’s definitely worth your time. There are a few little gems of wisdom sprinkled throughout, like printing keycaps standing up on their backsides (like where they would have a little flash dot if they were factory-molded). This gives them a nice texture thanks to the layer lines. But the real reason we’re here today is this DIY method for making doubleshot keycaps with little fuss that [Khmel] just tosses out there toward the end.

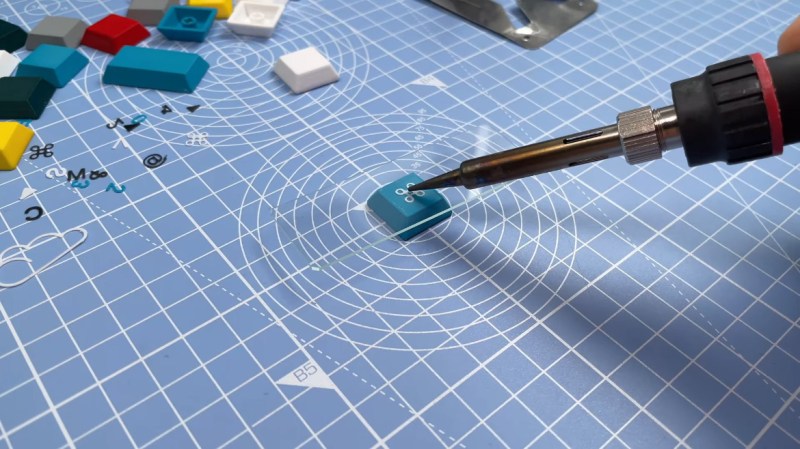
Traditionally, doubleshot keycaps are made with two layers of plastic — one for the legend, and one for the rest. This produces a quite durable keycap and (used to be the norm), but the expensive process gave way to laser-etched and pad-printed keycap legends in the ’90s. [Khmel] was able to fake the look by printing legends at 0.25 layer height and then fusing each one to its respective keycap by laying a thin piece of glass (think microscope slide) on top and applying a soldering iron for a few seconds. Classy!
Tweezing tiny legends not really your kind of tedium? Here’s a method for DIY waterslide decals instead.
via KBD #77


I bought a Cherry (?) brand slim keyboard and it measures at 20.2 mm thick at the ESC key, and 12.5 mm at the leftmost CTRL key.
Scissor switch keys FTW – although it’s a little bit too clacky for my liking. I would have preferred softer keys.
Good scissor switches are incredibly underappreciated these days. I’d pay a premium for an enthusiast grade one. Currently using the original thinkpad trackpoint USB and praying it never dies in a way I can’t fix.
Unfortunately like many things that has to do with usability and ergonomics, keyboards are a cargo cult, and the market will produce what the people will buy. Many will go to great lengths to adapt to bad devices and habits because they were told it’s good, and then continue to call them superior because “it works for me”.
A smaller keyboard with shorter softer keys makes for faster typing and less stress on the tendons and muscles on a bio-mechanical standpoint, and the lower profile gives you a better wrist position without an extra pad to take up space on your desk. There were some models like this a few years ago, but they vanished off the market in favor of huge battleship sized keyboards that of course leverage the myth of mechanical switches to sell them.
Like the melted on legend, very double shot in durability if not quite in the key cap quality.
I wish it were just a little easier to find low profile switches. Anything cheap and smaller than an MX seems to need too much force, not really have a standard keycap interface, or not have many sockets available.
The Kalih Chocs look great but they’re not exactly cheap.
I want them to bring scissor switches back. Low profile scissor stabilized topre is like the dream.
Noice. Right when I’m in need of FDM printable very low keycaps for Cherry MX switches for my cyberdeckthingy! Though I will need to compare multimaterial printing vs the doubleshot glass hack and decide what looks better.
I’m starting to think the best solution for custom keyboards is to buy a 3D printer (FDM), reed switches and magnets.
But, how do they work?
Well I saw a 3D printed switch that used the magnets to repel the keycap. It would be easy to add a little hysteresis to that to get the buckling spring effect and just add a reed switch at a location away from mechanical movement. Small magnets are cheep. They don’t need to be anything special like neodymium, just simple ferric magnets, probably four per key.
Small reed switches aren’t the cheapest but it’s worth paying for a keyboard that will last a long time.
I just want someone to make a keyboard with the Monterey “Big Three” layout. https://deskthority.net/wiki/File:Monterey_K104_front_view_alternate.jpg
Since the right Winlogo key and even the menu key are vanishing from newer keebs, even on laptops, all that would have to be done is make the unmarked dummy key on the left the Winlogo key.
Send it to manufacturing and all the fans of “Big Three” who haven’t been able to buy a new keyboard like they desire since 1995 will be very happy.
Those look more readable than typical commercialy produced keycaps.
Those keycaps are going to get nasty. Finger oils/skin/filth will build up in the layer lines, anyone that’s printed something where they regularly touch the layer lines can confirm. It just gets stuck in the small gaps between the ridges.
OMG. Acetone vapor smoothing solves this comoletely. Yes the stem remains dimensionaly accurate enough to hold very firmly on a switch. Been there, done that. No biggie.
Doesn’t that only work for ABS though?
Yes but there are other options, PLA can use dichloromethane to smooth it (hideous stuff tho!). There are also sprays I belive that will help to fill in the gaps.
PLA Gloop will do the job for PLA. Just Google it buddy.
Or just dip the keys in a varnish or thin UV/epoxy resin for that extra smooth outer layer.
I’m still missing a good method for custom backlit keycaps. backlit caps are cool but creating custom serigraph seems to be the real problem. Painting them on the front is not a solution at all.
Any advice ?
make whole cap including legend first and paint on surface around legend probably
clear keys, burnish on letters, paint key black, dissolve letter off.
I’ve tried to paint transparent keycaps in black with nitro spray but they don’t feel good to touch and after a while the small amount of grease in your fingers slowly fade the paint.
Applying it in the interior might give better results but it’s a really long process and the keycap has to be modified for that. I was thinking about 3d printing in black and cover everything with a thin layer of resin but it’s just an idea.
I’m actually curious to know how some good nail polish applied with a needle would work.
Keychron do a range of low profile keyboards both in mechanical and optical. Pretty reasonable value too i think. I bought one last year and love it, great build too with aluminium shell.