
The DisplayPort altmode is semi-proprietary, but it can absolutely be picked apart if we try. Last time, we found a cool appnote describing the DisplayPort altmode in detail, switched the FUSB302 into packet sniffing mode and got packet captures, learned about PD VDMs (vendor-defined messages), and successfully replayed the captured messages to switch a USB-C port into the DisplayPort altmode. Today, we will go through the seven messages that summon the DisplayPort altmode, implement them, and tie them all into a library – then, figure out the hardware we need to have DisplayPort work in the wild.
 For a start, as you might have seen from the diagram, a single command can be either a request or a response. For instance, if you get a
 Discover Identity REQ (request), you reply to it with a Discover Identity ACK (response), adding your identity data to your response along the way. With some commands, the DP source will add some data for you to use; for most commands, your DP sink will have to provide information instead – and we’ll do just that, armed with the PDF provided and the packet captures.
We have seven commands we need to handle in order to get DisplayPort out of a compatible USB-C port – if you need a refresher on these commands, page 13 of the ST’s PDF on the DP altmode will show you the message sequence. These commands are: Discover Identity, Discover SVIDs, Discover Modes, Enter Mode, DP Status Update, DP Configure, and Attention. Out of these, the first four are already partially described in the base USB PD standard, the two DP commands afterwards are DisplayPort-altmode-specific but sufficiently described in the PDF we have, and the Attention command is from the base standard as well, mostly helpful for reporting state of the HPD pin. Let’s start with the first two!
The Discovery Process
The first two commands are not DisplayPort-specific at all. In particular, the Discover Identity message is omnipresent. Just like with the Source_Capabilities message that we didn’t even have to request from the PSU, if you plug into a USB-C port of a laptop capable of DP or even Thunderbolt, you will receive a Discover Identity command message. If your device is capable of handling any altmode, replying to this message is how you announce this capability.
Your Discover Identity response will have to contain a bunch of data about your device – most of this data, you can outright fake. This data says that you’re an alternate mode adapter, there’s two bits denoting whether you’re capable of USB host or USB device operation, a “certification” field that can be left completely empty, as well as USB VID and PID. To my knowledge, the VID and PID aren’t used for anything feature-wise, unlike regular USB connection PID and VID, which we know to be used for driver selection in operating systems. The adapter that I have has vendor ID 0xBDA, product ID 0x2172 and bcdDevice number 0x201. These values are sent once, and don’t show up in any further USB-C communications whatsoever.
The second command is Discover SVIDs – SVIDs are, essentially, two-byte codes for the the altmodes that your device supports. If your answer is 0xFF01 (so, reply with 0xFF010000 as extra data), you get a cookie, in the form of being recognized as a DisplayPort altmode-capable device. One of the devices I own, answers with 0xFF01, but also adds 0x25A4 to it – my suspicion is that this is a firmware update interface, so if you ever wanted to probe USB-C devices for pentesting purposes, this would absolutely be a vector to look into.
DisplayPort Found – What’s Next?
By giving the 0xFF01 answer to the Discover SVIDs request, we claim that our device supports DisplayPort altmode – even if, truth be told, we’re halfway through properly implementing it, faking it until we make it. No worry, though, as we’re on the right track – now we’re talking DisplayPort specifics. Our third command is Discover Modes, where we let the DP source know how exactly our DisplayPort needs map onto the USB-C connector.
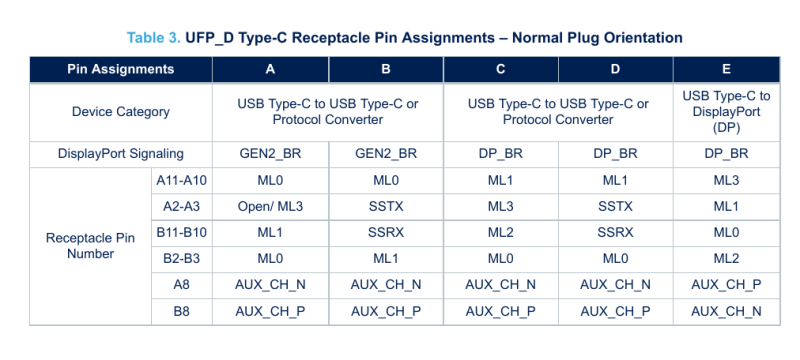
Remember how you can get full 4 lanes of DP from a USB-C connector, or do a 2-lane compromise but get USB3? Well, our Discover Modes response determines exactly that. First, our response defines whether we are a DP source or DP sink – apparently, the protocol allows for building bidirectional DP devices, which is certainly idea-provoking! It also explicitly defines USB 2.0 signaling use, whether the USB3 port we might request would support USB3 Gen 2, and whether our device uses a USB-C plug or a USB-C socket. Most importantly, though, it talks about the pin mapping.
The DisplayPort altmode can have six pin mappings, five in case of a USB-C socket. Two of them are dual-lane DP with USB3 and three of them are four-lane DP. All of them have different lane arrangements, apparently, but at least one of those should work for us as long as we wire up our mux chip according to the datasheet. It’s not clear to me what the noteworthy differences are or why the assignments are done the way they’re done – perhaps, the unavailable full spec would have some insights. For now, this PDF gives us the mappings we can use, and the bits we should set according to the mapping we have chosen.
After answering the Discover Modes message with info about our preferred pinout, we will shortly get an Enter Mode message – which we simply acknowledge with an Enter Mode response, no extra data required. Now, in hacker voice, we’re in.
The Last Trio
 The three last commands are even closer to the actual DisplayPort nitty-gritty. The first one is
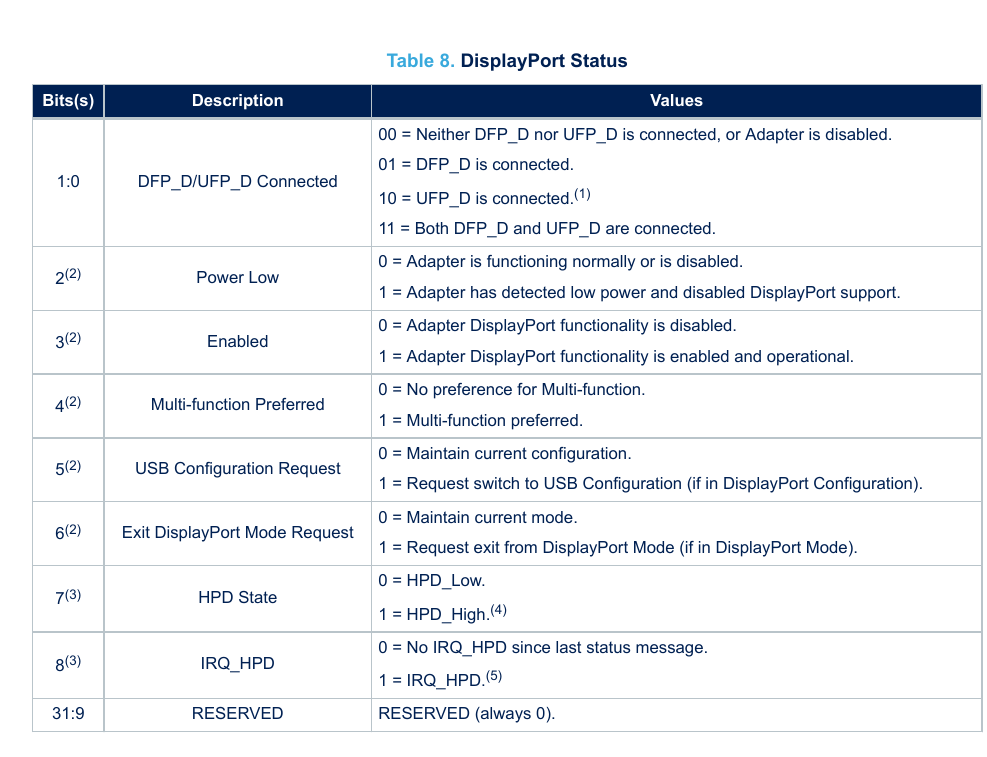
 DP Status Update, following right after the Enter Mode command. We can get this command whenever the DP sink wants to get an update, and we’ll have to answer it with our current link state. The bits in this command, as described on page 11 of our by-now-favourite PDF, communicate the current state of the DP altmode link. DP Status Update contents is a report on the overall connection status, both from the downstream point of view (DP source) and from the upstream point of view (DP sink, aka our device). Here we can exit the altmode if desired, switch to USB mode, or perhaps, to low-power mode, and we must also report the HPD pin state here. All of that fits within nine bits of data – not much to write home about, but write home, you must.
The very first occurrence of DP Status Update is uneventful, we just wing it, telling that HPD is low and all that. It will be followed by the DP Configure message – now, this point is where we get access to the raw DisplayPort signal on the SBU and high-speed pins of the USB-C port. The DP Configure message tells us which DP altmode pin mapping we should switch our hardware to, which is useful in case we claimed to support multiple mappings in our Discover Modes response – if we only claim to support one, there will be no surprises, unless the DP source doesn’t support the mapping we wanted.
Last but not least, there’s the Attention message – literally, bringing attention to some event on our side. The data for it is the same as the DP Status Update message – think of Attention as a DP Status Update message that we can send voluntarily whenever something changes on our side. So, if you have a USB-C to DisplayPort socket adapter, the Attention message will be the very last message of the DP altmode summoning process, letting the DP source know that the source has been connected. This, in particular is determined by the HPD pin, something that’s used as a hotplug detection pin in DisplayPort, but is also used for interrupts as a sideband to the AUX communication channel – as a pseudodifferential diffpair not unlike USB 1.1 and 2.0, the device on the other end expects to be polled, and our Attention messages will transfer the HPD cries of the device that has something to say and but hasn’t yet been asked to speak.
Now, we’re done – that’s all seven messages described, and implemented in code as we did so. The whole altmode negotiation flow has to be complete within a second’s time, or else the process will halt at some step. Which is to say, if you’d like to perform some calculations or print data out, you better be quick! Here’s example MicroPython code for you – somehow, I managed to have the parsing and command building be quick enough.
Mind you, this is the software side. Apart from what we just did, let’s go through a typical homegrown DP altmode design and what it needs.
Hardware Basics
First off, you’ll want to put the FUSB302 down on your schematic, and add a MCU to work with that. I usually pick a RP2040, but even an ESP12 module should do – you need I2C, a few GPIOs for mux control, and a bit of RAM for PD packet manipulation stuff. Then, of course, use a USB-C socket with high-speed lanes available – regular USB 2.0-only ports with 16 pins don’t expose the TX/RX pins we need. When it comes to DisplayPort diffpairs, pick a six-layer board – you’ll want two outer layers for DisplayPort diffpairs, two layers under each for reference ground planes, and two innermost layers for routing out the VBUS, USB2, CC and SBU pins – thankfully, both Aisler and JLCPCB have decent and cheap six-layer offerings now!
We can’t quite buy USB-C captive cables cheaply, sadly – however, putting a USB-C socket on our board is the next best thing! You do need a bit of extra hardware though. Again, the benefit of a captive cable is not needing a mux – which means that we will need a mux for handling our socket. When I was looking for USB-C muxes, I stumbled upon the VL170 chip, and pieced together its specifications from screenshots online. Later, I found out that the VL170 is a clone of TI’s HD3SS460 (datasheet), and that’s what I recommend you use – whether you want to do 4-lane DisplayPort, or a USB3 and DisplayPort combination, just USB3, or even combine DisplayPort from two sources, the HD3SS460 mux will work for you, and it has a proper datasheet with example circuits.
 Don’t ground the shield – it’s grounded at host end as a rule, so it’s going to become counterproductive given high speeds of DisplayPort. Instead, add a 0805 footprint or two going from the shield to ground; later on, you can put a ferrite there, or a resistor and capacitor combination. When it comes to high-speed signals, the shield will be performing the function of shielding your signals from external interference; however, if you ground it on both ends, it will also end up carrying some of the VBUS current, which will reduce its shielding properties significantly. Oh, and about VBUS – it’s up to you on what you will be doing with that, after all, the “PD controller” part will be fully in your reach to begin with; whether you summon 5 V, provide 5 V, perhaps request 20 V if you’ve found a high-power and DP-capable port somehow, all of that is completely up to you.
Route Your Tracks And You’re Done
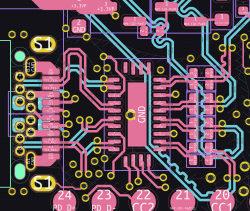
Remember the DisplayPort trace routing rules? Well, the VL170 doesn’t quite make it easy on you. Due to the the USB-C connector-side pair polarity on its pinout, only two of its diffpairs connect in a straightforward fashion – other two pairs need to be flipped before they connect. Remember, you still need to match lengths between the tracks, so you will need to adjust the part between the mux and the USB-C connector, and also the part between your your device and your mux. That said, in a reference-ish design of mine, I’ve managed to keep the connector-mux section to about one centimeter of length, so it shouldn’t be too much of a space hog for you. As for the after-mux side, you would route the DisplayPort link the same way you would normally, not much of a difference here.
Are there further bringup aspects you might need? Absolutely! For instance, you might need to tune the common-mode voltages before and after the mux using a few carefully matched resistors. Still, if you ever wanted to give your device a DisplayPort link out of a USB-C connector, now you’re well-equipped to do so, no NDAs or proprietary document acquisition needed.


I think this was supposed to include a link: `Here’s example MicroPython code for you – somehow, I managed to have the parsing and command building be quick enough.`
Awesome article. Very interesting and informative. 👍
You make reading the documents sound fun! 😂
A very nice article, thanks
With most of the articles on HaD changing into “Hey!, look there!” articles, I find your articles a real breath of fresh air. One can consume real useful information out of them from a hacking perspective. I especially enjoyed this DP series. More please… :-)
+1
This reminds me of how HAD used to be.
HaD has *always* had people complaining about the “good old days of HaD”. Nothing has actually changed.
Bring back the snow and the hills.