Thermoforming — which includes vacuum-forming — has its place in a well-rounded workshop, and Mayku (makers of desktop thermoforming machines) have a short list of tips for getting the best results when 3D printing molds on filament-based printers.
 A mold is put into direct, prolonged contact with a hot sheet of semi-molten plastic. If one needs a mold to work more than once, there are a few considerations to take into account. The good news is that a few simple guidelines will help get excellent results. Here are the biggest ones:
- The smoother the vertical surfaces, the better. Since thermoforming sucks (or pushes) plastic onto and into a mold like a second skin, keeping layer heights between 0.1 mm and 0.2 mm will make de-molding considerably easier.
- Generous draft angles. Aim for a 5 degree draft angle. Draft angles of 1-2 degrees are common in injection molding, but a more aggressive one is appropriate due to layer lines giving FDM prints an inherently non-smooth surface.
- Thick perimeters and top layers for added strength. The outside of a mold is in contact with the most heat for the longest time. Mayku suggests walls and top layer between 3 mm to 5 mm thick. Don’t forget vent holes!
- Use a high infill to better resist stress. Molds need to stand up to mechanical stress as well as heat. Aim for a 50% or higher infill to make a robust part that helps resist deformation.
- Ensure your printer can do the job. 3D printing big pieces with high infill can sometimes lift or warp during printing. Use enclosures or draft shields as needed, depending on your printer and material.
- Make the mold out of the right material. Mayku recommends that production molds be printed in nylon, which stands up best to the heat and stress a thermoforming mold will be put under. That being said, other materials will work for prototyping. In my experience, even a PLA mold (which deforms readily under thermoforming heat) is good for at least one molding.
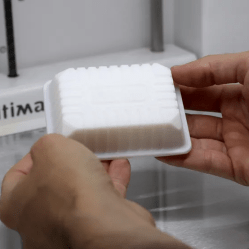
Thermoforming open doors for an enterprising hacker, and 3D printing molds is a great complement. If you’re happy being limited to small parts, small “dental” formers like the one pictured here are available from every discount overseas retailer. And of course, thermoforming is great for costumes and props. If you want to get more unusual with your application, how about forming your very own custom-shaped mirrors by thermoforming laminated polystyrene?


I tried thermoforming, and I didn’t have this list to refer to. I also didn’t have a “proper” thermoforming machine. I had a sheet of MDF with a grid of holes drilled in it and a shop vac. I heated my plastic with a heat gun (keep it moving – don’t ask me how I know). I took my best guess for printing the buck (that’s the name of the “mold”) and it all worked out.
Here’s an article I found on the internet that gives another perspective:
https://hackaday.com/2021/10/22/vacuum-forming-with-3d-printed-buck-tutorial/
Airplane modelers have been doing this for decades. With a normal kitchen oven, homemade forming thingy and a shop vac. It’s best to pull the sheet over the form in the oven and give the plastic time to anneal while cooling slowly.
It’s really easy to cast resin male mould from female silicone mould. Start with PLA 3d print, can make as many resin moulds as you want.
Point is the resin moulds don’t melt like PLA.
We have a Makyu and it’s great.
Since 3D printing allows shapes that are not possible with conventionnal tools, could the printed master have intricated internal “tubes” for watercooling the master when forming ? This can help maintain shape longer.
Even without circulation, water heat capacity is higher than plastic and help avoiding temperature grow and deform the master.
Funny, I read the article and water cooling was my first reaction as well.
Another possibility might be to 3d print a mold, not for the vacuum-formed object itself, but for use in casting a small concrete, plaster or fiberglass/epoxy article that would instead become the vacuum form.
I’ve done a lot of Thermforming prototyping for my job to design packaging prototypes. Here are a few tricks:
Gradual infill steps saves a lot of plastic. You can set a 3-5mm stagger to 60-70% infill, 3-4 steps, you can cut down print time by more than half and get the print stronger than trying to reduce infill to save plastic.
Remove the bottom layers.
If you need to make a lot of parts with your mould, fill it with plaster, no bottom layers means you can pour it in directly. You can start pulling parts in a couple of hours. The plaster pulls heat out of the sheet plastic so it might need to be a little hotter than without plaster fill.
Spray primer putty is great for removing the layer lines, lots of small coats is better than being impatient. Spray and sand a few times to get a great surface.
Drill holes in the cavities on the mould to let the air pull through.
Have a cloth you can use to help push the plastic into the deep cavity corners if you’re struggling to get the inside forms perfect.